RAW Sensor (MediaTek Imgsensor)
Important
All the bash commands shown here are based on Genio 510/700-EVK. For Genio 510-EVK, users can follow the same step to do the whole setup by changing the naming term from 700 to 510.
Note
All command operations presented in this chapter are based on Genio 700-EVK and Sony IMX214 sensor. You might get different operation results depending on the platform you use.
Camera Daughter Board
The RAW camera DTB for Genio 510/700-EVK is CAM DTB-D2.
It contains a SONY IMX214 CMOS Image Sensor.
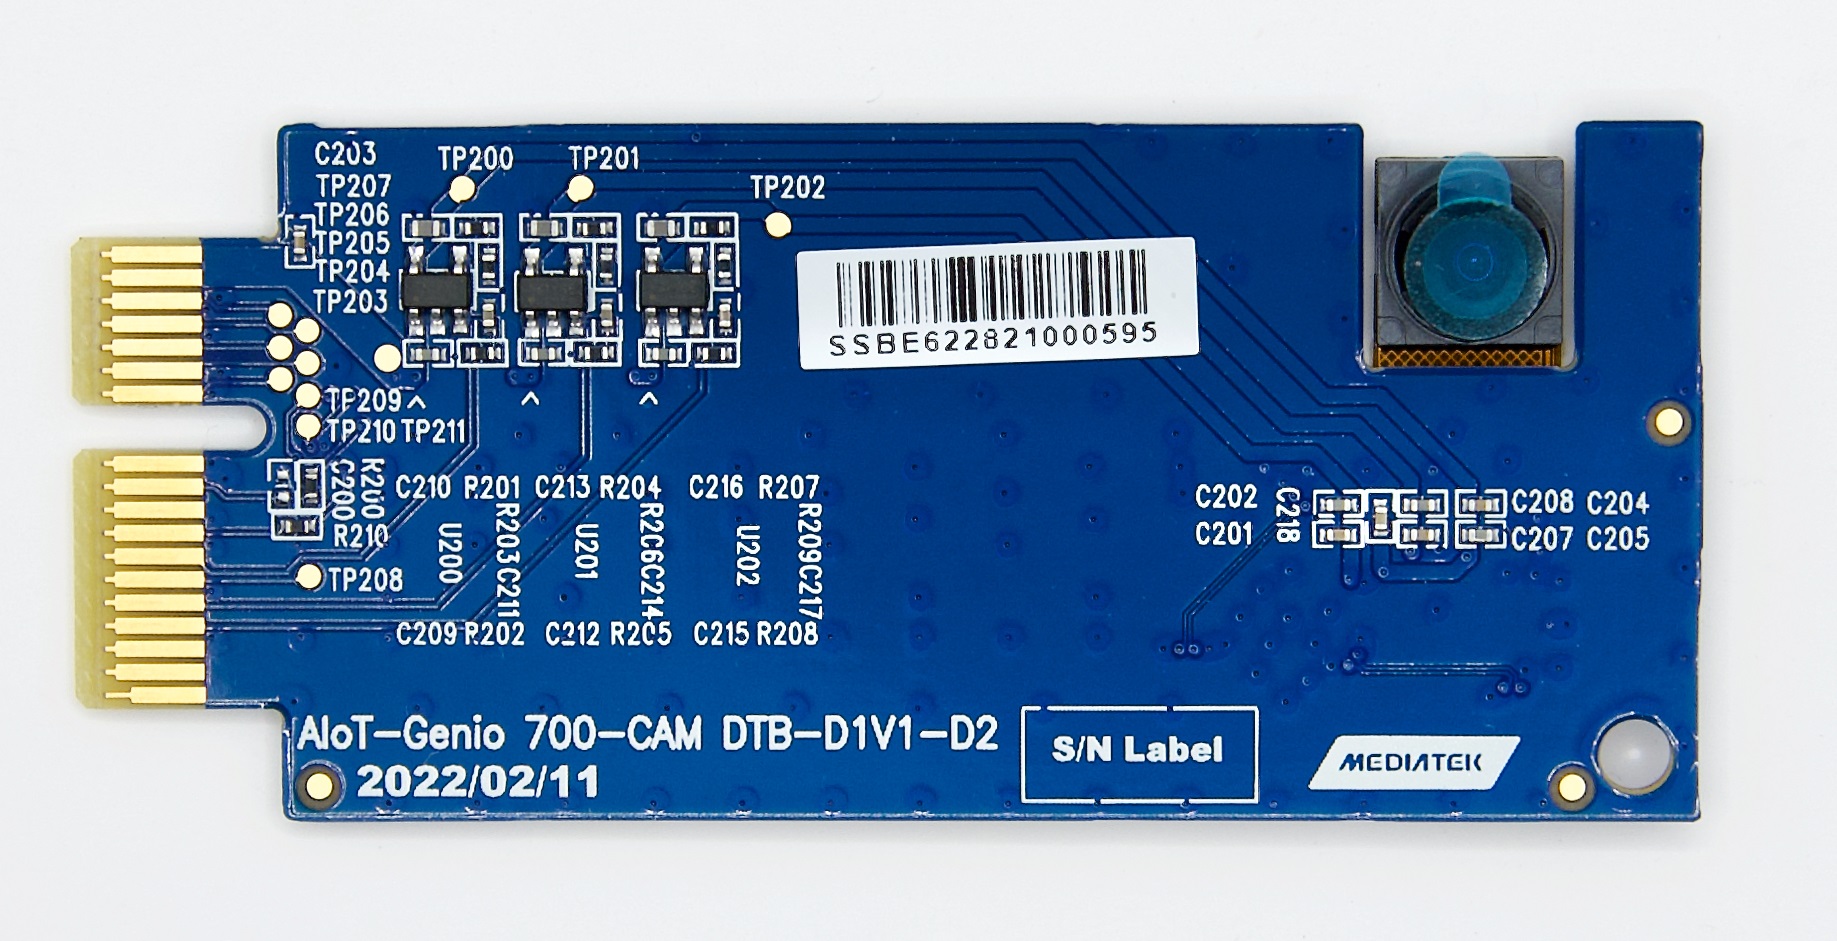
Camera DTB D2 - SONY IMX214 Sensor
Connect The Camera to the EVK
There are 2 MIPI-CSI slots on Genio 510/700-EVK, which are CSI0 and CSI1.
In the following figure, the camera DTB is connected to the CSI0 slot.
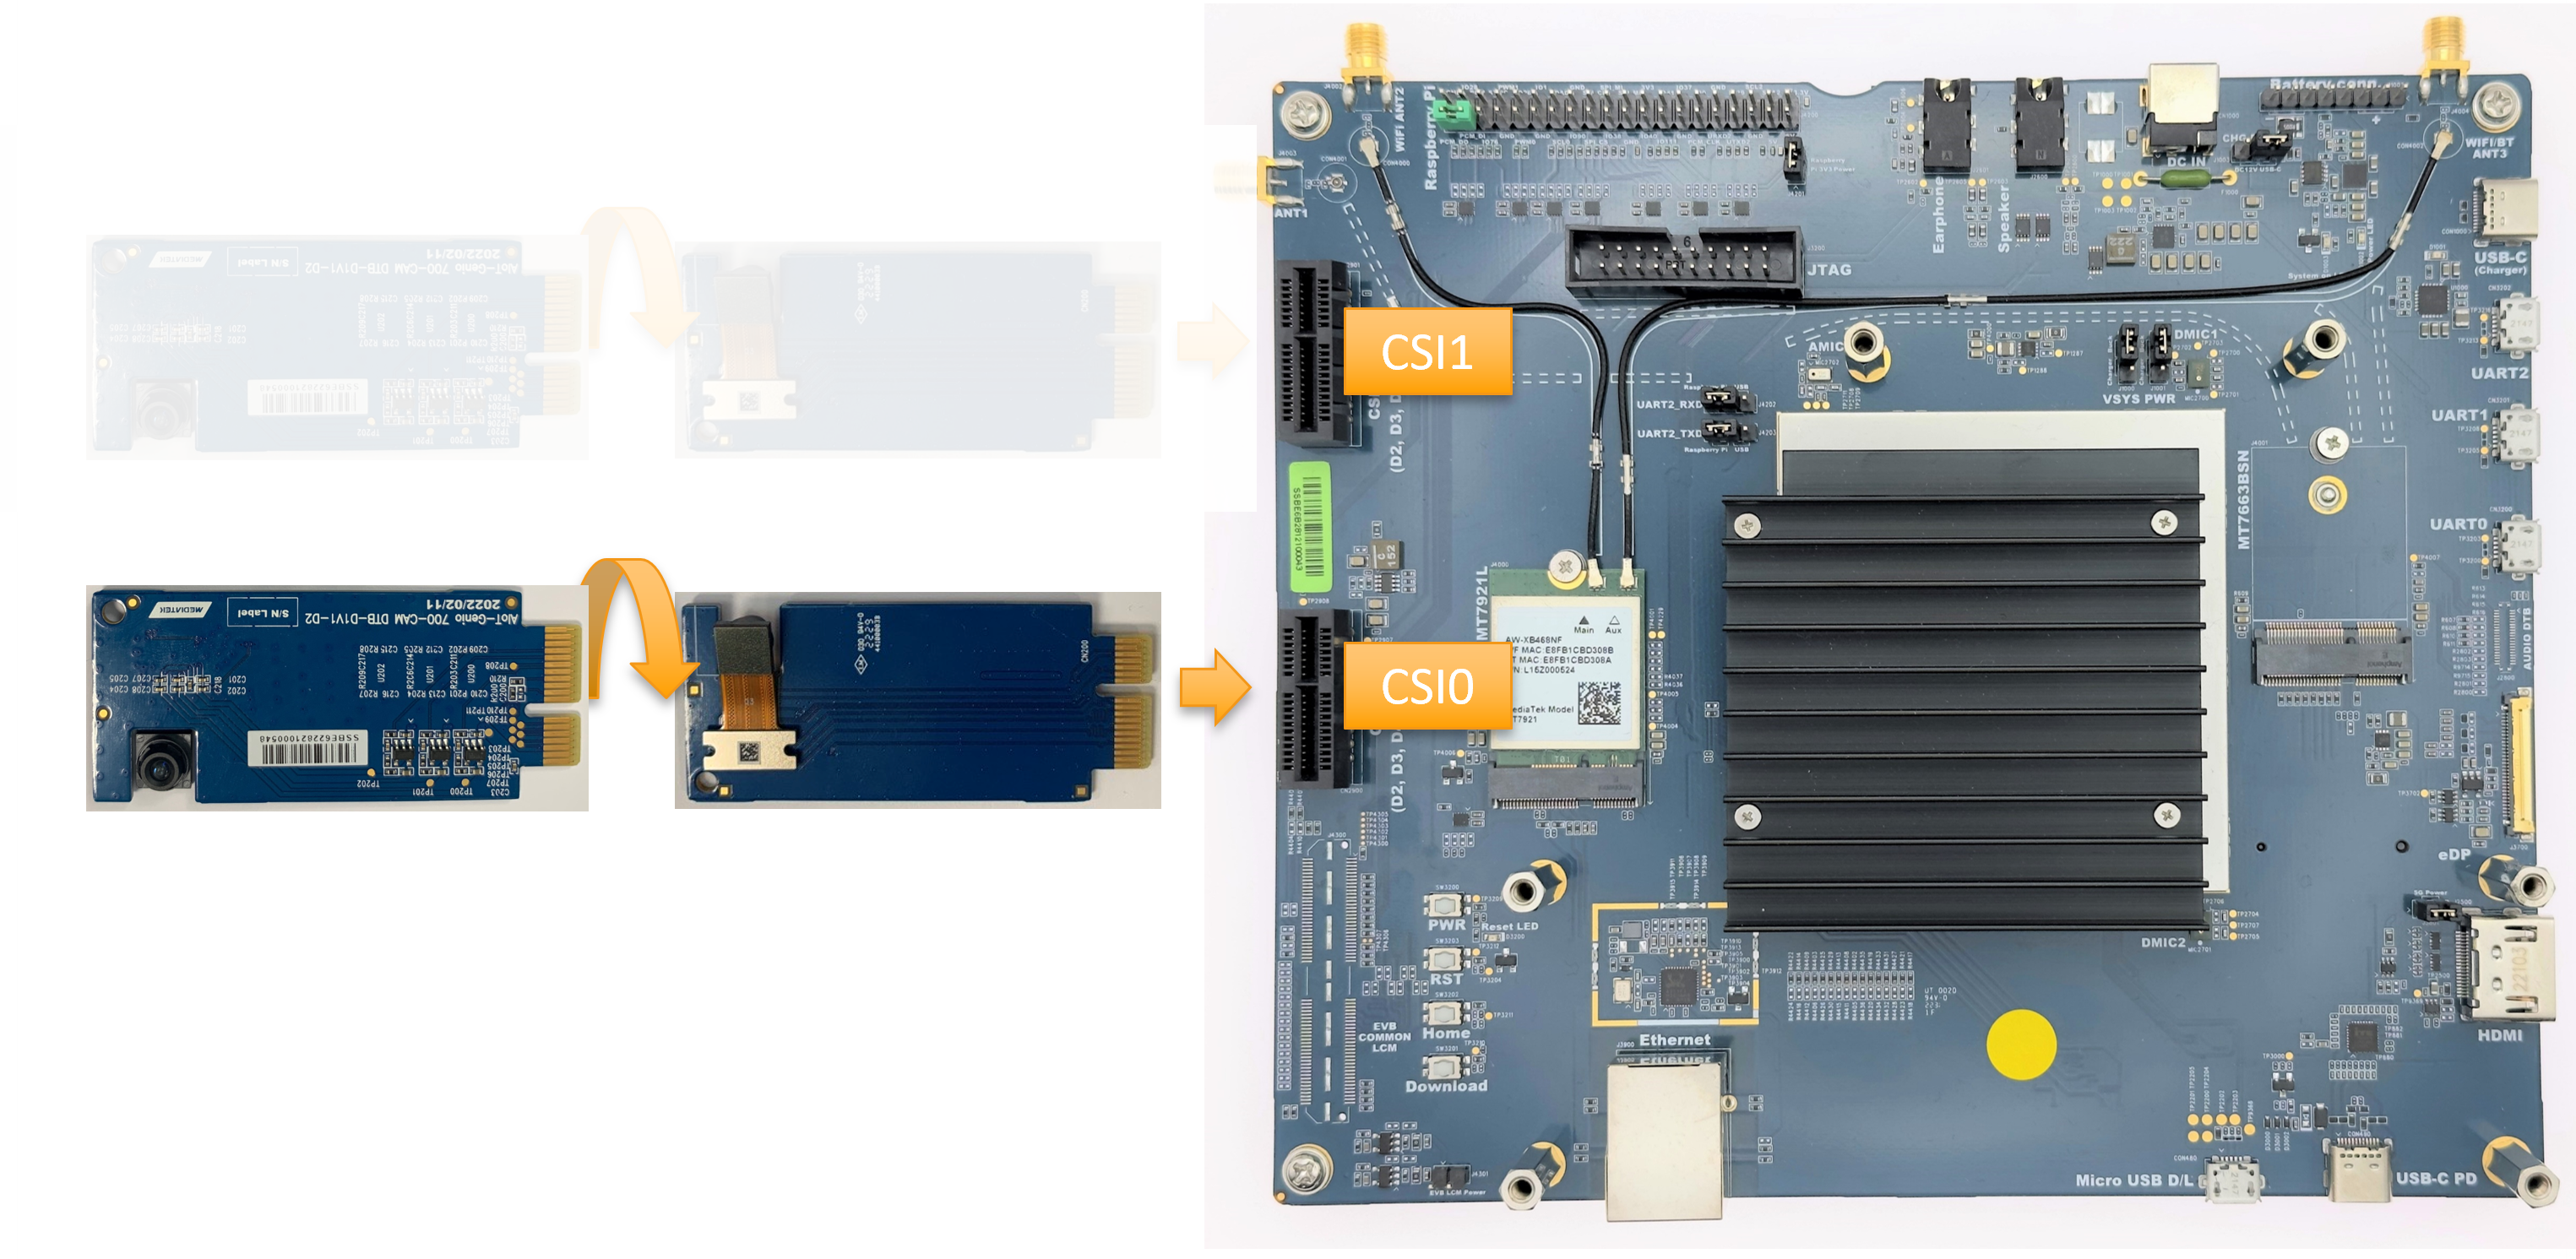
Connect Camera DTB D2 to Genio 510/700-EVK (Schematic)
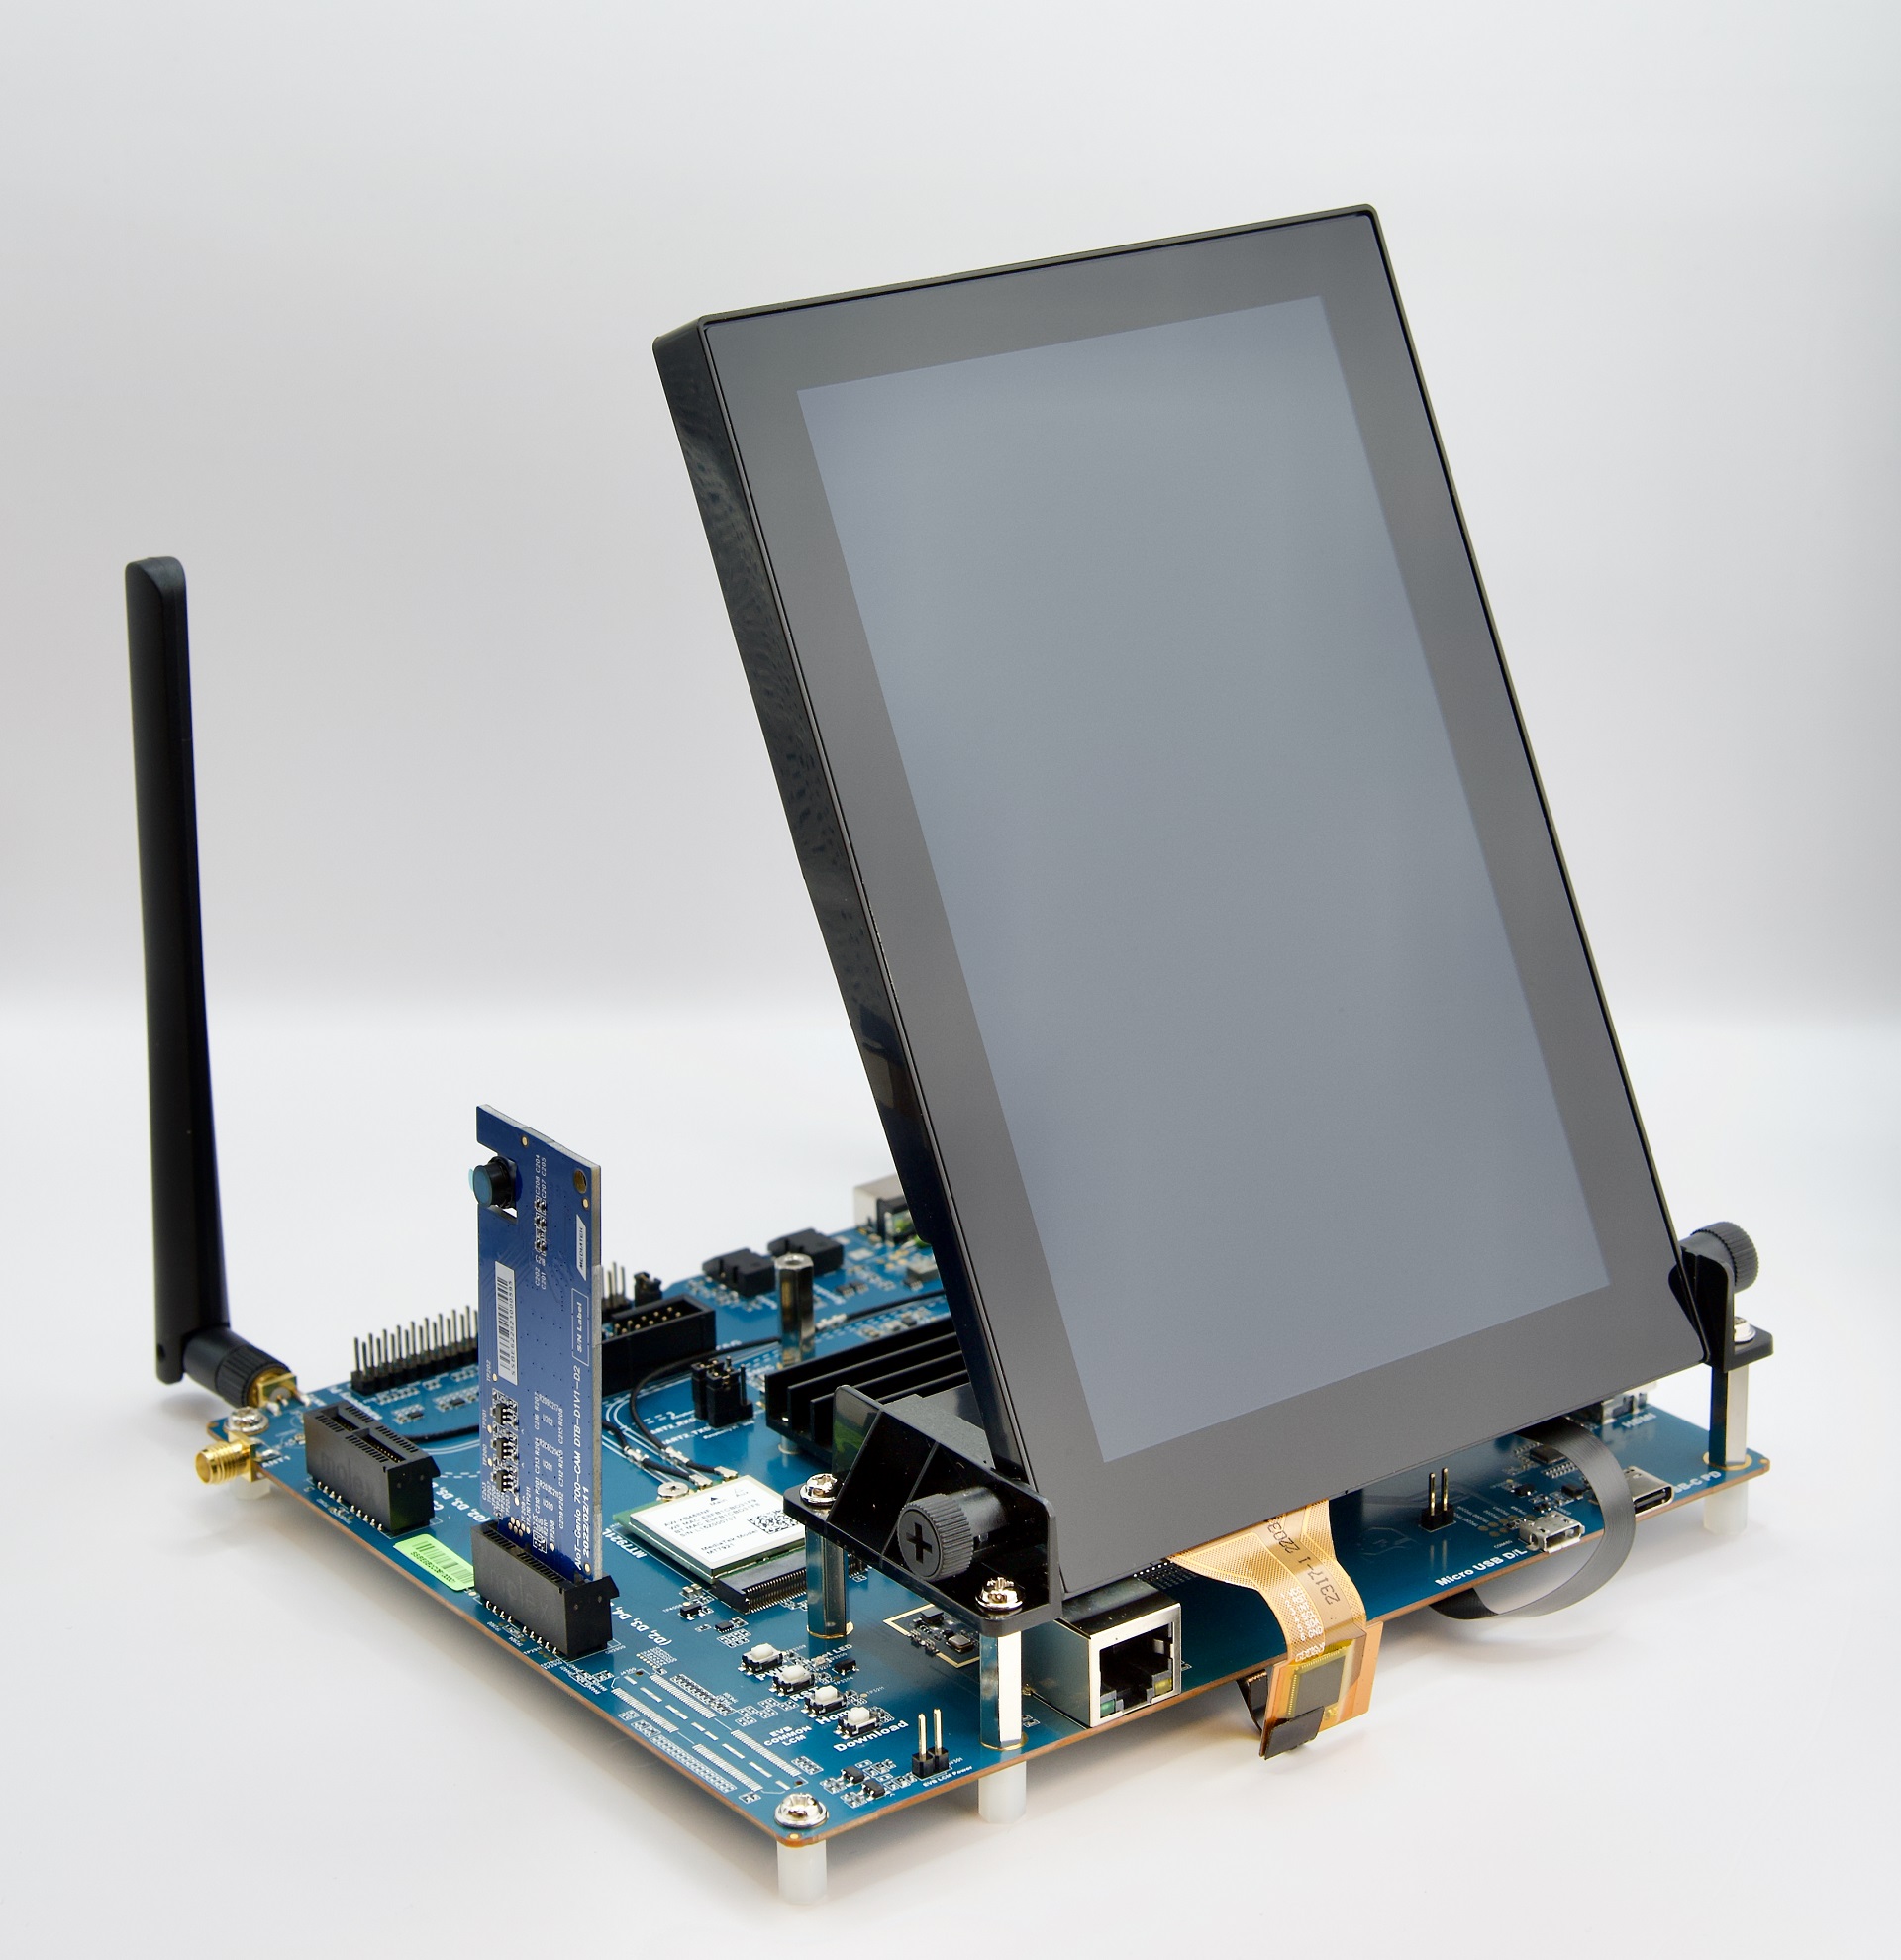
Connect Camera DTB D2 to Genio 510/700-EVK (Entity)
Note
All three CSI slots are available. The user can connect the camera sensor to any slot.
Select Camera Device Tree Blob Overlay
The camera device is inactive by default, so the kernel has to load a specific device tree blob overlay to enable it. Please refer to the bl33 (u-boot) section for more details.
Platform |
CSI0 |
CSI1 |
DTBO |
Usage |
|---|---|---|---|---|
Genio 510/700-EVK |
IMX214 |
x |
camera-imx214-csi0.dtbo |
Enable 4-lane CAM-DTB-D2 w/ Sony IMX214 on CSI0 |
Genio 510/700-EVK |
IMX214 (2 lane) |
x |
camera-imx214-2lanes-csi0.dtbo |
Enable 2-lane CAM-DTB-D2 w/ Sony IMX214 on CSI0 |
Genio 510/700-EVK |
x |
IMX214 |
camera-imx214-csi1.dtbo |
Enable 4-lane CAM-DTB-D2 w/ Sony IMX214 on CSI1 |
genio-flash --list-dtbo
List of available DTBO:
- camera-imx214-2lanes-csi0.dtbo
- camera-imx214-csi0.dtbo
- camera-imx214-csi1.dtbo
- ...
genio-flash --load-dtbo camera-imx214-csi0.dtbo --load-dtbo gpu-mali.dtbo --load-dtbo apusys.dtbo --load-dtbo video.dtbo
Warning
Please select the DTBO according to the CSI slot to which the camera sensor is connected.
For example, if the camera is connected to the CSI0 slot, please load the dtbo camera-imx214-csi0.dtbo.
Otherwise, the camera initialization will fail.
Supported Formats and Sizes
The following table shows the supported formats and resolutions for each stream.

Supported formats and Sizes
Note
The supported format, resolution, and frame rate are related to the capability of the sensor and SoC.
V4L2 Device Node
Camera ISP is a complicated feature that has a large number of device nodes. The camera ISP driver creates 132 video devices in total.
MTK-ISP-DIP-V4L2has 73 devicesmtk-camhas 56 devicesmtk-v4l2-camerahas 3 devices
MTK-ISP-DIP-V4L2 and mtk-cam are used by the camera ISP middleware.
The user can just focus on mtk-v4l2-camera which is for streaming.
v4l2-ctl --list-devices
...
MTK-ISP-DIP-V4L2 (platform:15000000.imgsys_fw):
(73 video devices)
/dev/media1
mtk-cam (platform:16000000.camisp):
(56 video devices)
/dev/media3
mtk-v4l2-camera (platform:mtkcam0):
/dev/video74
/dev/video75
/dev/video76
/dev/media2
Launch Camera
The V4L2 nodes with the name mtk-v4l2-camera can be used for streaming.
There are 3 V4L2 devices representing Preview, Video, and Capture streams.
The user can find the devices by the following command:
v4l2-ctl --list-device
mtk-v4l2-camera (platform:mtkcam0):
        /dev/video74
        /dev/video75
        /dev/video76
cat /sys/class/video4linux/video{74,75,76}/name
mtk-v4l2-camera@0-Preview
mtk-v4l2-camera@0-Video
mtk-v4l2-camera@0-Capture
Important
The above v4l2 device node number is for example. The node number may change every time the system boots.
To quickly fetch the correct node and assign the environment variable:
declare -a VIDEO_DEV=(`v4l2-ctl --list-devices | grep mtk-v4l2-camera -A 3 | grep video | tr -d "\n"`)
printf "Preview Node\t= ${VIDEO_DEV[0]}\nVideo Node\t= ${VIDEO_DEV[1]}\nCapture Node\t= ${VIDEO_DEV[2]}\n"
Preview Node    = /dev/video74
Video Node      = /dev/video75
Capture Node    = /dev/video76
The Preview and Video streams can deliver images in YUV and RGB formats. The Capture stream is for JPEG outputs. The Capture stream is used to fetch the image that the user sees on the Preview or Video stream. The 3A configuration of the Capture stream relies on the Preview or Video stream. Therefore, before starting the Capture stream, make sure one of the Preview and Video streams is running.
Section Supported formats and Sizes shows the supported formats and sizes.
The user can also use the v4l2 utility, v4l2-ctl, to list formats.
v4l2-ctl -d ${VIDEO_DEV[0]} --list-formats-ext    # List formats/sizes of Preview Stream
ioctl: VIDIOC_ENUM_FMT
        Type: Video Capture Multiplanar

        [0]: 'RGB3' (24-bit RGB 8-8-8)
                Size: Discrete 640x360
                        Interval: Discrete 0.033s (30.000 fps)
        ...
        [1]: 'YUYV' (YUYV 4:2:2)
                Size: Discrete 640x360
                        Interval: Discrete 0.033s (30.000 fps)
        ...
v4l2-ctl -d ${VIDEO_DEV[2]} --list-formats-ext    # List formats/sizes of Capture Stream
ioctl: VIDIOC_ENUM_FMT
        Type: Video Capture Multiplanar

        [0]: 'JPEG' (JFIF JPEG, compressed)
                Size: Discrete 320x240
                        Interval: Discrete 0.033s (30.000 fps)
        ...
To launch the camera, the user can use v4l2-ctl, gst-launch-1.0, or other V4L2 applications.
Use
v4l2-ctlv4l2-ctl -d ${VIDEO_DEV[0]} --set-fmt-video=width=1920,height=1080,pixelformat=YUYV --stream-mmap --stream-count=1 --stream-to=/tmp/preview.yuv --verboseUse
gst-launch-1.0gst-launch-1.0 v4l2src device=${VIDEO_DEV[0]} ! video/x-raw,width=640,height=480,format=YUY2 ! waylandsink sync=false & gst-launch-1.0 v4l2src device=${VIDEO_DEV[1]} ! video/x-raw,width=640,height=480,format=NV12 ! waylandsink sync=false & gst-launch-1.0 v4l2src device=${VIDEO_DEV[2]} ! image/jpeg,width=640,height=480,format=JPEG ! jpegdec ! waylandsink sync=false &
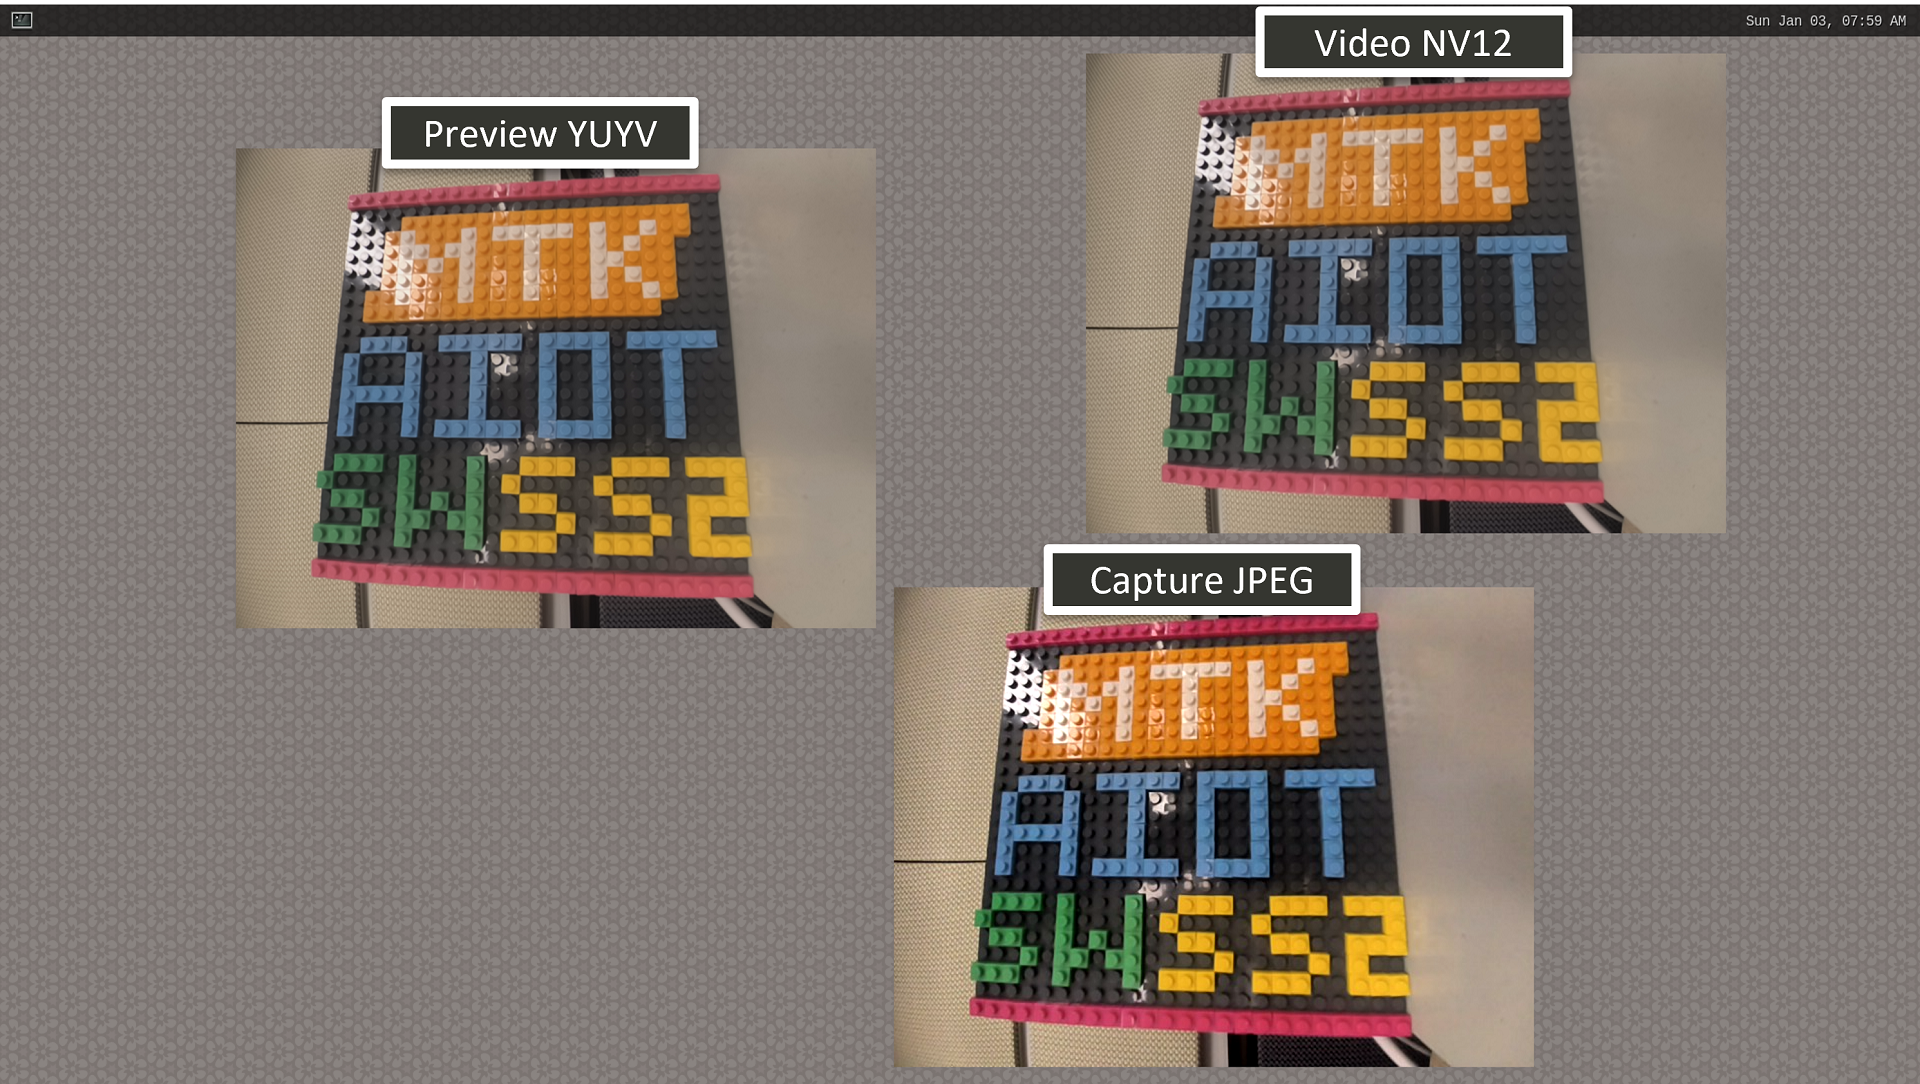
Show Preview/Video/Capture streams on Weston
Moreover, the user can show 720P Preview content on Weston, record 10 seconds of FHD Video to an mp4 file, and Capture 4K JPEG images by the following commands:
# Show 720P Preview on Weston
gst-launch-1.0 v4l2src device=${VIDEO_DEV[0]} ! video/x-raw,width=1280,height=720,format=YUY2 ! waylandsink sync=false &
# Record 10 seconds of FHD Video
gst-launch-1.0 v4l2src device=${VIDEO_DEV[1]} num-buffers=300 ! video/x-raw,width=1920,height=1080,format=NV12 ! v4l2h264enc ! h264parse ! queue ! mp4mux ! filesink location=video.mp4 &
# Capture 4K JPEG image
v4l2-ctl -d ${VIDEO_DEV[2]} --set-fmt-video=width=3840,height=2160,pixelformat=JPEG,sizeimage=4194304 --stream-mmap=1 --stream-count=1 --stream-to=capture.jpg --verbose
Important
JPEG is a compression format, so the size of the compressed result may vary each time.
The user should ensure that the buffer size is large enough to accommodate the worst-case compressed size.
Otherwise, the JPEG content may be incomplete.
To set the buffer size, the user can refer to the above example sizeimage=4194304.
Note
To use MediaTek video codec and MDP hardware, the user has to load video.dtbo. For more details, please refer to Genio 700-EVK Video Codec.
Set Camera ISP Controls
For each stream, there are 14 V4L2 controls.
These controls set 3A (Auto Focus, Auto Exposure, and Auto White Balance) and ISP pipeline features (Brightness, Contrast, Saturation, Hue, and Sharpness).
The tool v4l2-ctl can list all controls through the following command:
v4l2-ctl --list-ctrls-menu -d ${VIDEO_DEV[0]}

User Controls

                     brightness 0x00980900 (int)    : min=0 max=100 step=1 default=0 value=0 flags=slider
                       contrast 0x00980901 (int)    : min=0 max=10 step=1 default=0 value=0 flags=slider
                     saturation 0x00980902 (int)    : min=0 max=10 step=1 default=0 value=0 flags=slider
                            hue 0x00980903 (int)    : min=0 max=100 step=1 default=0 value=0 flags=slider
        white_balance_automatic 0x0098090c (bool)   : default=1 value=1
                       exposure 0x00980911 (int)    : min=-40 max=40 step=1 default=0 value=0
           power_line_frequency 0x00980918 (menu)   : min=0 max=3 default=3 value=3 (Auto)
                                0: Disabled
                                1: 50 Hz
                                2: 60 Hz
                                3: Auto
      white_balance_temperature 0x0098091a (int)    : min=2700 max=6500 step=1 default=6500 value=6500
                      sharpness 0x0098091b (int)    : min=0 max=10 step=1 default=0 value=0 flags=slider
  min_number_of_capture_buffers 0x00980927 (int)    : min=1 max=32 step=1 default=1 value=8 flags=read-only, volatile
                            iso 0x009819a9 (int)    : min=100 max=6400 step=100 default=100 value=100

Camera Controls

                  auto_exposure 0x009a0901 (menu)   : min=0 max=1 default=0 value=0 (Auto Mode)
                                0: Auto Mode
                                1: Manual Mode
         exposure_time_absolute 0x009a0902 (int)    : min=100000 max=100000000 step=1 default=33000000 value=33000000
                 focus_absolute 0x009a090a (int)    : min=0 max=255 step=1 default=0 value=0
     focus_automatic_continuous 0x009a090c (bool)   : default=0 value=0
Note
Preview stream and Video stream share the same control setting, so the user modifies one and affects another. However, the control setting of Capture is separated, it doesn’t affect others.
Auto Focus
Note
The SONY IMX214 sensor doesn’t support AF, so this is not yet available.
Auto Exposure
Auto Exposure can be set to AUTO mode and MANUAL mode.
In AUTO mode, the exposure is calculated automatically. The user can set exposure compensation to adjust the exposure level.
v4l2-ctl -d ${VIDEO_DEV[0]} -c auto_exposure=0                    # AUTO
v4l2-ctl -d ${VIDEO_DEV[0]} -c exposure=-40                       # MIN
v4l2-ctl -d ${VIDEO_DEV[0]} -c exposure=0                         # DEFAULT
v4l2-ctl -d ${VIDEO_DEV[0]} -c exposure=40                        # MAX
In MANUAL mode, the exposure is decided manually by the user. The user can set exposure time and ISO to adjust the exposure level.
v4l2-ctl -d ${VIDEO_DEV[0]} -c auto_exposure=1                    # MANUAL
v4l2-ctl -d ${VIDEO_DEV[0]} -c exposure_time_absolute=100000      # MIN
v4l2-ctl -d ${VIDEO_DEV[0]} -c exposure_time_absolute=100000000   # MAX
v4l2-ctl -d ${VIDEO_DEV[0]} -c iso=100                            # MIN
v4l2-ctl -d ${VIDEO_DEV[0]} -c iso=6400                           # MAX
Auto White Balance
Auto White Balance can be set to AUTO mode or MANUAL mode.
In AUTO mode, the white balance value is calculated automatically.
v4l2-ctl -d ${VIDEO_DEV[0]} -c white_balance_automatic=1 # AUTO
In MANUAL mode, the white balance value is decided manually by the user. The user can set the white balance temperature value.
v4l2-ctl -d ${VIDEO_DEV[0]} -c white_balance_automatic=0          # MANUAL
v4l2-ctl -d ${VIDEO_DEV[0]} -c white_balance_temperature=2800     # INCANDESCENT
v4l2-ctl -d ${VIDEO_DEV[0]} -c white_balance_temperature=3300     # WARM_FLUORESCENT
v4l2-ctl -d ${VIDEO_DEV[0]} -c white_balance_temperature=3800     # TWILIGHT
v4l2-ctl -d ${VIDEO_DEV[0]} -c white_balance_temperature=4400     # FLUORESCENT
v4l2-ctl -d ${VIDEO_DEV[0]} -c white_balance_temperature=5200     # DAYLIGHT
v4l2-ctl -d ${VIDEO_DEV[0]} -c white_balance_temperature=5800     # CLOUDY_DAYLIGHT
v4l2-ctl -d ${VIDEO_DEV[0]} -c white_balance_temperature=6300     # SHADE
Note
Although the temperature value is consecutive, the white balance change is discrete. Because the value is mapped to a white balance mode, such as INCANDESCENT, DAYLIGHT, etc.
ISP Pipeline Feature
There are 5 ISP pipeline feature controls (Brightness, Contrast, Saturation, Hue, and Sharpness). The user can set them and observe the image quality change. The default control value is zero which means to disable the control.
Brightness
v4l2-ctl -d ${VIDEO_DEV[0]} -c brightness=0                       # DISABLED
v4l2-ctl -d ${VIDEO_DEV[0]} -c brightness=1                       # MIN
v4l2-ctl -d ${VIDEO_DEV[0]} -c brightness=100                     # MAX
Contrast
v4l2-ctl -d ${VIDEO_DEV[0]} -c contrast=0                         # DISABLED
v4l2-ctl -d ${VIDEO_DEV[0]} -c contrast=1                         # MIN
v4l2-ctl -d ${VIDEO_DEV[0]} -c contrast=10                        # MAX
Saturation
v4l2-ctl -d ${VIDEO_DEV[0]} -c saturation=0                       # DISABLED
v4l2-ctl -d ${VIDEO_DEV[0]} -c saturation=1                       # MIN
v4l2-ctl -d ${VIDEO_DEV[0]} -c saturation=10                      # MAX
Hue
v4l2-ctl -d ${VIDEO_DEV[0]} -c hue=0                              # DISABLED
v4l2-ctl -d ${VIDEO_DEV[0]} -c hue=1                              # MIN
v4l2-ctl -d ${VIDEO_DEV[0]} -c hue=100                            # MAX
Sharpness
v4l2-ctl -d ${VIDEO_DEV[0]} -c sharpness=0                        # DISABLED
v4l2-ctl -d ${VIDEO_DEV[0]} -c sharpness=1                        # MIN
v4l2-ctl -d ${VIDEO_DEV[0]} -c sharpness=10                       # MAX
Appendix
Buffer Drop Due To Camera Flush
In the MediaTek Imgsensor architecture, the RAW sensor manages three data streams: Preview, Video, and Capture. When initiating one data stream, the buffers of the other streams are flushed. This occurs because starting a stream with a different format or size needs to reinitialize the entire processing pipeline. The flushing process involves:
Clearing Driver State: Resets the current state of the driver to ensure no residual data affects the new stream.
Returning Buffers with an ERROR Flag: Existing buffers are returned marked with an error flag to prevent the use of corrupted or outdated data.
Reinitializing the Pipeline: The entire data processing pipeline is reset and configured for the new stream parameters.
Resuming Stream Operation: After reinitialization, the new data stream begins its operation seamlessly.
As a result, when a new stream starts, any actively running stream may dequeue a buffer flagged with an ERROR. This behavior is expected due to the necessary flushing of buffers during the initialization of the new stream.
Practical Example
To illustrate the process, consider the following scenario:
Scenario: The Capture stream is running for 5 seconds, after which the Preview stream is initiated.
Outcome: The initiation of the Preview stream triggers the flush process, causing buffers to be returned with an ERROR flag.
declare -a video=(`v4l2-ctl --list-devices | grep mtk-v4l2-camera -A 3 | grep video | tr -d "\n"`)
v4l2-ctl -v width=4000,height=3000,pixelformat=JPEG -d ${video[2]} --stream-mmap --verbose > ./capture-0.log 2>&1 &
sleep 5
v4l2-ctl -v width=4000,height=3000,pixelformat=YUYV -d ${video[0]} --stream-mmap --verbose > ./preview-0.log 2>&1 &
The capture stream log shows that the buffers with sequence numbers 47, 49, and 50 have an ERROR flag.
cat ./capture-0.log
            VIDIOC_REQBUFS returned 0 (Success)
            VIDIOC_QUERYBUF returned 0 (Success)
            VIDIOC_QUERYBUF returned 0 (Success)
            VIDIOC_QUERYBUF returned 0 (Success)
            VIDIOC_QUERYBUF returned 0 (Success)
            VIDIOC_QBUF returned 0 (Success)
            VIDIOC_QBUF returned 0 (Success)
            VIDIOC_QBUF returned 0 (Success)
            VIDIOC_QBUF returned 0 (Success)
            VIDIOC_STREAMON returned 0 (Success)
cap dqbuf: 0 seq:      0 bytesused: 1048576 ts: 12.988022 (ts-monotonic, ts-src-eof)
cap dqbuf: 1 seq:      1 bytesused: 1048576 ts: 13.021346 delta: 33.324 ms (ts-monotonic, ts-src-eof)
...
cap dqbuf: 2 seq:     47 bytesused: 1048576 ts: 0.000000 delta: -16431.418 ms fps: 13.36 (error, ts-monotonic, ts-src-eof)
cap dqbuf: 3 seq:     48 bytesused: 1048576 ts: 16.498985 fps: 13.67 dropped: 1 (ts-monotonic, ts-src-eof)
cap dqbuf: 1 seq:     49 bytesused: 1048576 ts: 0.000000 delta: -16498.985 ms fps: 13.67 (error, ts-monotonic, ts-src-eof)
cap dqbuf: 0 seq:     50 bytesused: 1048576 ts: 0.000000 fps: 13.67 (error, ts-monotonic, ts-src-eof)
cap dqbuf: 2 seq:     51 bytesused: 1048576 ts: 17.079369 fps: 12.47 dropped: 2 (ts-monotonic, ts-src-eof)
cap dqbuf: 3 seq:     52 bytesused: 1048576 ts: 17.112693 delta: 33.324 ms fps: 12.61 (ts-monotonic, ts-src-eof)
Buffer Handling
To prevent the use of erroneous image data, it is crucial for user processes to check the buffer flags before using them.
For example, given the property drop-buffer-flags=corrupted, the GStreamer plug-in, identity, will check the ERROR flag and drop the corrupted buffers.
declare -a video=(`v4l2-ctl --list-devices | grep mtk-v4l2-camera -A 3 | grep video | tr -d "\n"`)
gst-launch-1.0 v4l2src device=${video[0]} ! video/x-raw,width=1920,height=1080,format=YUY2 ! identity drop-buffer-flags=corrupted ! v4l2convert output-io-mode=dmabuf-import ! waylandsink sync=false &
gst-launch-1.0 v4l2src device=${video[1]} ! video/x-raw,width=1920,height=1080,format=NV12 ! identity drop-buffer-flags=corrupted ! v4l2convert output-io-mode=dmabuf-import ! waylandsink sync=false &
gst-launch-1.0 v4l2src device=${video[2]} ! image/jpeg,width=1920,height=1080,format=JPEG ! identity drop-buffer-flags=corrupted ! v4l2jpegdec ! waylandsink sync=false &
Buffer Size Is Larger Than Image Size
In configurations using the NM12 format, the driver may return a buffer size larger than the actual image size. For example, if a user sets the resolution to 2104x1560 using the NM12 format, the driver returns a buffer sized 2112x1568. The reason is that the ISP hardware requires width and height alignments, causing the driver to adjust the buffer size accordingly. The driver applies a 16-pixel alignment for the width and a 32-pixel alignment for the height. Therefore, v4l2 users must interpret the buffer based on the parameters (bytesperline and sizeimage) returned by the driver.
The diagram below illustrates the relation between the image size and the buffer size.

V4L2 Buffer Padding
When using the V4L2 ioctl to set/get the format, the driver returns the parameters (bytesperline and sizeimage). The example below shows that the actual image width/height is 2104/1560. The bytesperline is 2112, meaning the buffer width has 8-pixel padding. The sizeimage/bytesperline is 1568, meaning the buffer height has 8-pixel padding.
[ 513.313435] video5: VIDIOC_G_FMT: type=vid-cap-mplane, width=2104, height=1560, format=NM12  // width = 2104, height = 1560, format = NM12
[ 513.313455] plane 0: bytesperline=2112 sizeimage=3311616                                     // bytesperline = 2112, sizeimage/bytesperline = 1568
[ 513.313459] plane 1: bytesperline=2112 sizeimage=1655808
The padding value is 0. If the padding is not removed, green borders will appear.
Interpret size-aligned (2112x1568) buffer with the aligned size (2112x1568)
If the user uses the size 2104x1560 to interpret a 2112x1568 buffer, the content will be wrong due to the padding.

Interpret size-aligned (2112x1568) buffer with the actual image size (2104x1560)
Known Issue
When the capture (JPEG) stream runs with the GStreamer plug-in,
v4l2jpegdec, the pipeline may be stuck if all the buffers are flushed and returned with an ERROR flag. The reason is that the JPEG decoder needs to extract the output format/size from the given JPEG image. If all the JPEG images are corrupted, the JPEG encoder will stop.