Communicating with the Board
With IoT Yocto, there are several options to connect your host PC to the Genio boards for debugging and development purposes:
UART Port: The UART port provides access to Boot ROM, bootloader and kernel console access in IoT Yocto. This design is shared across all Genio EVKs.
- USB: Various functionality is provided via the USB of Genio SoCs in it’s default configuration:
Image Download: You can program the on-board storage (EMMC or UFS) through USB with Genio Tools.
- Ethernet connectivity: The device is configured to expose a virtual Ethernet connection with the host via multiple protocols.
This allows various networking services to be exposed such as ssh / scp to obtain shell & file transfer functionality.
Debugging capabilites: The device is also configured as an Android Debug Bridge (ADB) device.
Serial Console
Most Genio evaluation kits and development boards have the UART0 port connected to an UART-to-USB chip, such as FTDI-232 on Genio 350-EVK, which expose the UART as an USB serial device to your host PC, allowing access to boot messages, plus bootloader and Linux consoles.
Note
See Connecting Board to Host for more details of connecting UART0.
For other development boards, check which port UART0 is connected to in the user guide or schematics of the board.
Serial Configuration
Different stages of the boot process utilise different baud rates:
Console |
Baud Rate |
Purpose |
|---|---|---|
Download Agent |
921600 |
Download progress log from download agent ( |
Boot ROM |
115200 |
SoC boot ROM logs and messages |
Bootloader Console |
921600 |
U-Boot console for debugging and boot configurations |
Linux Console |
921600 |
kernel messages and inux console |
Settings other than baud rate are the same between the boot firmware and Linux console:
Data Bits: 8
Stop Bits: 1
Parity: None
Flow control: None
Connect to UART
You can now connect to the UART using the following command:
picocom -b 921600 /dev/ttyUSB0
or using
screen /dev/ttyUSB0 921600
Note
Depending on your system, you may have more than one USB serial device
connected, which means the board might not be presented as /dev/ttyUSB0 in your system.
In this case, please try other ttyUSB devices (i.e. /dev/ttyUSB1,
/dev/ttyUSB2, etc.)
Launch the serial terminal emulator previously installed as part of the UART setup. Refer to the specific serial terminal emulators documentation for details of how to configure the serial port and baud rate to be used.
Network Connectivity
The boards support multiple ways to provide network connectivity.
RNDIS
An additional network adapter should appear:
 $ networkctl list
 WARNING: systemd-networkd is not running, output will be incomplete.

 IDX LINK            TYPE     OPERATIONAL SETUP
   1 lo              loopback n/a         unmanaged
   2 enp1s0          ether    n/a         unmanaged
   5 enxaa0118a6864c ether    n/a         unmanaged

 3 links listed.
This interface should already be setup:
 $ networkctl status enxaa0118a6864c
 WARNING: systemd-networkd is not running, output will be incomplete.

 Failed to query link bit rates: Unit dbus-org.freedesktop.network1.service not found.
 Failed to query link DHCP leases: Unit dbus-org.freedesktop.network1.service not found.
 ● 5: enxaa0118a6864c
                      Link File: /usr/lib/systemd/network/73-usb-net-by-mac.link
                   Network File: n/a
                           Type: ether
                          State: n/a (unmanaged)
                   Online state: unknown
                           Path: pci-0000:02:00.0-usb-0:3:1.0
                         Driver: rndis_host
                         Vendor: MediaTek Inc.
                          Model: Genio
                     HW Address: aa:01:18:a6:86:4c
                            MTU: 1500 (max: 65535)
                          QDisc: fq_codel
   IPv6 Address Generation Mode: none
           Queue Length (Tx/Rx): 1/1
               Auto negotiation: no
                          Speed: n/a
                         Duplex: half
                           Port: tp
                        Address: 192.168.96.26
                                 fe80::ce63:e01a:3c5a:b073
              Activation Policy: up
            Required For Online: yes
You should now be able to proceed to the next section to connect to the board with SSH.
Press
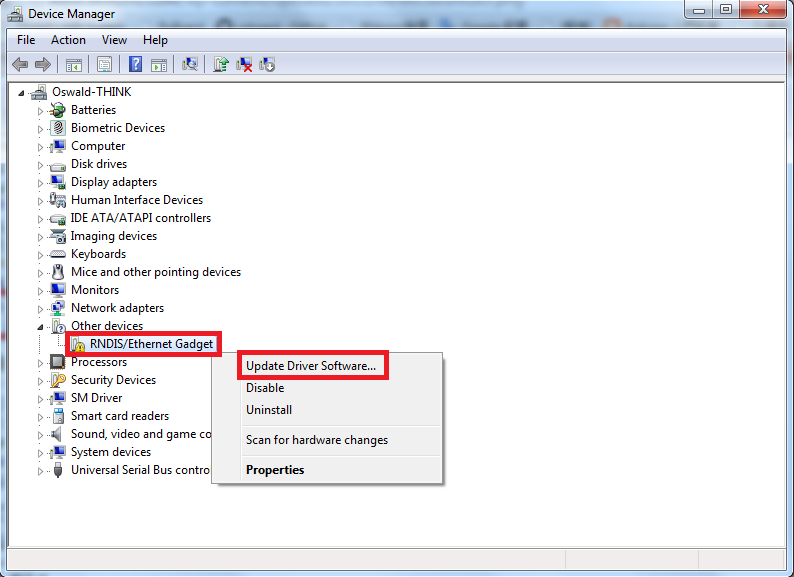
Windows+Rand typedevmgmt.mscthen pressENTERRight-click on the unrecognized RNDIS/Ethernet Gadget device, and select Update Driver Software:

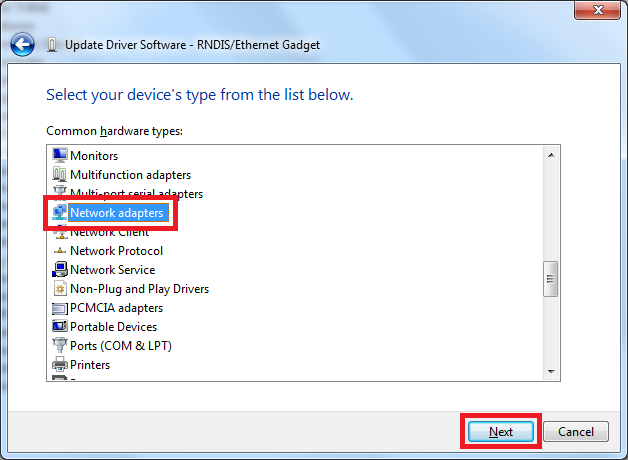
Select Browse my computer for driver software → Let me pick from a list of device drivers on my computer → Network adapters

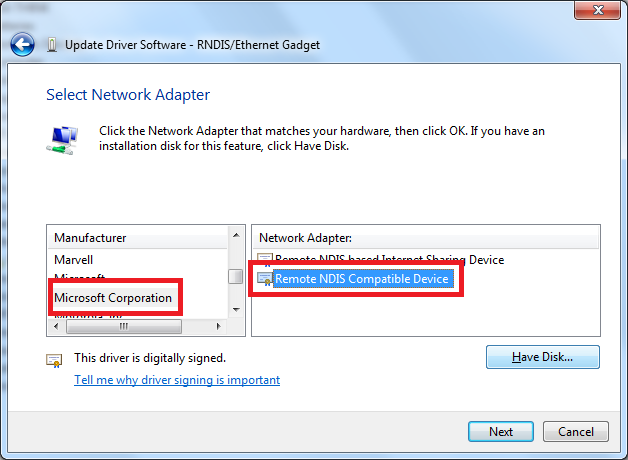
Select Microsoft Corporation → Remote NDIS Compatible Device

You should see an additional network adapter appear in Network and Sharing Center.
Set the Static IP of the adapter to:
IP:
192.168.96.2Subnet Mask:
255.255.255.0Default Gateway:
192.168.96.1
After static IP setting, you should now be able to proceed to the next section to connect to the board with SSH.
The RNDIS interface in rity-demo-image is configured with the following static IP:
192.168.96.1
Physical Ethernet
If you plugged an ethernet cable into the board as part of the Connecting Board to Host and the network to which it was connected has a DHCP server, the device will have automatically picked up a suitable IP address from it. Connect via serial, via SSH using a configured RNDIS connection or consult your DHCP logs to discover the IP address provided to the board.
Note
If logged in to the board via the serial console or SSH via the RNDIS connection, running the follwoing command:
networkctl status eth0
Connecting using the board IP
rity-demo-image includes a SSH server. You can connect to the SSH server from a Linux host.
You can connect to the board using the following command (assuming using the IP address configured for RNDIS):
ssh root@192.168.96.1
root@genio-350-evk:~#
You can also use the scp program to copy files to the board:
scp host-file.txt root@192.168.96.1:/path/to/target/directory
Connecting by using mDNS
IoT Yocto also includes a mDNS server avahi daemon to provide device discovery.
The host name of the board is in the form <machine>.local, where <machine> is the value of MACHINE variable that
was used to build the SDK.
For instance you can connect to the genio-350-evk board with the host name genio-350-evk.local by using the following command:
ssh root@genio-350-evk.local
root@genio-350-evk:~#
Hint
It is recommended to modify /etc/avahi/avahi-daemon.conf and set host-name to change the host name of the board to something unique if there are multiple boards of the same model connected to the same network. And run systemctl restart avahi-daemon to take effect.
ADB
The following commands are supported:
adb pushadb pulladb shell
Login Identity
Use root to login to the Linux when asked for a username. A password is not required.
Important
The kernel console and SSH console in IoT Yocto can be logged-in with root without password.
The purpose is to ease development and debugging. This configuration is not suitable for production purposes. Therefore, please make sure you change the account and permission security configurations before using IoT Yocto in a production environment.