Flash Image to Board
This guide shows how to “flash”(write) the system image into the non-volatile flash memory of Genio EVKs. The flashing process is performed over a USB connection between the target board and the host computer containing the image.
In order to write the on-board storage with Genio Tools, you need to set the SoC in download mode, which allows AIoT Tools to transfer a download agent binary to the SRAM of SoC. The download agent then provides a fastboot interface for subsequent image transfer and storage write operations.
Note
Make sure you have install the latest Genio Tools on your Linux or Windows host before continuing the process.
Genio 520 SoC and Genio 720 SoC require Genio Tools v1.7 or later.
Note
These pages are only a quick guide on using Genio Tools to flash images. Please read Genio Tools in order to get the most out of Genio Tools.
Select Boot Storage (Genio 520/720-EVK)
Note
If you are using other Genio EVK boards, you may skip this step.
Genio 520/720-EVK allows you to select 3 different boot storages, each requires different prebuilt image:
Boot from eMMC: Download
genio-720-evkimagesBoot from UFS: Download
genio-720-evk-ufsimagesBoot from serial(QSPI) NOR flash: Download
genio-720-evk-norboot-ufsimages
Choose your desired boot storage, and make sure you’ve built or downloaded the correct image:
Boot from UFS storage.
The image should be built using genio-720-evk-ufs config.
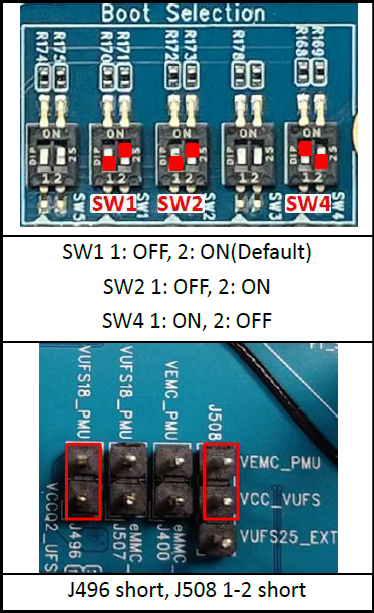
Boot from UFS Storage
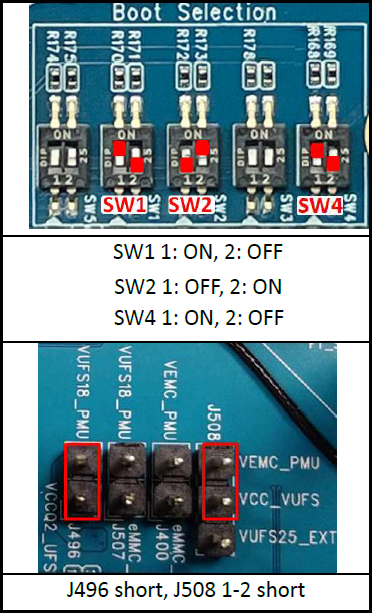
Boot from eMMC storage.
The image should be built using genio-720-evk config.

Boot from eMMC Storage
Boot from SPI NOR flash storage,
and then boot to system on UFS storage.
The image should be built using genio-720-evk-norboot-ufs config.
Boot from SPI NOR Flash, UFS as System Storage
Launch genio-flash Tool
Change working directory to the image directory.
If you built rity-demo-image from source, the image is default in:
cd $BUILD_DIR/tmp/deploy/images/genio-350-evk
cd $BUILD_DIR/tmp/deploy/images/genio-510-evk
cd $BUILD_DIR/tmp/deploy/images/genio-700-evk
cd $BUILD_DIR/tmp/deploy/images/genio-1200-evk
cd $BUILD_DIR/tmp/deploy/images/genio-720-evk-ufs
cd $BUILD_DIR/tmp/deploy/images/genio-720-evk
cd $BUILD_DIR/tmp/deploy/images/genio-720-evk-norboot-ufs
BUILD_DIR variable set was set within the Configure Build Environment chapter.
If you are using a pre-built image, please change to the directory that you’ve extracted the pre-built image.
It should contain a partitions.json file.
To use the default configuration, run the following commands:
$ genio-flash
The dtbo overlays included by default are:
gpu-mali.dtbo
video.dtbo
display-dsi.dtbo
display-hdmi.dtbo
The default configuration is:
GPU support is enabled (out-of-tree driver).
Video encoder, decoder and MDP are enabled.
HDMI is enabled (which disables Ethernet as both of them use the same DPI pin).
DSI LCM is enabled.
Cameras are disabled.
To enable CSI0 camera and Ethernet:
$ genio-flash --load-dtbo camera-ap1302-ar0430-single-csi0.dtbo --load-dtbo net-ethernet.dtbo
$ genio-flash
The dtbo overlays included by default are:
video.dtbo
apusys.dtbo
display-dsi.dtbo
display-hdmi.dtbo
The default configuration is:
Video encoder, decoder and MDP are enabled.
HDMI is enabled.
DSI LCM is enabled.
Cameras are disabled.
$ genio-flash
The dtbo overlays included by default are:
video.dtbo
apusys.dtbo
display-dsi.dtbo
display-hdmi.dtbo
The default configuration is:
Video encoder, decoder and MDP are enabled.
HDMI is enabled.
DSI LCM is enabled.
Cameras are disabled.
$ genio-flash
The dtbo overlays included by default are:
video.dtbo
apusys.dtbo
display-dsi.dtbo
display-hdmi.dtbo
The default configuration is:
Video encoder, decoder and MDP are enabled.
HDMI is enabled.
DSI LCM is enabled.
Cameras are disabled.
$ genio-flash
The dtbo overlays included by default are:
video.dtbo
apusys.dtbo
display-dsi.dtbo
ufs.dtbo
The default configuration is:
Video encoder, decoder and MDP are enabled.
DSI LCM is enabled.
Cameras are disabled.
UFS storage enabled
$ genio-flash
The dtbo overlays included by default are:
video.dtbo
apusys.dtbo
display-dsi.dtbo
emmc.dtbo
The default configuration is:
Video encoder, decoder and MDP are enabled.
DSI LCM is enabled.
Cameras are disabled.
eMMC storage
$ genio-flash
The dtbo overlays included by default are:
video.dtbo
apusys.dtbo
display-dsi.dtbo
ufs.dtbo
The default configuration is:
Video encoder, decoder and MDP are enabled.
DSI LCM is enabled.
Cameras are disabled.
UFS storage enabled
The additional board features are device tree overlays. You can load multiple overlays by adding multiple --load-dtbo parameters.
The following command can be used to see what overlays are available to be enabled:
$ genio-flash --list-dtbo
The default overlays are marked by an asterisk *.
By default genio-flash will use the prefix rity-demo-image to search for files under image directory.
If you are building other images, use -i option to specify different prefix. For example:
$ genio-flash -i rity-bringup-image
Note
DPI-to-HDMI and Ethernet are mutually exclusive on Genio 350-EVK.
$ genio-flash -i rity-bringup-image
$ genio-flash -i rity-bringup-image
$ genio-flash -i rity-bsp-image
genio-flash -i rity-browser-image
genio-flash -i rity-bsp-image
genio-flash -i rity-bringup-image
genio-flash should print logs to the terminal similar to this:
Genio Tools: <tool-version>
Yocto Image:
        name:     Rity Demo Image (rity-demo-image)
        distro:   Rity Demo Layer <iot-yocto-version> (rity-demo)
        codename: scarthgap
        machine:  <machine>
        overlays: ['gpu-mali.dtbo', 'apusys.dtbo', 'video.dtbo', 'display-dsi.dtbo', 'display-hdmi.dtbo']

Looking for MediaTek SoC matching USB device 0e8d:0003
The <tool-version>, <iot-yocto-version> and <machine> strings change according to the tool version, IoT Yocto version and Genio EVK used.
Once you see line Looking for MediaTek SoC matching USB device 0e8d:0003 prompt, proceed to the next step.
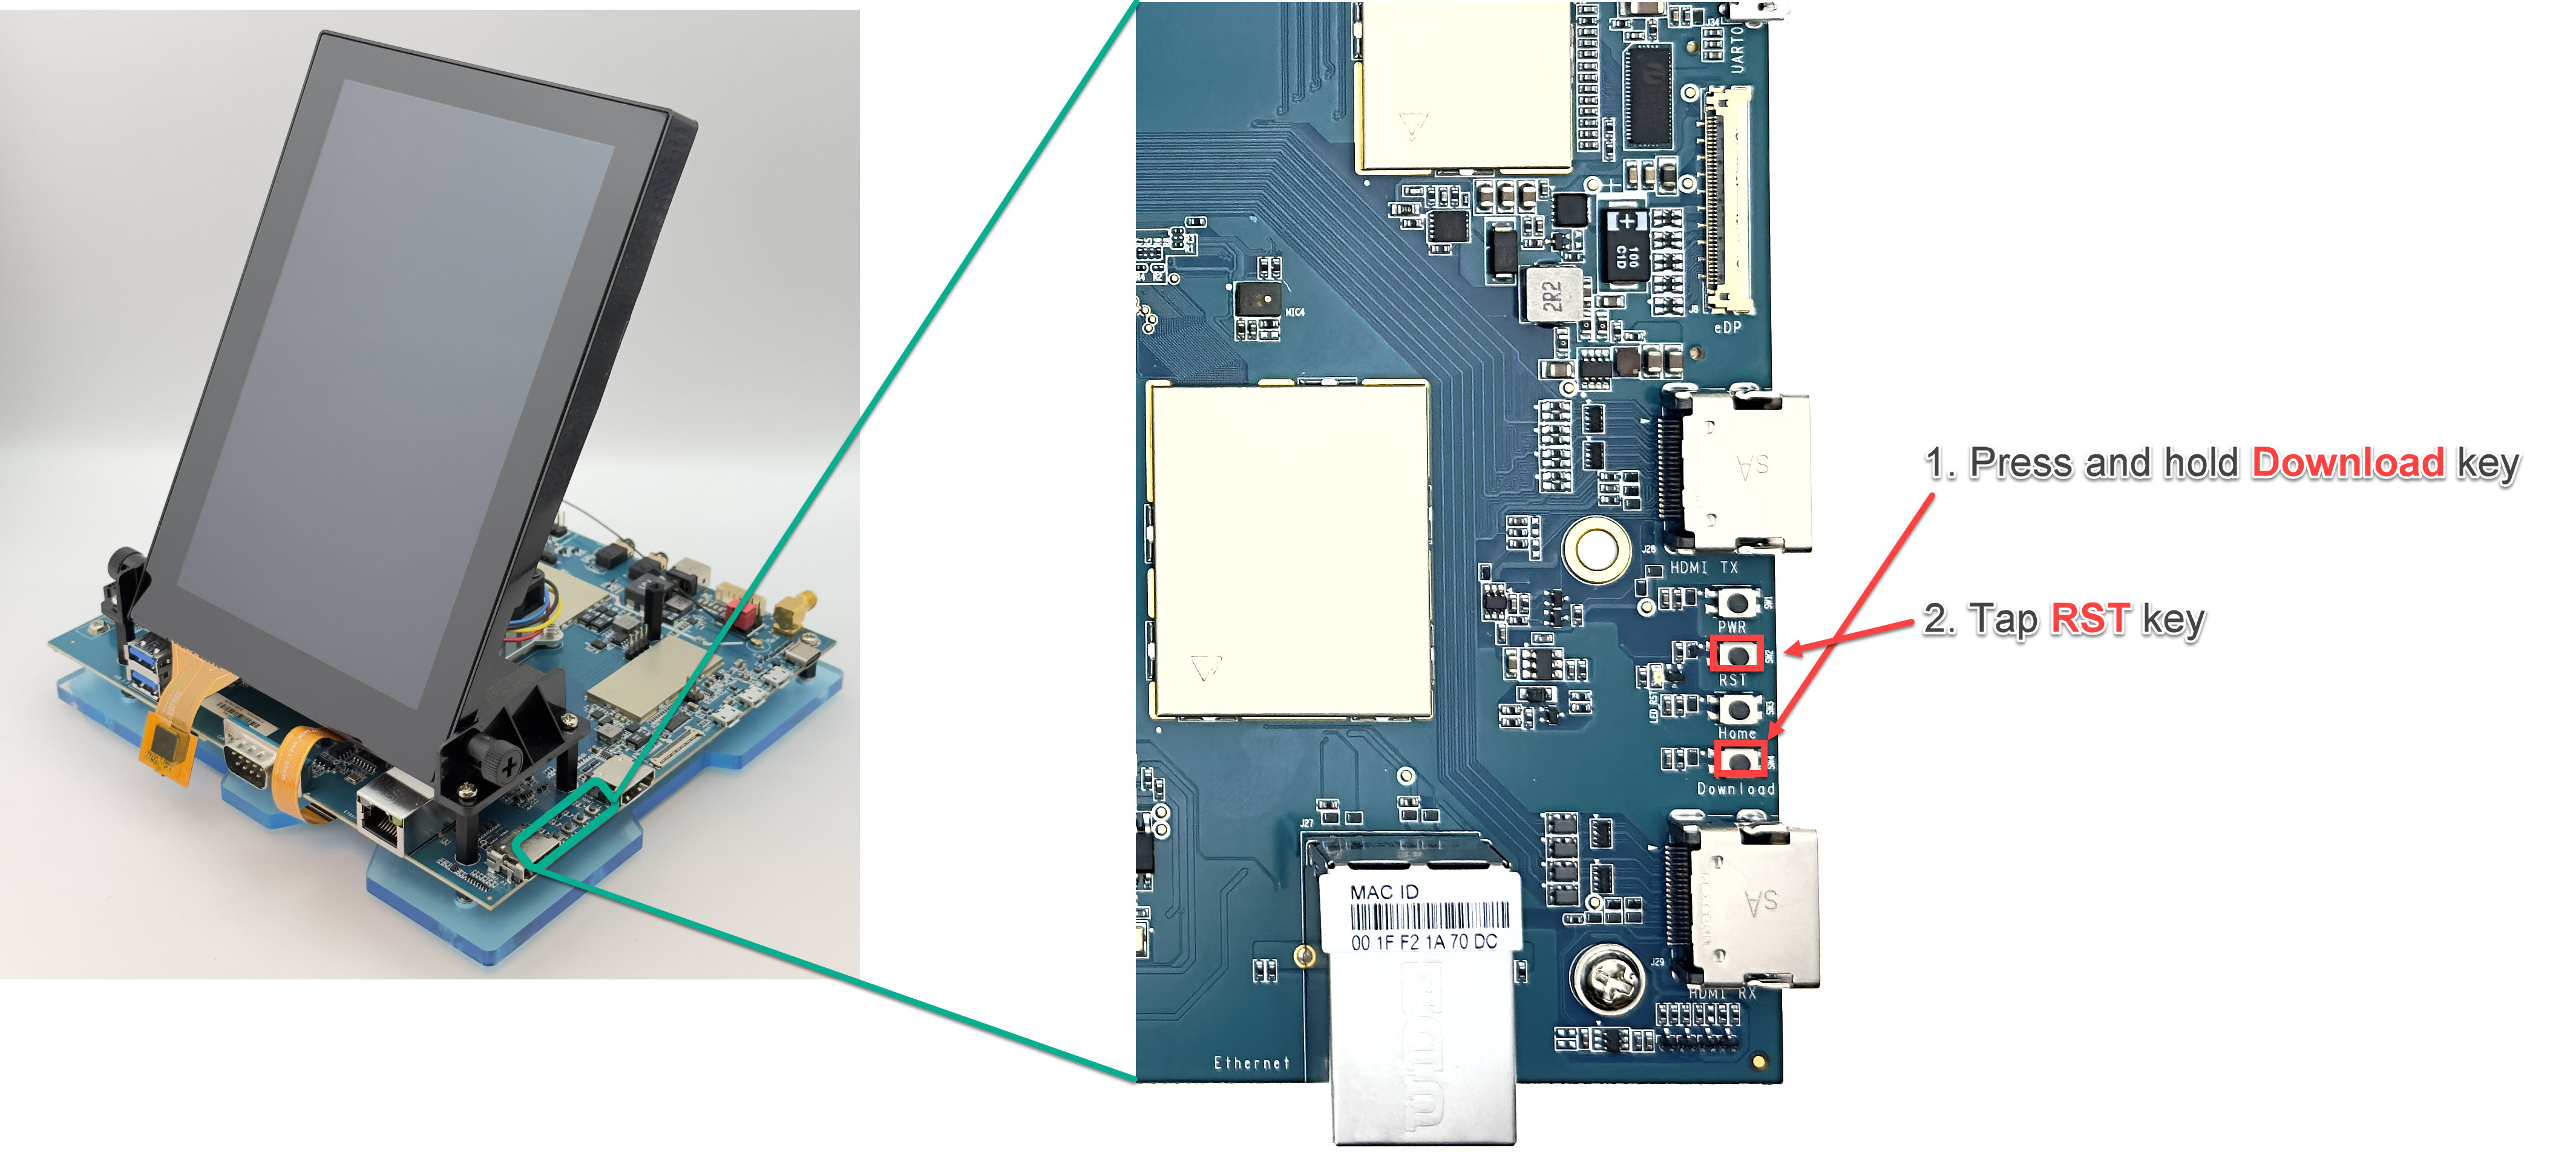
Enter Download Mode
Follow these steps to make the Genio EVK enter download mode:
Locate the push buttons on the board:
Press and keep pressing the volume up button
Press and release the reset button
Release the volume up button
Locate the push buttons on the board:
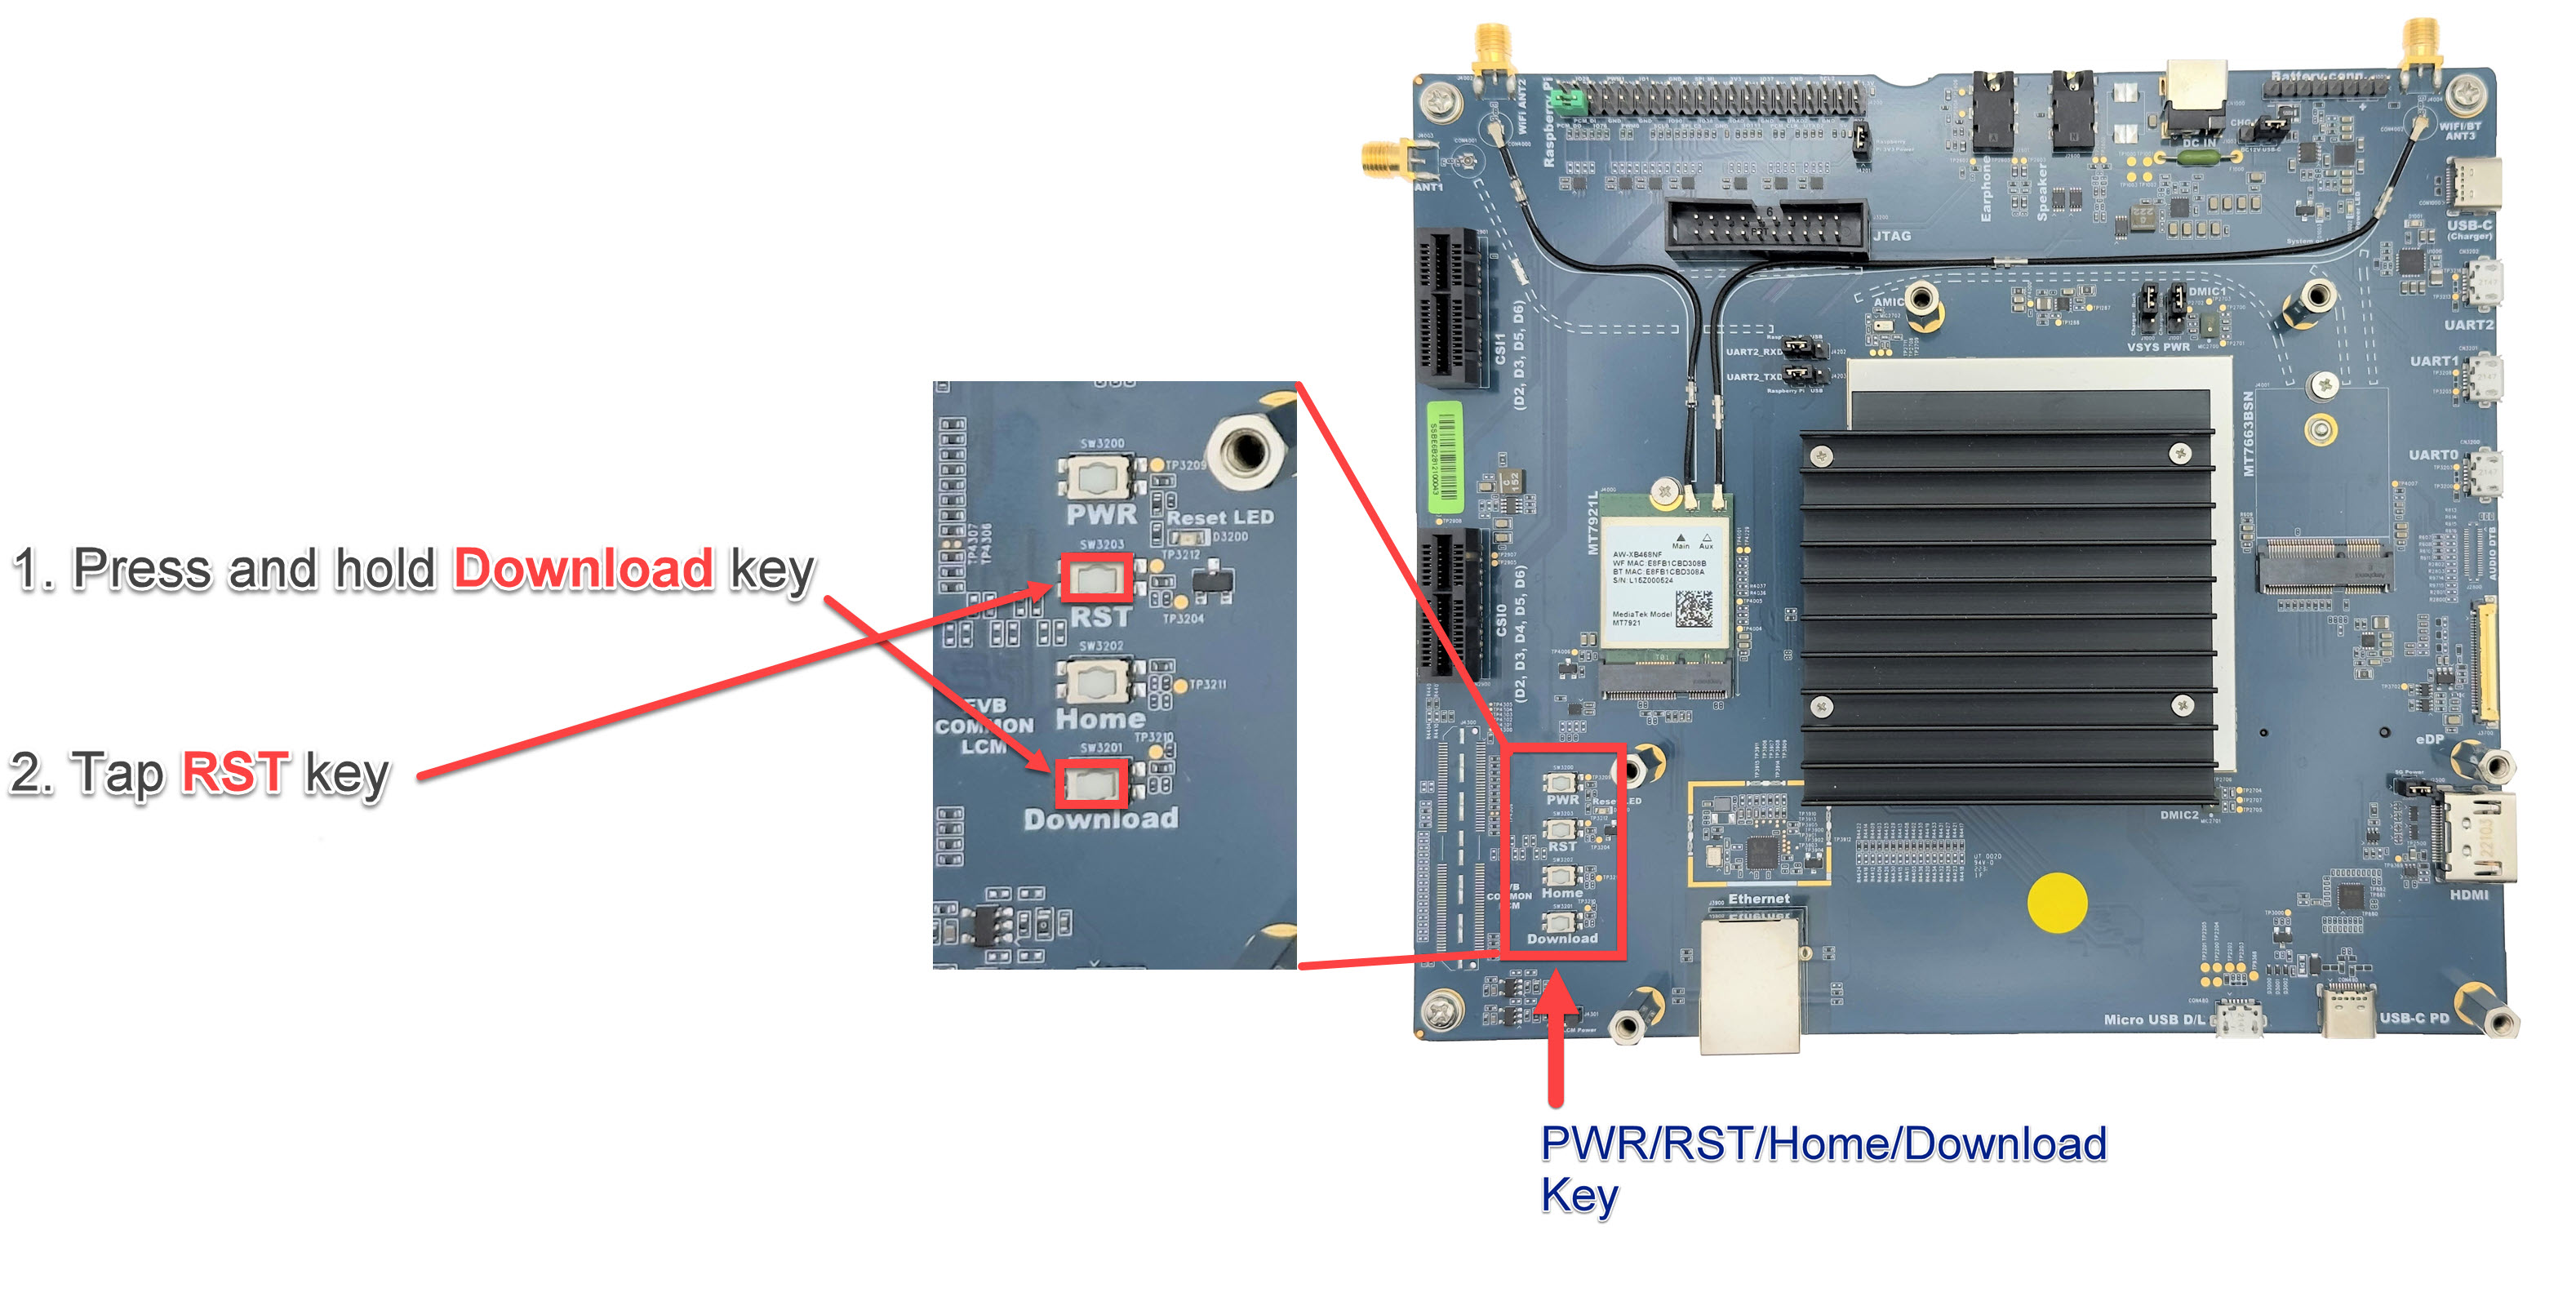
Press and keep pressing the Download button.
Press and release the RST button.
Hold the Download button until you see the log
Erasing 'mmc0'message, as shown below:
Locate the push buttons on the board:
Press and keep pressing the Download button.
Press and release the RST button.
Hold the Download button until you see the log
Erasing 'mmc0'message, as shown below:
Locate the push buttons on the board:
Press and keep pressing the Download button.
Press and release the RST button.
Hold the Download button until you see the log
Erasing 'mmc0'message, as shown below:
Locate the push buttons on the board:

Press and keep pressing the Download button.
Press and release the Reset button.
Hold the Download button until you see the log
Erasing 'mmc0'message, as shown below:
Locate the push buttons on the board:
Press and keep pressing the Download button.
Press and release the Reset button.
Hold the Download button until you see the log
Erasing 'mmc0'message, as shown below:
Locate the push buttons on the board:
Press and keep pressing the Download button.
Press and release the Reset button.
Hold the Download button until you see the log
Erasing 'mmc0'message, as shown below:
Note
SPI NOR flash can take a long time to erase and program. It can take up to several minutes to complete the SPI NOR flash programming. The UFS storage programming follows after.
You should see flashing process start. A typical successful log looks like this:
Genio Tools: <tool-version>
Yocto Image:
        name:     Rity Demo Image (rity-demo-image)
        distro:   Rity Demo Layer <iot-yocto-version> (rity-demo)
        codename: scarthgap
        machine:  genio-1200-evk
        overlays: ['gpu-mali.dtbo', 'apusys.dtbo', 'video.dtbo']

Looking for MediaTek SoC matching USB device 0e8d:0003
Opening COM33 using baudate=115200
Connected to MediaTek MT8195 SoC
Sending bootstrap to address: 0x201000
Jumping to bootstrap at address 0x201000 in AArch64 mode
erasing mmc0
< waiting for any device >
Erasing 'mmc0'                                     (bootloader) request sz: 0xe8f800000, real erase len: 0x0
OKAY [  9.627s]
Finished. Total time: 9.655s
erasing mmc0boot0
Erasing 'mmc0boot0'                                (bootloader) request sz: 0x800000, real erase len: 0x800000
OKAY [  0.013s]
Finished. Total time: 0.018s
erasing mmc0boot1
Erasing 'mmc0boot1'                                (bootloader) request sz: 0x800000, real erase len: 0x800000
OKAY [  0.004s]
Finished. Total time: 0.010s
 flashing mmc0=rity-demo-image-genio-1200-evk.wic.img
Sending sparse 'mmc0' 1/9 (262140 KB)              OKAY [  6.440s]
Writing 'mmc0'                                     OKAY [  9.393s]
Sending sparse 'mmc0' 2/9 (262140 KB)              OKAY [  6.332s]
Writing 'mmc0'                                     OKAY [ 10.185s]
Sending sparse 'mmc0' 3/9 (230376 KB)              OKAY [  5.607s]
Writing 'mmc0'                                     OKAY [  8.196s]
Sending sparse 'mmc0' 4/9 (262140 KB)              OKAY [  6.362s]
Writing 'mmc0'                                     OKAY [  9.354s]
Sending sparse 'mmc0' 5/9 (262140 KB)              OKAY [  6.401s]
Writing 'mmc0'                                     OKAY [ 10.089s]
Sending sparse 'mmc0' 6/9 (262140 KB)              OKAY [  6.413s]
Writing 'mmc0'                                     OKAY [  9.291s]
Sending sparse 'mmc0' 7/9 (242392 KB)              OKAY [  5.924s]
Writing 'mmc0'                                     OKAY [  8.585s]
Sending sparse 'mmc0' 8/9 (262140 KB)              OKAY [  6.417s]
Writing 'mmc0'                                     OKAY [  9.288s]
Sending sparse 'mmc0' 9/9 (129780 KB)              OKAY [  3.159s]
Writing 'mmc0'                                     OKAY [  4.605s]
Finished. Total time: 132.157s
flashing mmc0boot0=bl2.img
Sending 'mmc0boot0' (205 KB)                       OKAY [  0.007s]
Writing 'mmc0boot0'                                OKAY [  0.026s]
Finished. Total time: 0.054s
flashing mmc0boot1=u-boot-env.bin
Sending 'mmc0boot1' (4 KB)                         OKAY [  0.002s]
Writing 'mmc0boot1'                                OKAY [  0.015s]
Finished. Total time: 0.028s
Rebooting                                          OKAY [  0.002s]
Finished. Total time: 0.002s
Note
If you are experiencing issues flashing on Windows, please refer to the troubleshooting guide.
Flash a Single Partition
During development, you might want to update a single partition instead of completely re-write the entire storage.
For example, after modifying and rebuilding the kernel image, it is much faster to just flash the fitImage.
There are 4 partitions that can be updated individually on open SDK: mmc0boot0, mmc0boot1, bootloaders, kernel.
The mmc0 and rootfs partitions do not support individual updates.
To flash just one partition, you can run the following command:
genio-flash $PARTITION
genio-flash kernel # example to update kernel partition
The following table shows common $PARTITION used in rity-demo-image:
Partition |
File |
|---|---|
mmc0 |
N/A |
mmc0boot0 |
|
mmc0boot1 |
|
bootloaders |
|
kernel |
|
rootfs |
N/A |
Hint
See the Genio Tools page for more information on how to utilise genio-flash.