Lontium LT6911UXE
Overview
The LT6911UXE is a high-performance HDMI 2.0 to MIPI DSI/CSI converter. It supports HDMI 2.0b, HDMI 1.4, and DVI 1.0 standards, with data rates up to 6Gbps, enabling seamless transmission of 4K video at 30Hz. The device is compliant with HDCP 2.3 and HDCP 1.4 for secure content protection.
The LT6911UXE features a configurable single-port or dual-port MIPI DSI/CSI transmitter, supporting up to 4 data lanes per port with a maximum data rate of 2.5Gbps per lane. In addition to video capabilities, the LT6911UXE includes digital audio output interfaces such as I2S, supporting sample rates up to 192kHz.
Genio DTB - HDMI to MIPI
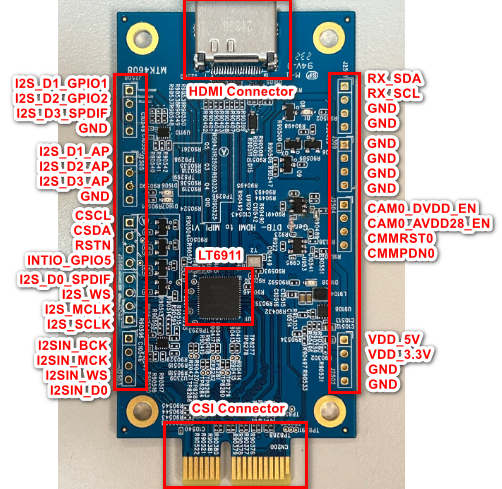
The camera sensor used by the Genio DTB - HDMI to MIPI is Lontium, LT6911UXE.
The following provides a complete example of how to convert HDMI input to MIPI output through
Genio DTB - HDMI to MIPI and streaming on Genio 510/700/1200-EVK.
Genio DTB - HDMI to MIPI
Flash Firmware for Genio DTB - HDMI to MIPI
Once the Genio DTB is newly manufactured, it needs to have the firmware flashed. After flashing the firmware, the device can be used normally.
Required Equipment
Lontium has developed the firmware, please reach out to them to acquire it. To flash the firmware
into the Genio DTB, you need to prepare a USB-to-I2C programmer and use Lontium’s programming
tool - LT Programmer.
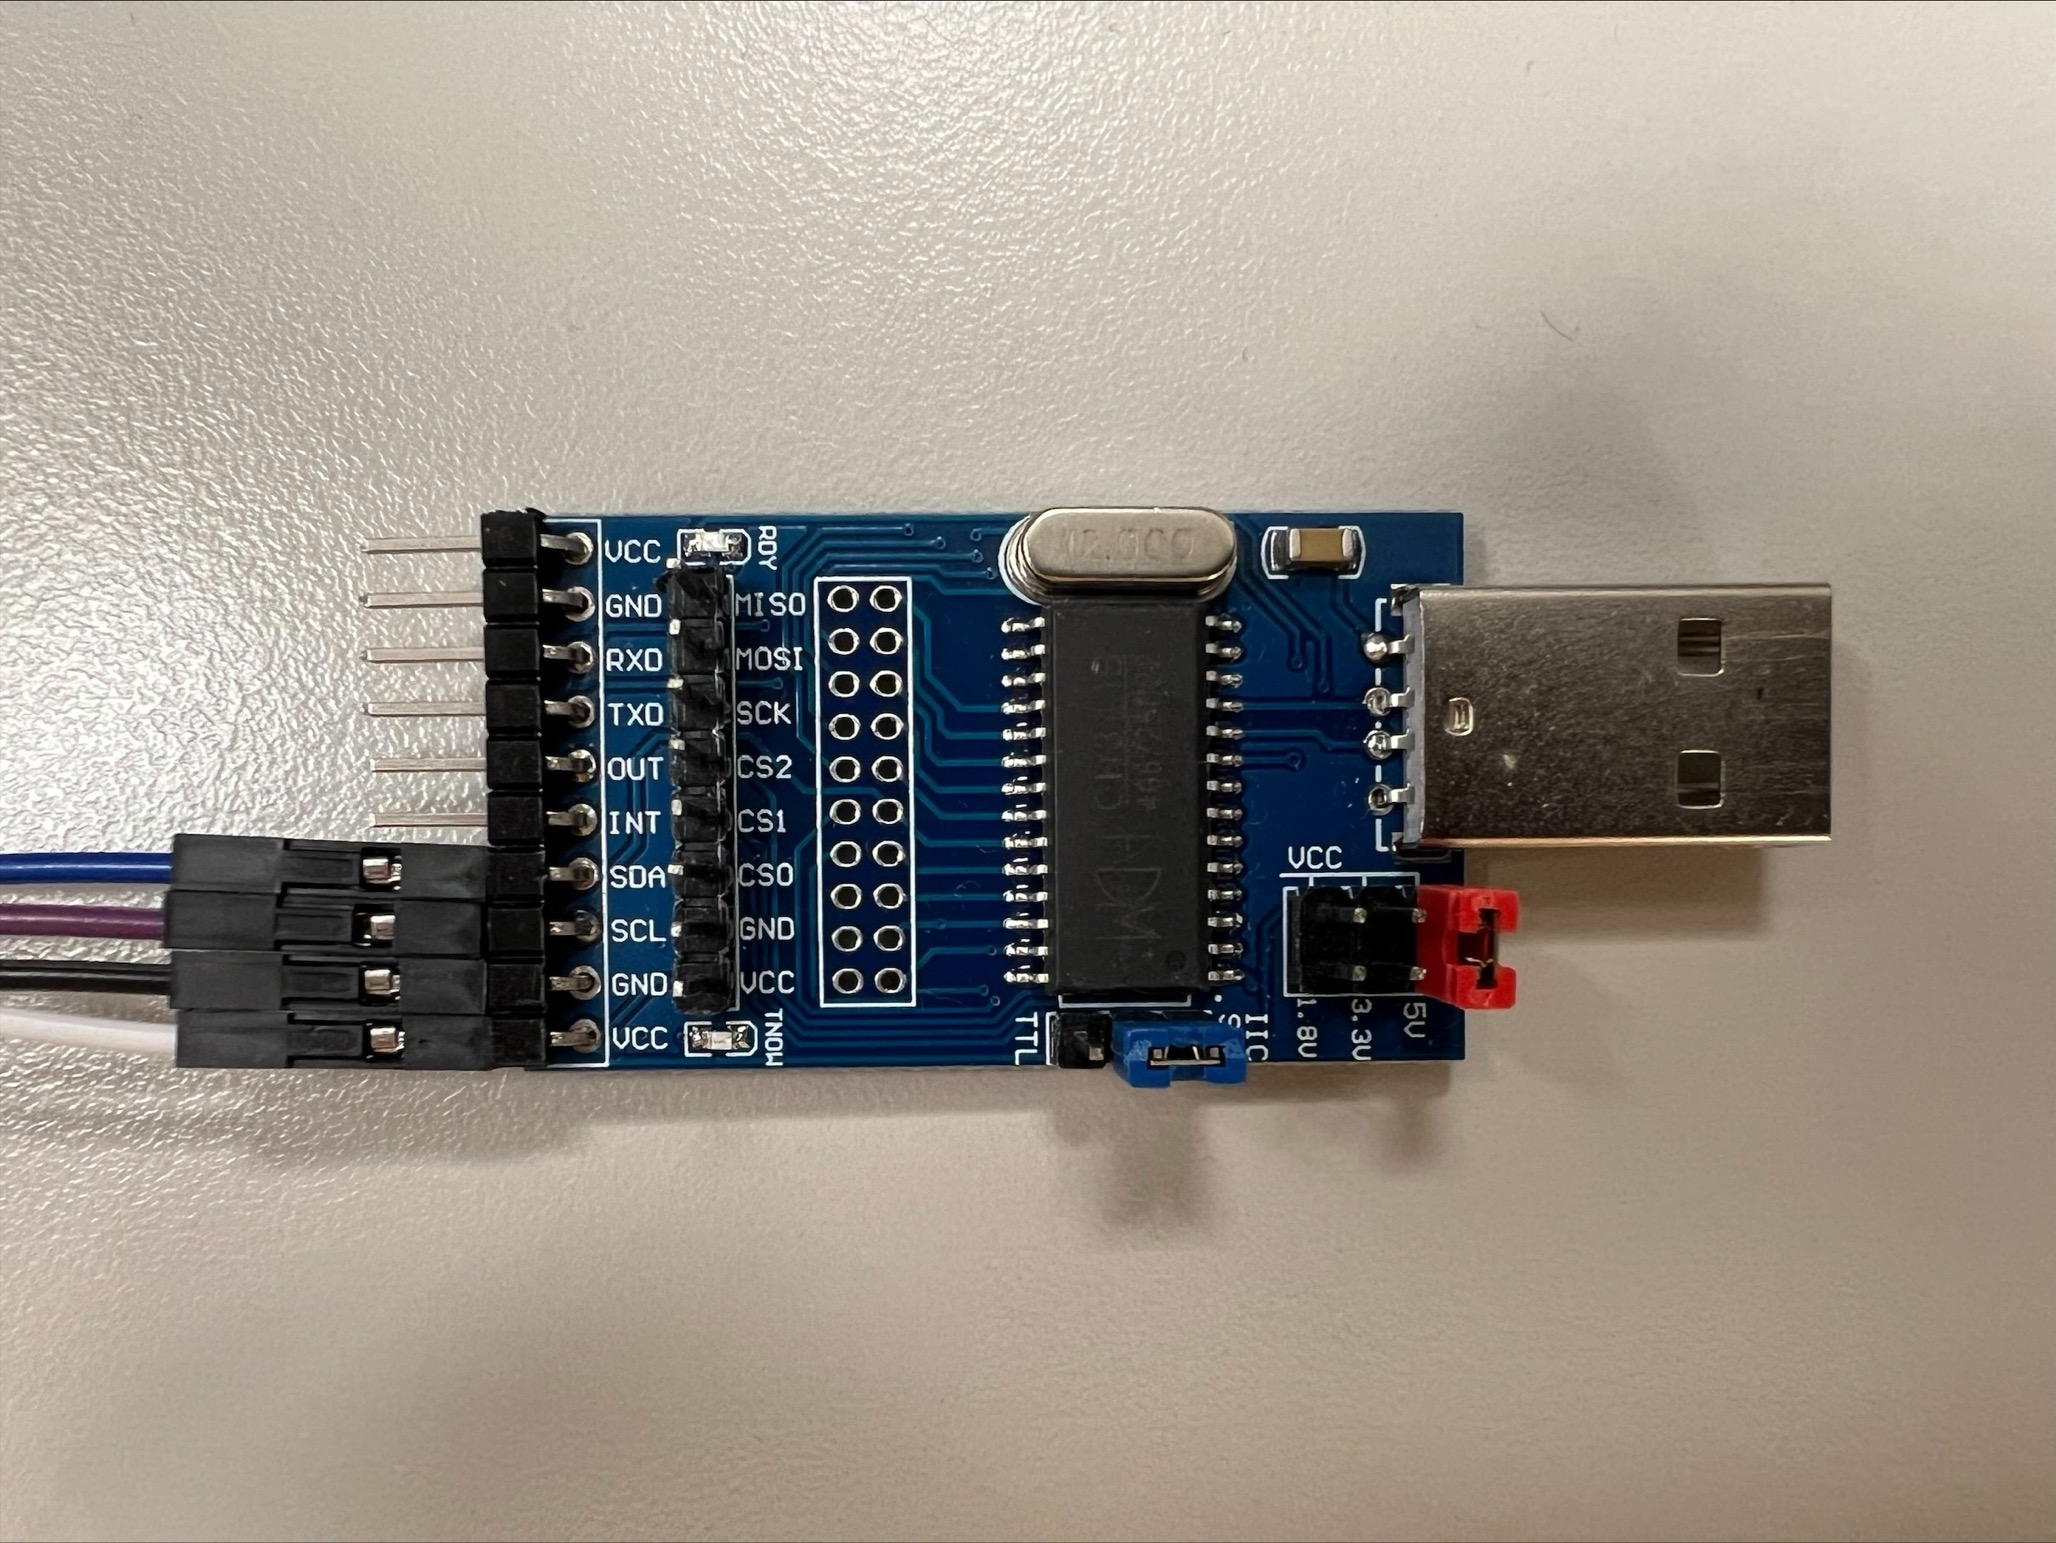
USB-to-I2C programmer
Firmware:
LT6911UXE_422_HV1_SV1_5_MIIPI_OFF_Con_CLK_240326.hex(Please get in touch with Lontium to obtain.)LT Programmer (Please get in touch with Lontium to obtain.)
PC with Windows OS - to run LT Programmer
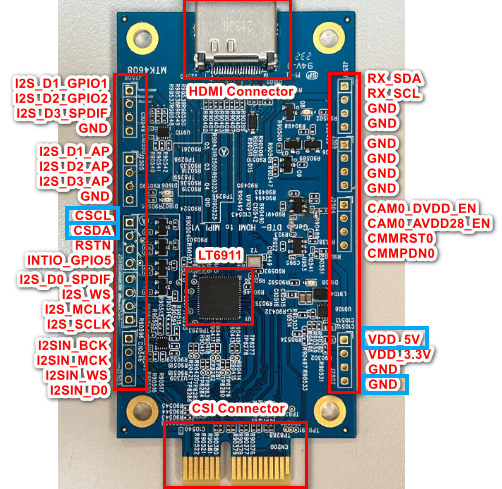
To flash firmware, please connect these 4 pins on the USB-to-I2C programmer and Genio DTB, and set the VCC to 5V:
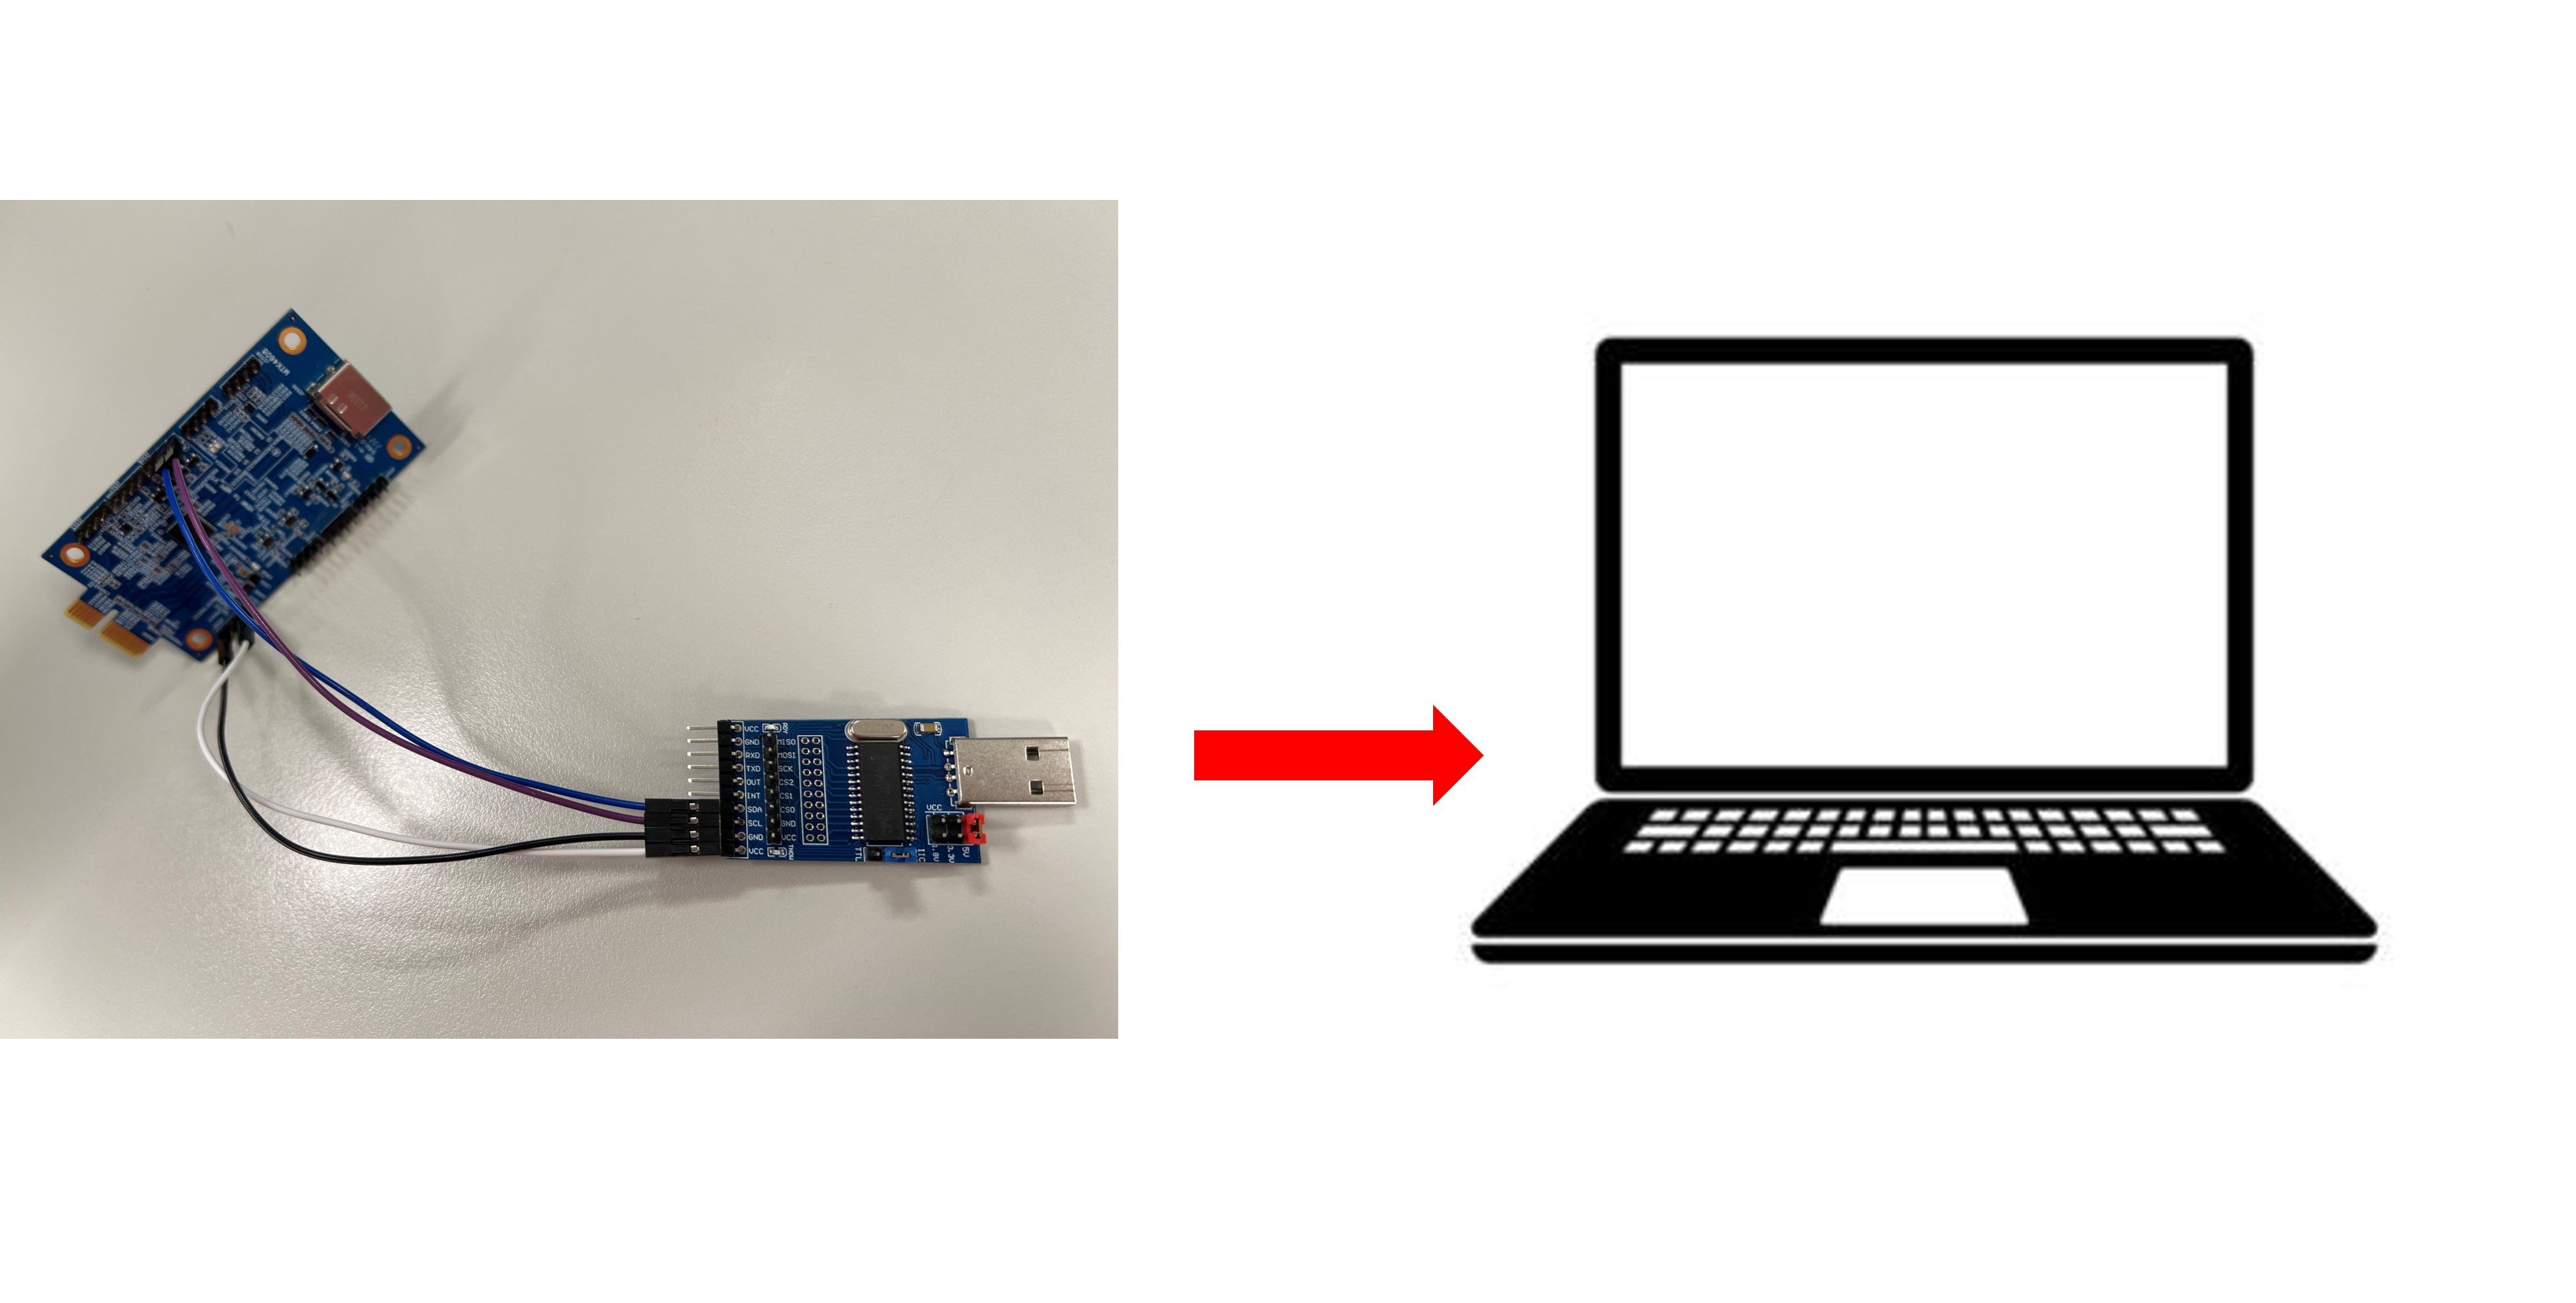
Please consult Lontium’s documentation for detailed programming steps and operational procedures of the LT Programmer.
Genio DTB - HDMI to MIPI User Guide
The Genio DTB - HDMI to MIPI converts the input HDMI signal into MIPI signals (video part) and I2S signals (audio part) for output. To utilize this functionality, connect the Genio DTB to the Genio EVK Board via the CSI socket. The MIPI and I2S signals will then enter the Genio EVK Board through the CSI socket and be displayed on the external monitors connected to the Genio EVK Board. This chapter provides a comprehensive usage example for reference.
Warning
When plugging or unplugging the Genio DTB, please make sure that the Genio EVK Board is in the power off state to avoid damage to the Genio DTB circuit.
Hardware
Genio DTB - HDMI to MIPI with firmware flashed
Genio EVK Board
HDMI signal generator
Streaming Steps
Step 1. Flash image with LT6911UXE DTBO
Genio 510/700-EVK supports using dual Genio DTB - HDMI to MIPI at the same time. Genio 1200-EVK only supports a single path. Please load the corresponding DTBO according to the configuration you want to use.
on Genio 510/700-EVK
Single path
genio-flash --load-dtbo gpu-mali.dtbo --load-dtbo video.dtbo --load-dtbo camera-lt6911uxe-csi0-std.dtboDual path
genio-flash --load-dtbo gpu-mali.dtbo --load-dtbo video.dtbo --load-dtbo camera-lt6911uxe-dual-std.dtbo
on Genio 1200-EVK
Single path
genio-flash --load-dtbo gpu-mali.dtbo --load-dtbo video.dtbo --load-dtbo camera-lt6911uxe-csi0-std.dtbo
Step 2. Check the media node
Use
v4l2-ctlto confirm which media node corresponds to the Genio DTB. You can see/dev/mediaXundermtk-cam (platform:16000000.camisp).v4l2-ctl --list-deviceUse
media-ctl -pon the Genio DTB’s media node to further confirm the sensor’s device node, as well as the input and output ports used when linking the sensor -> seninf -> camsv. (seninfstands for sensor interface, andcamsvstands for camera simultaneous virtual channel.)media-ctl -d /dev/media1 -p | grep lt6911 -A 2Step 3. Set the stream link
Use
media-ctlto configure the links between the sensor, seninf, and camsv.on Genio 510/700-EVK
Single path
media-ctl -d /dev/media1 -l "'mtk-cam camsv-0':1 -> 'mtk-cam camsv-0 main-stream':0 [3]"
media-ctl -d /dev/media1 -l "'seninf-0':1 -> 'mtk-cam camsv-0':0 [5]"
media-ctl -d /dev/media1 -l "'lt6911uxe 5-002b':0 -> 'seninf-0':0 [1]"
Dual path
CSI0
media-ctl -d /dev/media1 -l "'mtk-cam camsv-0':1 -> 'mtk-cam camsv-0 main-stream':0 [3]"
media-ctl -d /dev/media1 -l "'seninf-0':1 -> 'mtk-cam camsv-0':0 [5]"
media-ctl -d /dev/media1 -l "'lt6911uxe 5-002b':0 -> 'seninf-0':0 [1]"

CSI1
media-ctl -d /dev/media1 -l "'mtk-cam camsv-1':1 -> 'mtk-cam camsv-1 main-stream':0 [3]"
media-ctl -d /dev/media1 -l "'seninf-1':1 -> 'mtk-cam camsv-1':0 [5]"
media-ctl -d /dev/media1 -l "'lt6911uxe 3-002b':0 -> 'seninf-1':0 [1]"
on Genio 1200-EVK
Single path
media-ctl -d /dev/media1 -l "'mtk-cam camsv-0':1 -> 'mtk-cam camsv-0 main-stream':0 [3]"
media-ctl -d /dev/media1 -l "'seninf-0':1 -> 'mtk-cam camsv-0':0 [5]"
media-ctl -d /dev/media1 -l "'lt6911uxe 0-002b':0 -> 'seninf-0':0 [1]"
Step 4. Set DV timing
The table below lists the resolutions supported by the LT6911UXE. In the last column of the table, the indexes are mapping to the timing set, which should be specified in the command.
LT6911UXE Resolutions Table Resolution
Frame Rate (Hz)
Pixel Clock (Hz)
Index
3840*2160
30.00
297000000
89
1920*1080
60.00
148500000
12
1280*720
60.00
74250000
7
720*480
60.00
27000000
1
The below command sets the digital video timing based on a predefined index. The index corresponds to a specific video format or resolution and timing parameter set. For instance,
index=89represents the timing set for the resolution of 3840x2160p at 30.00 Hz.Please set the timing according to the resolution of the HDMI signal source.
on Genio 510/700-EVK
Single path
v4l2-ctl -d /dev/v4l-subdev1 --set-dv-bt-timing index=89Dual path
CSI0
v4l2-ctl -d /dev/v4l-subdev3 --set-dv-bt-timing index=89

CSI1
v4l2-ctl -d /dev/v4l-subdev1 --set-dv-bt-timing index=89
on Genio 1200-EVK
Single path
v4l2-ctl -d /dev/v4l-subdev1 --set-dv-bt-timing index=89
Step 5. Set the format
Based on the configured timing, set the format for the sensor, seninf, and camsv. If you want to change the resolution, please edit the content of
[fmt:UYVY8_1x16/????x????]in the command.on Genio 510/700-EVK
Single path
media-ctl -d /dev/media1 -V "'lt6911uxe 5-002b':0 [fmt:UYVY8_1X16/3840x2160]"
media-ctl -d /dev/media1 -V "'seninf-0':1 [fmt:UYVY8_1X16/3840x2160]"
media-ctl -d /dev/media1 -V "'mtk-cam camsv-0':1 [fmt:UYVY8_1X16/3840x2160]"
Dual path
CSI0
media-ctl -d /dev/media1 -V "'lt6911uxe 5-002b':0 [fmt:UYVY8_1X16/3840x2160]"
media-ctl -d /dev/media1 -V "'seninf-0':1 [fmt:UYVY8_1X16/3840x2160]"
media-ctl -d /dev/media1 -V "'mtk-cam camsv-0':1 [fmt:UYVY8_1X16/3840x2160]"

CSI1
media-ctl -d /dev/media1 -V "'lt6911uxe 3-002b':0 [fmt:UYVY8_1X16/3840x2160]"
media-ctl -d /dev/media1 -V "'seninf-1':1 [fmt:UYVY8_1X16/3840x2160]"
media-ctl -d /dev/media1 -V "'mtk-cam camsv-1':1 [fmt:UYVY8_1X16/3840x2160]"
on Genio 1200-EVK
Single path
media-ctl -d /dev/media1 -V "'lt6911uxe 0-002b':0 [fmt:UYVY8_1X16/3840x2160 field:none]"
media-ctl -d /dev/media1 -V "'seninf-0':1 [fmt:UYVY8_1X16/3840x2160 field:none]"
media-ctl -d /dev/media1 -V "'mtk-cam camsv-0':1 [fmt:UYVY8_1X16/3840x2160 field:none]"
Step 6. Check the video number
The below command is used to obtain the video device node number of multiple entities using the
media-ctland store this result in an array name video.In this way, when you use the device, you only need to read the content in the video array to get that video device node number.
declare -a video=($(for i in {0..5}; do media-ctl -d /dev/media1 --entity "mtk-cam camsv-$i main-stream"; done | tr "\n" " "))Step 7. Start streaming
This is the example command for starting the streaming process using GStreamer.
on Genio 510/700-EVK
Single path
gst-launch-1.0 -v v4l2src device=${video[0]} ! video/x-raw,width=3840,height=2160,format=UYVY ! v4l2convert output-io-mode=dmabuf-import ! video/x-raw,width=3840,height=2160 ! waylandsink sync=false fullscreen=trueDual path
gst-launch-1.0 -v v4l2src device=${video[0]} ! video/x-raw,width=3840,height=2160,format=UYVY ! v4l2convert output-io-mode=dmabuf-import ! video/x-raw,width=640,height=480 ! waylandsink sync=false & gst-launch-1.0 -v v4l2src device=${video[1]} ! video/x-raw,width=3840,height=2160,format=UYVY ! v4l2convert output-io-mode=dmabuf-import ! video/x-raw,width=640,height=480 ! waylandsink sync=false
on Genio 1200-EVK
Single path
gst-launch-1.0 -v v4l2src device=${video[0]} ! video/x-raw,width=3840,height=2160,format=UYVY ! v4l2convert output-io-mode=dmabuf-import ! video/x-raw,width=3840,height=2160 ! waylandsink sync=false fullscreen=true
This is an example of streaming with audio output to an HDMI device.
Note
AV sync streaming is only available in single path mode; dual path mode does not support audio output.
on Genio 510/700-EVK
Single path
gst-launch-1.0 -v v4l2src device=${video[0]} ! video/x-raw,width=3840,height=2160,format=UYVY ! v4l2convert output-io-mode=dmabuf-import ! video/x-raw,width=3840,height=2160 ! waylandsink sync=false fullscreen=true alsasrc device=i2s_in ! audio/x-raw,channels=2,format=S32LE,rate=48000 ! alsasink device=hw:0,0
on Genio 1200-EVK
Single path
gst-launch-1.0 -v v4l2src device=${video[0]} ! video/x-raw,width=3840,height=2160,format=UYVY ! v4l2convert output-io-mode=dmabuf-import ! video/x-raw,width=3840,height=2160 ! waylandsink sync=false fullscreen=true alsasrc device=i2s_in ! audio/x-raw,channels=2,format=S32LE,rate=48000 ! alsasink device=hw:0,0
The Genio EVK Board and driver implementation do not support resolution changes during streaming. To change the resolution, please stop the streaming first, then reset the DV timing and format before resuming the stream.