Genio 520/720-EVK
This page provides board-specific information on the display interfaces of the Genio 520-EVK and Genio 720-EVK. Both EVKs use the same image. For common display and compositor information, please visit the Display page.
Display Interfaces on Genio 520/720-EVK
IoT Yocto supports four display interfaces on Genio 520/720-EVK:
DSI with DSI Panel
STARTEK KD070FHFID078DisplayPort(DP) through USB Type-C port
Embedded Display Port(eDP) with eDP Panel
INNOLUX HK173VB-01BLVDS with LVDS Panel
KOE TX18D204VM0BAA
Note
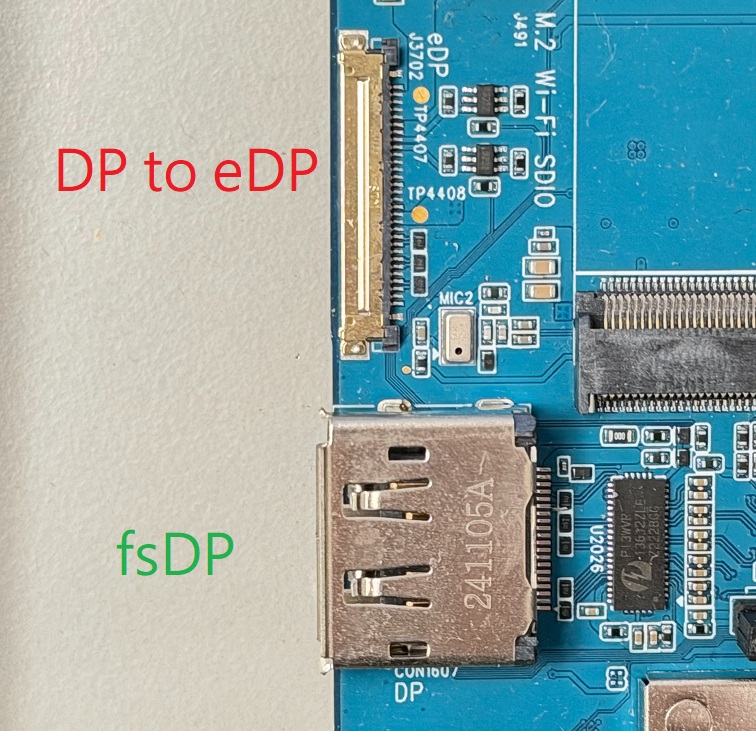
For P3 EVKs, the DP port is provided as fsDP (full-size DP) instead of USB Type-C, and the eDP interface is tested with the panel
AUO G156HAN03.Also for P3 EVKs, there is an additional eDP interface alongside the fsDP port, which is intended for DP output to eDP and can be controlled by a switch on the EVK. However, this configuration is not currently supported.
The display system VDOSYS0 has two different pipelines - that can be used for any of the dual display combinations. These pipelines are abstracted as different crtc in the DRM framework.
Each pipeline provides 3840x2160, 60Hz refresh rate.
Default rity-demo-image enables single display DSI. Other display combinations can be enabled by loading the device tree overlay during the flash programming process.
|
|
|
|---|---|---|
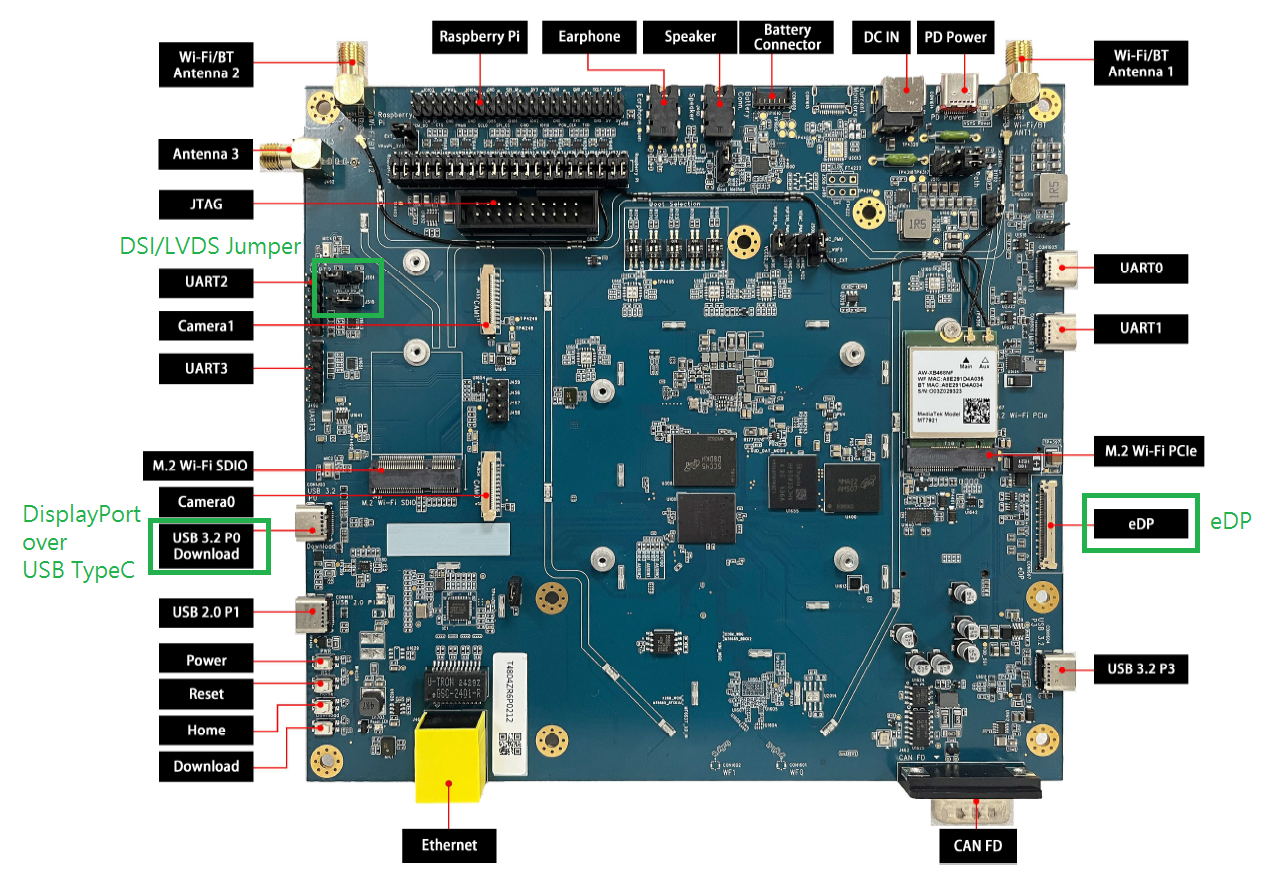
top view without DSI panel installed (showing eDP, DPoC, DSI/LVDS jumper) |
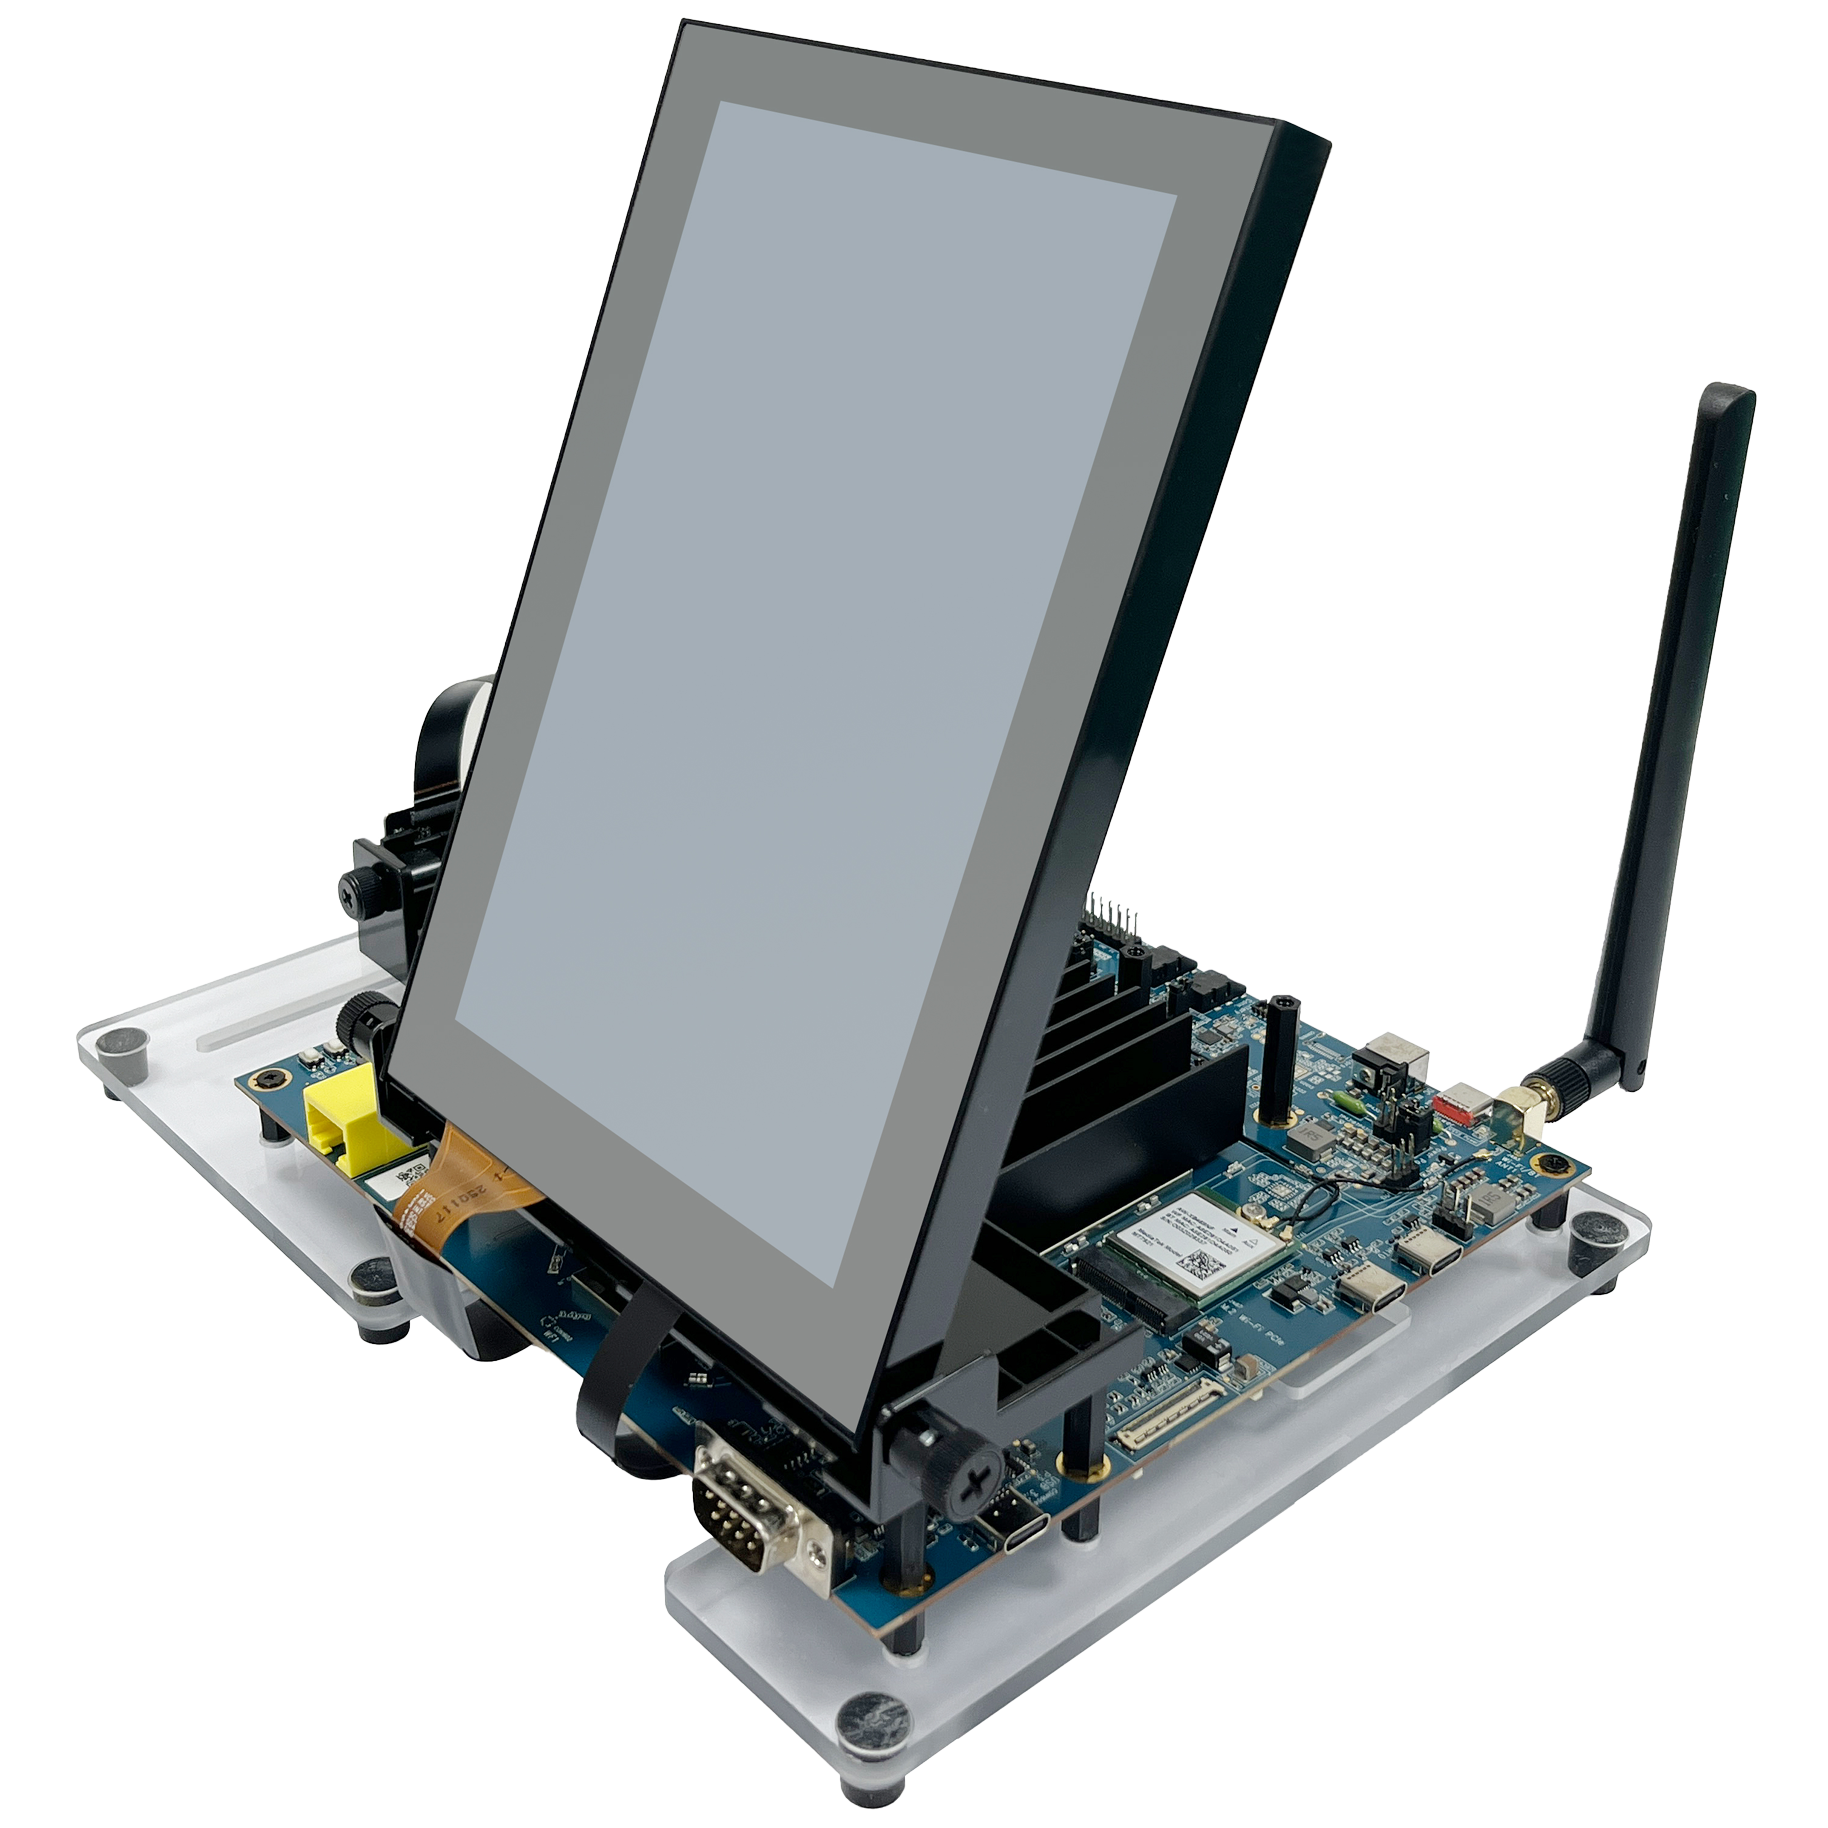
side view with DSI panel installed |
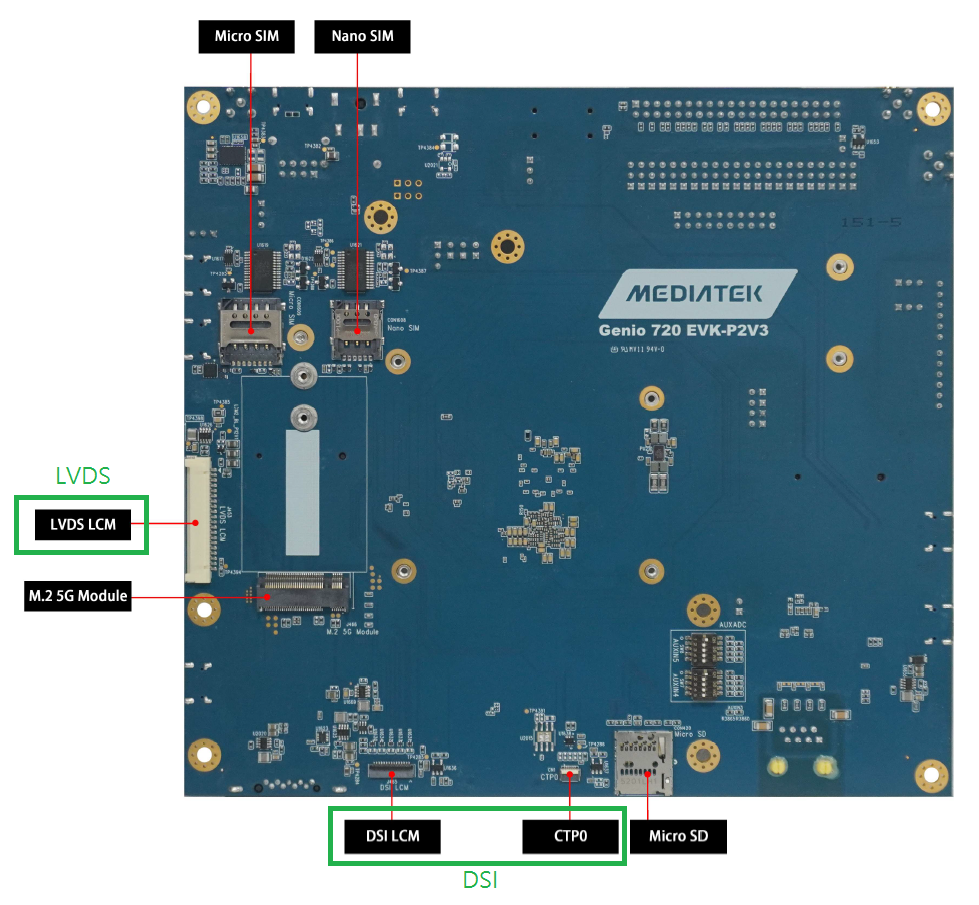
bottom view without DSI panel installed (showing DSI, LVDS) |
Note
The LVDS connector shares the same data lanes with the DSI connector, so only one of them can be used at the same time. Check LVDS for hardware setup instructions.
Lists of Display Device Tree Overlay
Starting from v25, none of the EVK default DTS files enable any display interfaces; loading the relevant DTBOs is required to enable them.
For the G720 EVK, the default configuration loads display-dsi.dtbo.
$ genio-flash -i rity-demo-image
    Genio Tools: v1.7.0a1
    Yocto Image:
    ...
    machine:  genio-720-evk
    overlays: ['apusys.dtbo', 'emmc.dtbo', 'video.dtbo', 'display-dsi.dtbo']
If you do not need display-dsi.dtbo, use the unload-dtbo option to remove the default display-dsi.dtbo.
$ genio-flash -i rity-demo-image --unload-dtbo display-dsi.dtbo
    Genio Tools: v1.7.0a1
    Yocto Image:
    ...
    machine:  genio-720-evk
    overlays: ['apusys.dtbo', 'emmc.dtbo', 'video.dtbo']
Here are lists of all available display combination device tree overlays and description link of each one:
dtbo |
Description |
|---|---|
|
dtbo |
Description |
|---|---|
No need dtbo |
dtbo |
Description |
|---|---|
|
|
|
|
|
|
|
dtbo |
Description |
|---|---|
|
|
|
|
|
|
|
|
|
DSI
DSI is the default display interface for the prebuilt rity-demo-image. A DSI panel is pre-connected to G520/G720 EVK. Flash the board with:
$ genio-flash -i rity-demo-image
    Genio Tools: v1.7.0a1
    Yocto Image:
    ...
    machine:  genio-720-evk
    overlays: ['apusys.dtbo', 'emmc.dtbo', 'video.dtbo', 'display-dsi.dtbo']
As shown in the example above, display-dsi.dtbo is loaded by default.
After boot into the console you can use modeprint mediatek command to check if DSI port have been properly configured:
root@genio-720-evk:~# modeprint mediatek
Starting test
Resources

count_connectors : 1
count_encoders   : 1
count_crtcs      : 2
count_fbs        : 0

Connector: DSI-1
        id             : 32
        encoder id     : 31
        conn           : connected
        size           : 95x151 (mm)
        count_modes    : 1
        count_props    : 5
        props          : 1 2 5 6 4
        count_encoders : 1
        encoders       : 31
Mode: "1200x1920" 1200x1920 60
The associated display data pipeline can process up to 2.5K(2560 x 1600) with 60Hz refresh rate for DSI.
Headless
Headless means that Yocto works without enabling any physical display connector.
There is a virtual display at /dev/dri/renderD128 prepared for offline rendering.
To enable Headless, remove the overlay file display-dsi.dtbo during flashing process:
genio-flash -i rity-demo-image --unload-dtbo display-dsi.dtbo
If you don’t want to re-flash the entire root file system, you can simply update the overlay configuration with:
genio-flash -i rity-demo-image --unload-dtbo display-dsi.dtbo kernel mmc0boot1
After boot into the console you will see the following error log which is because there is no physical display for Weston desktop rendering
[FAILED] Failed to start Weston, a compositor, as a system service.
See 'systemctl status weston.service' for details.
You can use modeprint mediatek command to check if headless has been properly configured by checking if connector count equals 0:
root@genio-720-evk:~# modeprint mediatek
Starting test
Resources

count_connectors : 0
count_encoders   : 0
eDP
To enable eDP as the only display connector, load the overlay file display-edp-4k.dtbo during flashing process:
genio-flash -i rity-demo-image --unload-dtbo display-dsi.dtbo --load-dtbo display-edp-4k.dtbo
If you don’t want to re-flash the entire root file system, you can simply update the overlay configuration with:
genio-flash -i rity-demo-image --unload-dtbo display-dsi.dtbo --load-dtbo display-edp-4k.dtbo kernel mmc0boot1
After boot into the console you can use modeprint mediatek command to check if eDP port have been properly configured:
root@genio-720-evk:~# modeprint mediatek
Starting test
Resources

count_connectors : 1
count_encoders   : 1
count_crtcs      : 2
count_fbs        : 0

Connector: eDP-1
        id             : 32
        encoder id     : 31
        conn           : connected
        size           : 279x174 (mm)
        count_modes    : 2
        count_props    : 5
        props          : 1 2 5 6 4
        count_encoders : 1
        encoders       : 31
Mode: "3840x2160" 3840x2160 60
Mode: "3840x2160" 3840x2160 60
The associated display data pipeline can process up to 4K(3840 x 2160) with 60Hz refresh rate for eDP.
On the other hand, if you are using a P3 EVK, you can load display-edp-fhd.dtbo to enable support for the AUO G156HAN03 eDP panel.
DP
To enable DP as the only display connector, load the overlay file display-dpoc.dtbo during flashing process:
genio-flash -i rity-demo-image --unload-dtbo display-dsi.dtbo --load-dtbo display-dpoc.dtbo
If you don’t want to re-flash the entire root file system, you can simply update the overlay configuration with:
genio-flash -i rity-demo-image --unload-dtbo display-dsi.dtbo --load-dtbo display-dpoc.dtbo kernel mmc0boot1
After boot into the console you can use modeprint mediatek command to check if DP port have been properly configured:
root@genio-720-evk:~# modeprint mediatek
Starting test
Resources

count_connectors : 1
count_encoders   : 1
count_crtcs      : 2
count_fbs        : 0

Connector: DP-1
        id             : 32
        encoder id     : 31
        conn           : connected
        size           : 720x390 (mm)
        count_modes    : 27
        count_props    : 5
        props          : 1 2 5 6 4
        count_encoders : 1
        encoders       : 31
Mode: "3840x2160" 3840x2160 60
Mode: "3840x2160" 3840x2160 30
...
The associated display data pipeline can process up to 4K(3840 x 2160) with 60Hz refresh rate for DP. On the other hand, if you are using a P3 EVK with a full-size DisplayPort (fsDP) connector, you can load display-dp.dtbo to enable support.
LVDS
To enable LVDS as the only display connector, load the overlay file display-lvds.dtbo during flashing process:
genio-flash -i rity-demo-image --unload-dtbo display-dsi.dtbo --load-dtbo display-lvds.dtbo
If you don’t want to re-flash the entire root file system, you can simply update the overlay configuration with:
genio-flash -i rity-demo-image --unload-dtbo display-dsi.dtbo --load-dtbo display-lvds.dtbo kernel mmc0boot1
After boot into the console you can use modeprint mediatek command to check if LVDS port have been properly configured:
root@genio-720-evk:~# modeprint mediatek
Starting test
Resources

count_connectors : 1
count_encoders   : 1
count_crtcs      : 2
count_fbs        : 0

Connector: LVDS-1
        id             : 32
        encoder id     : 31
        conn           : connected
        size           : 109x103 (mm)
        count_modes    : 1
        count_props    : 5
        props          : 1 2 5 6 4
        count_encoders : 1
        encoders       : 31
Mode: "1920x1080" 1920x1080 60
The associated display data pipeline can process up to FHD(1920 x 1080) with 60Hz refresh rate for LVDS.
DSI + eDP
You can configure the DSI + eDP combination with:
genio-flash -i rity-demo-image --load-dtbo display-edp-4k.dtbo
If you don’t want to re-flash the entire root file system, you can simply update the overlay configuration with:
genio-flash -i rity-demo-image --load-dtbo display-edp-4k.dtbo kernel mmc0boot1
After boot into the console you can use modeprint mediatek command to check if both DSI and eDP ports have been properly configured:
root@genio-720-evk:~# modeprint mediatek
Starting test
Resources

count_connectors : 2
count_encoders   : 2
count_crtcs      : 2
count_fbs        : 0

Connector: DSI-1
        id             : 32
        encoder id     : 31
        conn           : connected
        size           : 95x151 (mm)
        count_modes    : 1
        count_props    : 5
        props          : 1 2 5 6 4
        count_encoders : 1
        encoders       : 31
Mode: "1200x1920" 1200x1920 60
Connector: eDP-1
        id             : 34
        encoder id     : 33
        conn           : connected
        size           : 279x174 (mm)
        count_modes    : 2
        count_props    : 5
        props          : 1 2 5 6 4
        count_encoders : 1
        encoders       : 33
Mode: "3840x2160" 3840x2160 60
Mode: "3840x2160" 3840x2160 60
The associated display data pipeline can process up to 2.5K(2560 x 1600) with 60Hz refresh rate for DSI, and 4K(3840 x 2160) with 60Hz refresh rate for eDP.
DSI + DP
To enable DSI + DP, load the dtbo file display-dpoc.dtbo during flashing process:
genio-flash -i rity-demo-image --load-dtbo display-dpoc.dtbo
If you don’t want to re-flash the entire root file system, you can simply update the overlay configuration with:
genio-flash -i rity-demo-image --load-dtbo display-dpoc.dtbo kernel mmc0boot1
After boot into the console you can use modeprint mediatek command to check if both DSI and DP ports have been properly configured:
root@genio-720-evk:~# modeprint mediatek
Starting test
Resources

count_connectors : 2
count_encoders   : 2
count_crtcs      : 2
count_fbs        : 0

Connector: DSI-1
        id             : 32
        encoder id     : 31
        conn           : connected
        size           : 95x151 (mm)
        count_modes    : 1
        count_props    : 5
        props          : 1 2 5 6 4
        count_encoders : 1
        encoders       : 31
Mode: "1200x1920" 1200x1920 60
Connector: DP-1
        id             : 34
        encoder id     : 33
        conn           : connected
        size           : 600x340 (mm)
        count_modes    : 33
        count_props    : 5
        props          : 1 2 5 6 4
        count_encoders : 1
        encoders       : 33
Mode: "3840x2160" 3840x2160 60
Mode: "3840x2160" 3840x2160 30
...
The associated display data pipeline can process up to 2.5K(2560 x 1600) with 60Hz refresh rate for DSI, and 4K(3840 x 2160) with 60Hz refresh rate for DP.
LVDS + eDP
You can configure the LVDS + eDP combination with:
genio-flash -i rity-demo-image --unload-dtbo display-dsi.dtbo --load-dtbo display-lvds.dtbo --load-dtbo display-edp-4k.dtbo
If you don’t want to re-flash the entire root file system, you can simply update the overlay configuration with:
genio-flash -i rity-demo-image --unload-dtbo display-dsi.dtbo --load-dtbo display-lvds.dtbo --load-dtbo display-edp-4k.dtbo kernel mmc0boot1
After boot into the console you can use modeprint mediatek command to check if both LVDS and eDP ports have been properly configured:
root@genio-720-evk:~# modeprint mediatek
Starting test
Resources

count_connectors : 2
count_encoders   : 2
count_crtcs      : 2
count_fbs        : 0

Connector: eDP-1
        id             : 32
        encoder id     : 31
        conn           : connected
        size           : 279x174 (mm)
        count_modes    : 2
        count_props    : 5
        props          : 1 2 5 6 4
        count_encoders : 1
        encoders       : 31
Mode: "3840x2160" 3840x2160 60
Mode: "3840x2160" 3840x2160 60
Connector: LVDS-1
        id             : 34
        encoder id     : 33
        conn           : connected
        size           : 109x103 (mm)
        count_modes    : 1
        count_props    : 5
        props          : 1 2 5 6 4
        count_encoders : 1
        encoders       : 33
Mode: "1920x1080" 1920x1080 60
The associated display data pipeline can process up to FHD(1920 x 1080) with 60Hz refresh rate for LVDS, and 4K(3840 x 2160) with 60Hz refresh rate for eDP.
LVDS + DP
You can configure the LVDS + DP combination with:
genio-flash -i rity-demo-image --unload-dtbo display-dsi.dtbo --load-dtbo display-lvds.dtbo --load-dtbo display-dpoc.dtbo
If you don’t want to re-flash the entire root file system, you can simply update the overlay configuration with:
genio-flash -i rity-demo-image --unload-dtbo display-dsi.dtbo --load-dtbo display-lvds.dtbo --load-dtbo display-dpoc.dtbo kernel mmc0boot1
After boot into the console you can use modeprint mediatek command to check if both LVDS and HDMI ports have been properly configured:
root@genio-720-evk:~# modeprint mediatek
Starting test
Resources

count_connectors : 2
count_encoders   : 2
count_crtcs      : 2
count_fbs        : 0

Connector: LVDS-1
        id             : 36
        encoder id     : 35
        conn           : connected
        size           : 109x103 (mm)
        count_modes    : 1
        count_props    : 5
        props          : 1 2 5 6 4
        count_encoders : 1
        encoders       : 35
Mode: "1920x1080" 1920x1080 60
Connector: DP-1
        id             : 32
        encoder id     : 31
        conn           : connected
        size           : 720x390 (mm)
        count_modes    : 27
        count_props    : 5
        props          : 1 2 5 6 4
        count_encoders : 1
        encoders       : 31
Mode: "3840x2160" 3840x2160 60
Mode: "3840x2160" 3840x2160 30
...
The associated display data pipeline can process up to FHD(1920 x 1080) with 60Hz refresh rate for LVDS, and 4K(3840 x 2160) with 60Hz refresh rate for DP.
eDP + DP
You can configure the eDP + DP combination with:
genio-flash -i rity-demo-image --unload-dtbo display-dsi.dtbo --load-dtbo display-edp-4k.dtbo --load-dtbo display-dpoc.dtbo
If you don’t want to re-flash the entire root file system, you can simply update the overlay configuration with:
genio-flash -i rity-demo-image --unload-dtbo display-dsi.dtbo --load-dtbo display-edp-4k.dtbo --load-dtbo display-dpoc.dtbo
After boot into the console you can use modeprint mediatek command to check if both eDP and DP ports have been properly configured:
root@genio-720-evk:~# modeprint mediatek
Starting test
Resources

count_connectors : 2
count_encoders   : 2
count_crtcs      : 2
count_fbs        : 0

Connector: eDP-1
        id             : 32
        encoder id     : 31
        conn           : connected
        size           : 279x174 (mm)
        count_modes    : 2
        count_props    : 5
        props          : 1 2 5 6 4
        count_encoders : 1
        encoders       : 31
Mode: "3840x2160" 3840x2160 60
Mode: "3840x2160" 3840x2160 60
Connector: DP-1
        id             : 34
        encoder id     : 33
        conn           : connected
        size           : 600x340 (mm)
        count_modes    : 33
        count_props    : 5
        props          : 1 2 5 6 4
        count_encoders : 1
        encoders       : 33
Mode: "3840x2160" 3840x2160 60
Mode: "3840x2160" 3840x2160 30
...
The associated display data pipeline can process up to 4K(3840 x 2160) with 60Hz refresh rate for eDP, and 4K(3840 x 2160) with 60Hz refresh rate for DP.
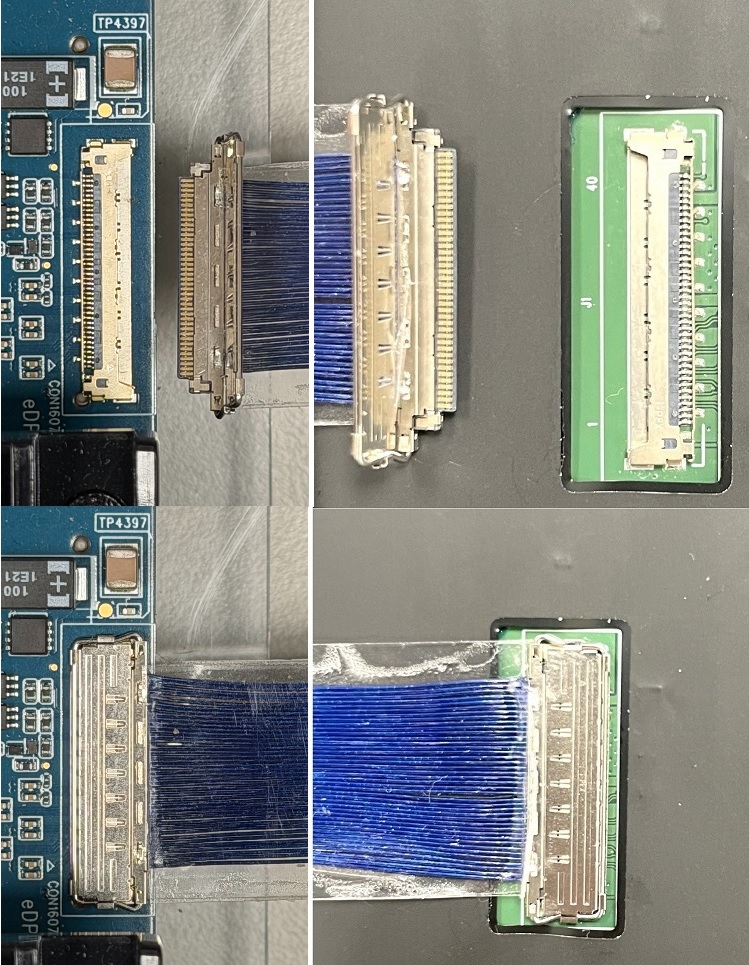
Hardware Setup for eDP
The prebuilt rity-demo-image supports INNOLUX HK173VB-01B panel with an eDP cable, as shown below:

Please always use this associated cable to connect to the panel. Connect either side to the Genio 520/720-EVK board and to the panel, as shown below:
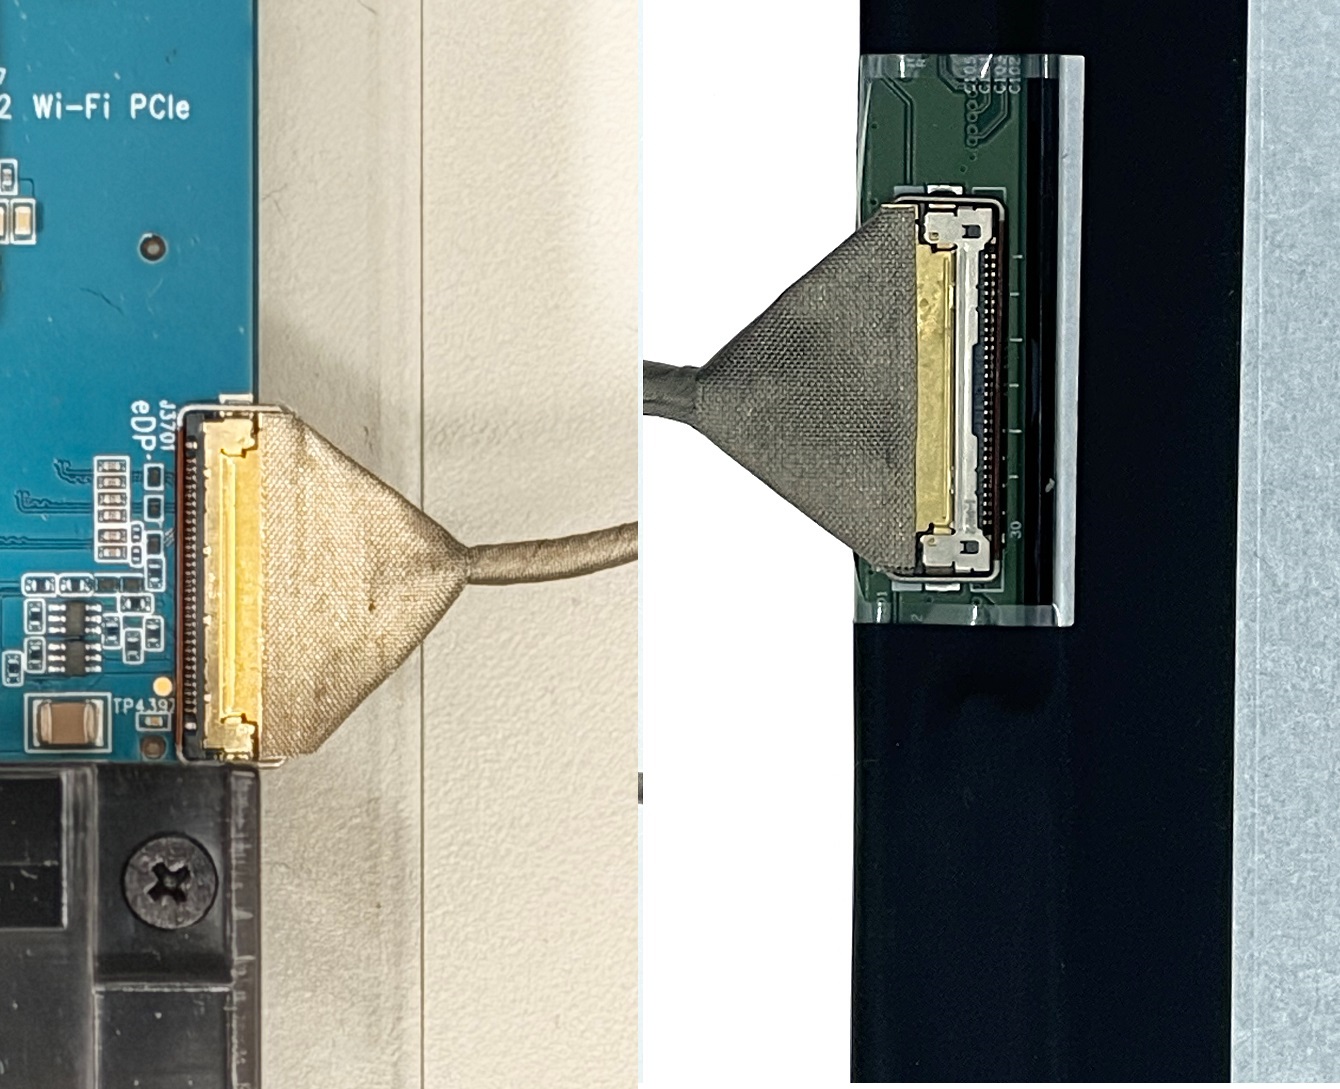
The prebuilt rity-demo-image also supports AUO G156HAN03 panel with an eDP cable on P3 EVK, as shown below:
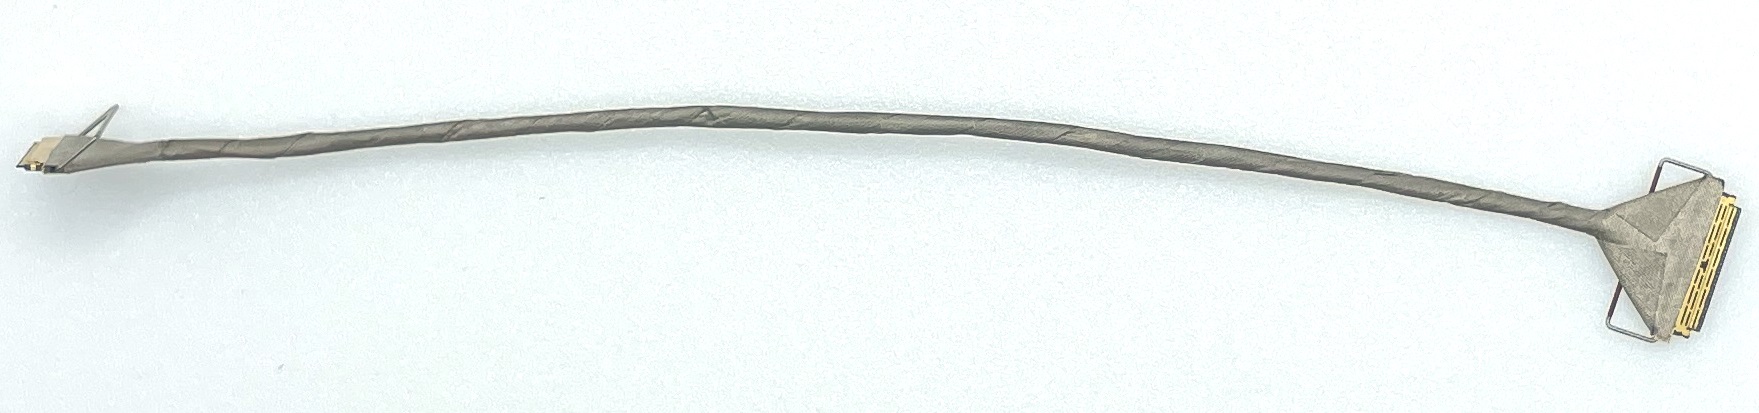
Please always use this associated cable to connect to the panel. Connect either side to the Genio 520/720-EVK P3 board and to the panel, as shown below:
Note
The eDP panel
INNOLUX HK173VB-01Bis the same panel used on Genio 1200-EVK.The eDP panel
AUO G156HAN03is the same panel used on Genio 510/700-EVK.
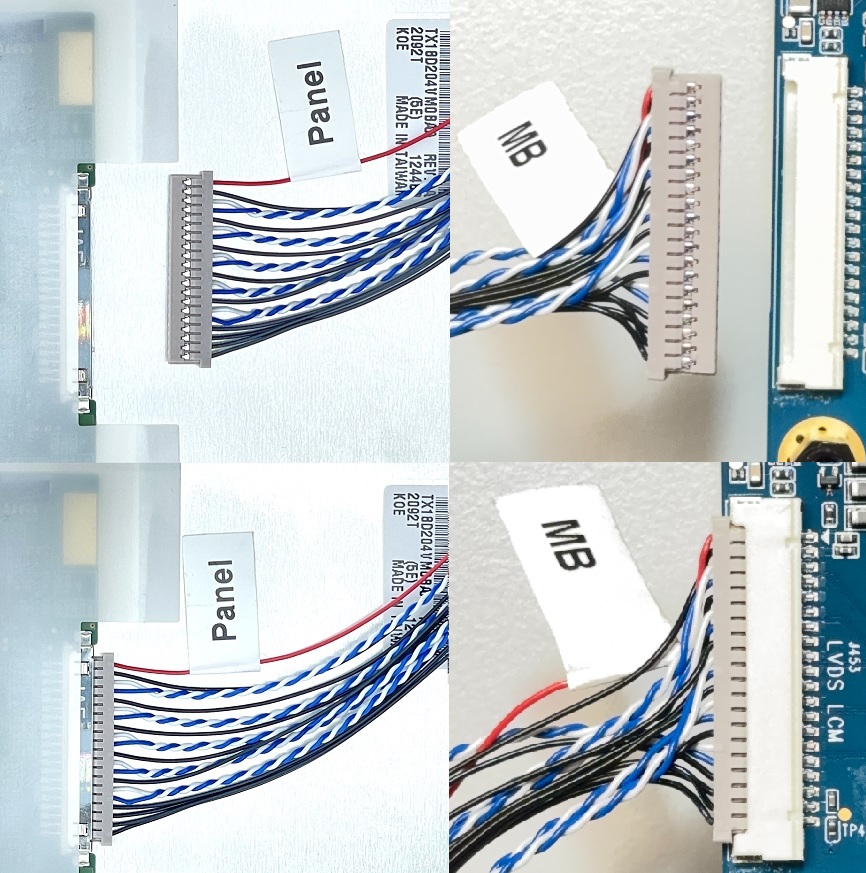
Hardware Setup for LVDS
The prebuilt rity-demo-image supports KOE TX18D204VM0BAA panel with a LVDS cable, as shown below:
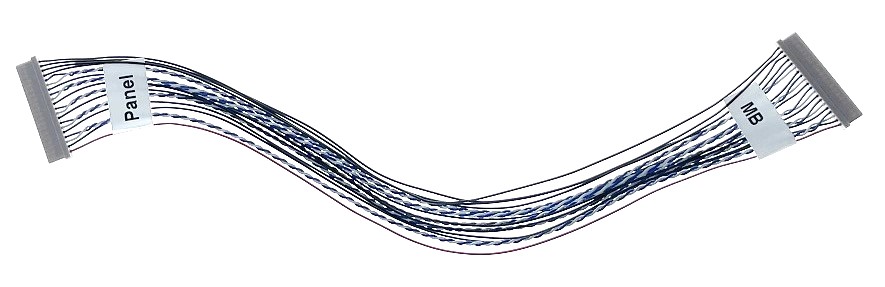
Please always use this associated cable to connect to the panel. Connect either side to the Genio 520/720-EVK board and to the panel, as shown below:
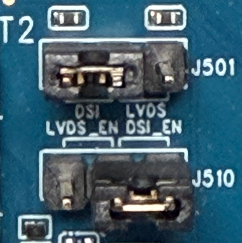
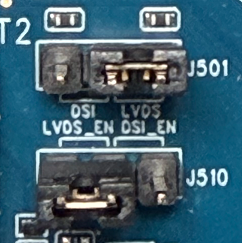
Note
Two jumpers, J501 and J510, on the EVK must be adjusted to enable either DSI or LVDS
|
|
|---|---|
Jumper settings to enable DSI |
Jumper Settings to enable LVDS |
Note
The LVDS panel
KOE TX18D204VM0BAAis the same panel used on Genio 1200-EVK.