Flash Genio 350-EVK
This guide shows how to “flash”(write) the image you have built into the non-volatile flash memory of Genio 350-EVK. The flashing process is performed over a USB connection between the target board and the host computer containing the image.
In order to write the on-board storage with AIoT Tools, you need to set the SoC in download mode, which allows AIoT Tools to transfer a download agent binary to the SRAM of SoC. The download agent then provides a fastboot interface for subsequent image transfer and storage write operations.
Note
Make sure you have install AIoT tools on your Linux or Windows host before continuing the process.
Step 1. Connect board to host PC
Connect power to the board. On Genio 350-EVK, plug the 12V power jack to the DC IN port.
Find the USB0 port on Genio 350-EVK, and connect it to host PC with a micro-USB cable.
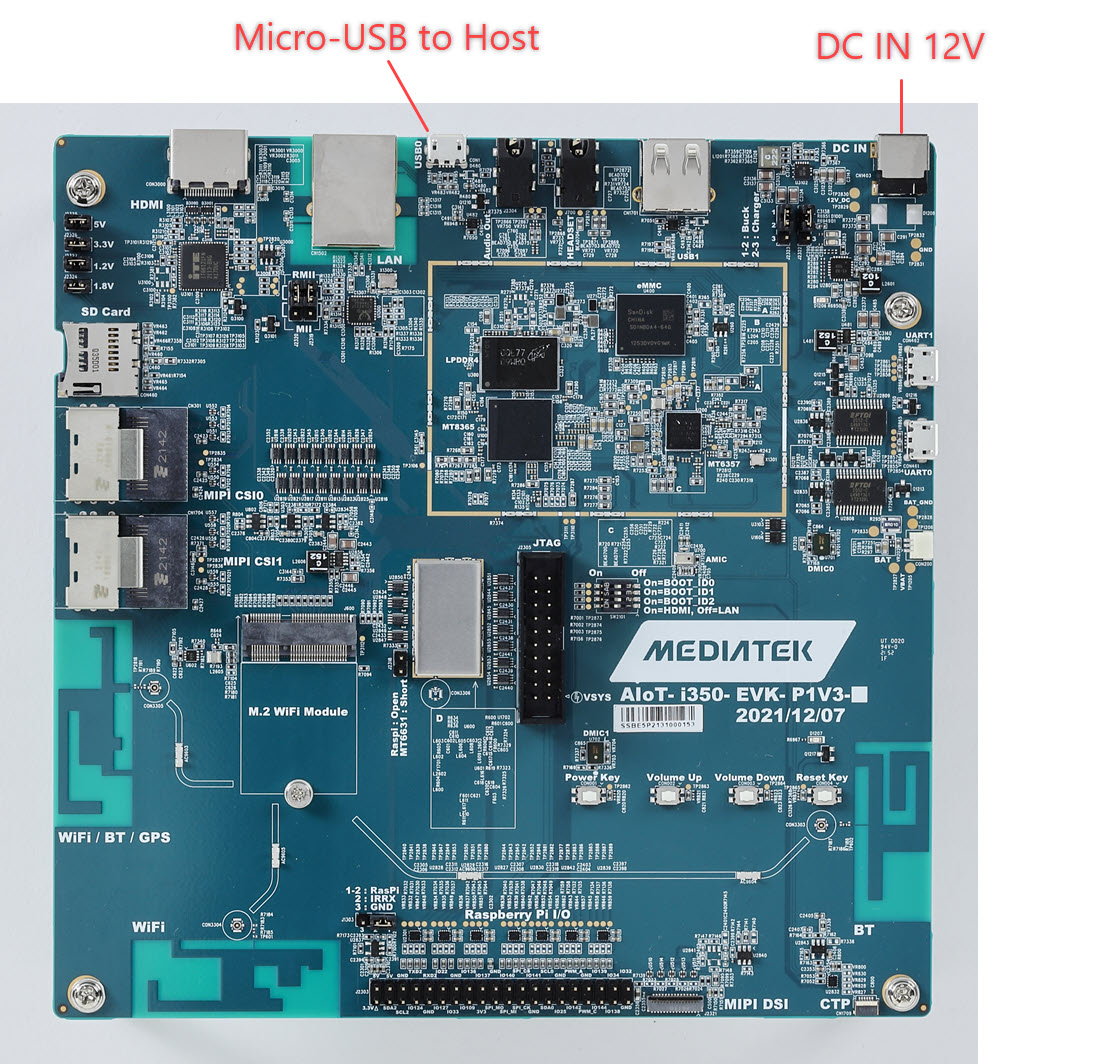
Connect to USB0 and DC IN port to host PC
Note
Make sure you connect to the USB0 port of the board. They can be confused with UART ports, which are also micro-USB ports on many boards.
Step 2. Launch genio-flash Tool
Change working folder to the image directory before running the genio-flash commands:
cd $BUILD_DIR/tmp/deploy/images/genio-350-evk
BUILD_DIR variable set will be set within the chapter here.
Choose Board Device Tree Overlays
Before flashing the board, check if there are certain board features you’d like to enable:
genio-flash --list-dtbo
List of available DTBO:
    - camera-ap1302-ar0430-dual.dtbo
    - camera-ap1302-ar0430-single-csi0.dtbo
    - camera-ap1302-ar0430-single-csi1.dtbo
    - net-ethernet.dtbo
    - panel-startek-kd070fhfid015.dtbo
    - gpu-mali.dtbo
    - video.dtbo
The default configuration is:
HDMI is enabled, which disables ethernet.
DSI LCM is disabled.
Cameras are disabled.
Please note:
Make sure you load the
gpu-mali.dtbo``and ``video.dtbo. GPU and video codec does not work if you omitting these overlays.DPI-to-HDMI and Ethernet are mutually exclusive on Genio 350-EVK.
Once you enables DSI LCM, HDMI port does not work if the LCM panel is not attached.
Flash Image with Selected Overlays
To use the default configuration, run the following commands:
genio-flash --load-dtbo gpu-mali.dtbo --load-dtbo video.dtbo
The additional board features are device tree overlays. You can load multiple overlays by adding multiple --load-dtbo parameters.
To enable DSI LCM, and to enable ethernet, which disables HDMI:
genio-flash --load-dtbo panel-startek-kd070fhfid015.dtbo --load-dtbo net-ethernet.dtbo
To enable CSI0 camera, Ethernet, and the StarTek DSI LCM:
genio-flash --load-dtbo camera-ap1302-ar0430-single-csi0.dtbo --load-dtbo net-ethernet.dtbo --load-dtbo panel-startek-kd070fhfid015.dtbo
Once you see Looking for a MediaTek SoC ... prompt, proceed to next step.
Step 3. Enter Download Mode
Follow these steps to make Genio 350-EVK enter download mode:
Press and keep pressing the volume up button
Press and release the reset button
Release the volume up button
Reset the board to enter download mode
You should see flashing process started after releasing the volume up button. A typical successful log looks like this:
AIoT Tools: v1.3.dev7+gcdbf6fc
Yocto Image:
        name:     Rity Demo Image (rity-demo-image)
        distro:   Rity Demo Layer 21.3-dev (rity-demo)
        codename: dunfell
        machine:  g350-evk
        overlays: []

Looking for MediaTek SoC matching USB device 0e8d:0003
Opening COM11 using baudate=115200
Connected to MediaTek MT8365 SoC
Sending bootstrap to address: 0x201000
Jumping to bootstrap at address 0x201000 in AArch64 mode
erasing mmc0
< waiting for any device >
Erasing 'mmc0'                                     (bootloader) request sz: 0x3a6800000, real erase len: 0x0
OKAY [  0.233s]
Finished. Total time: 0.238s
erasing mmc0boot0
Erasing 'mmc0boot0'                                (bootloader) request sz: 0x400000, real erase len: 0x400000
OKAY [  0.008s]
Finished. Total time: 0.015s
erasing mmc0boot1
Erasing 'mmc0boot1'                                (bootloader) request sz: 0x400000, real erase len: 0x400000
OKAY [  0.008s]
Finished. Total time: 0.013s
flashing mmc0=rity-demo-image-i500-pumpkin.wic.img
Sending sparse 'mmc0' 1/4 (239976 KB)              OKAY [ 28.000s]
Writing 'mmc0'                                     OKAY [ 16.079s]
Sending sparse 'mmc0' 2/4 (244076 KB)              OKAY [ 29.369s]
Writing 'mmc0'                                     OKAY [ 16.151s]
Sending sparse 'mmc0' 3/4 (259564 KB)              OKAY [ 31.091s]
Writing 'mmc0'                                     OKAY [ 18.437s]
Sending sparse 'mmc0' 4/4 (99296 KB)               OKAY [ 11.605s]
Writing 'mmc0'                                     OKAY [  6.882s]
Finished. Total time: 159.160s
flashing mmc0boot0=bl2.img
Sending 'mmc0boot0' (155 KB)                       OKAY [  0.025s]
Writing 'mmc0boot0'                                OKAY [  0.133s]
Finished. Total time: 0.186s
flashing mmc0boot1=u-boot-env.bin
Sending 'mmc0boot1' (4 KB)                         OKAY [  0.002s]
Writing 'mmc0boot1'                                OKAY [  0.061s]
Finished. Total time: 0.099s
Rebooting                                          OKAY [  0.002s]
Finished. Total time: 0.003s
Note
On most AIoT evaluation boards, the volume up button is connected to the KPCOL0 pin of the chip. If you have trouble finding the correct button, refer to the user guide or schematics of your board.
Flash Other Images
By default genio-flash will use the prefix rity-demo-image to search for files under image directory.
If you are building other images, use -i option to specify different prefix. For example:
genio-flash -i rity-bringup-image
Flash a Single Partition
During development, you might want to update a single partition instead of completely re-write the entire storage. For example, after modifying and rebuilding the kernel image, it is much faster to just flash the fitImage.
There are 4 partitions that can be updated individually on open SDK: mmc0boot0, mmc0boot1, bootloaders, kernel.
The mmc0 and rootfs partitions do not support individual updates.
To flash just one partition, you can run the following command:
cd $BUILD_DIR/tmp/deploy/images/genio-350-evk
genio-flash <partition_name>
genio-flash kernel # example to update kernel partition
The following table shows common <partition> and <file> used in rity-demo-image:
Partition |
File |
|---|---|
mmc0 |
N/A |
mmc0boot0 |
bl2.img |
mmc0boot1 |
u-boot-env.bin |
bootloaders |
fip.bin |
kernel |
fitImage |
rootfs |
N/A |
Once you see Looking for a MediaTek SoC ... prompt, put the board into download mode. You should be able to see flashing process started after releasing the volume up button.
Troubleshooting the Driver (Windows Only)
Please refer to the chapter here: Missing “Yocto” Device Driver (Windows Only).