Camera
Introduction
This chapter describes the common information and instructions for the camera on IoT Yocto, such as setting camera hardware/software, launching the camera pipeline, etc. The camera on different platforms may have some platform-specific instructions or test results. For example, you will have different camera settings on other platforms. Please refer to the platform-specific section to find more details.
There are two software architectures supported on the Genio series EVK. One is MediaTek Imgsensor and another is V4L2 sensor.
MediaTek Imgsensor is mainly for driving the SoC-internal ISP to process the Bayer RAW sensor. It needs more sensor-level controls to support the advanced features.
V4L2 sensor provides a simpler way to use the V4L2 sensor driver. This is for the RAW/YUV sensor direct dump which doesn’t need any ISP processing.
The following tables and figures show all the supported sensors on each Genio series platform.
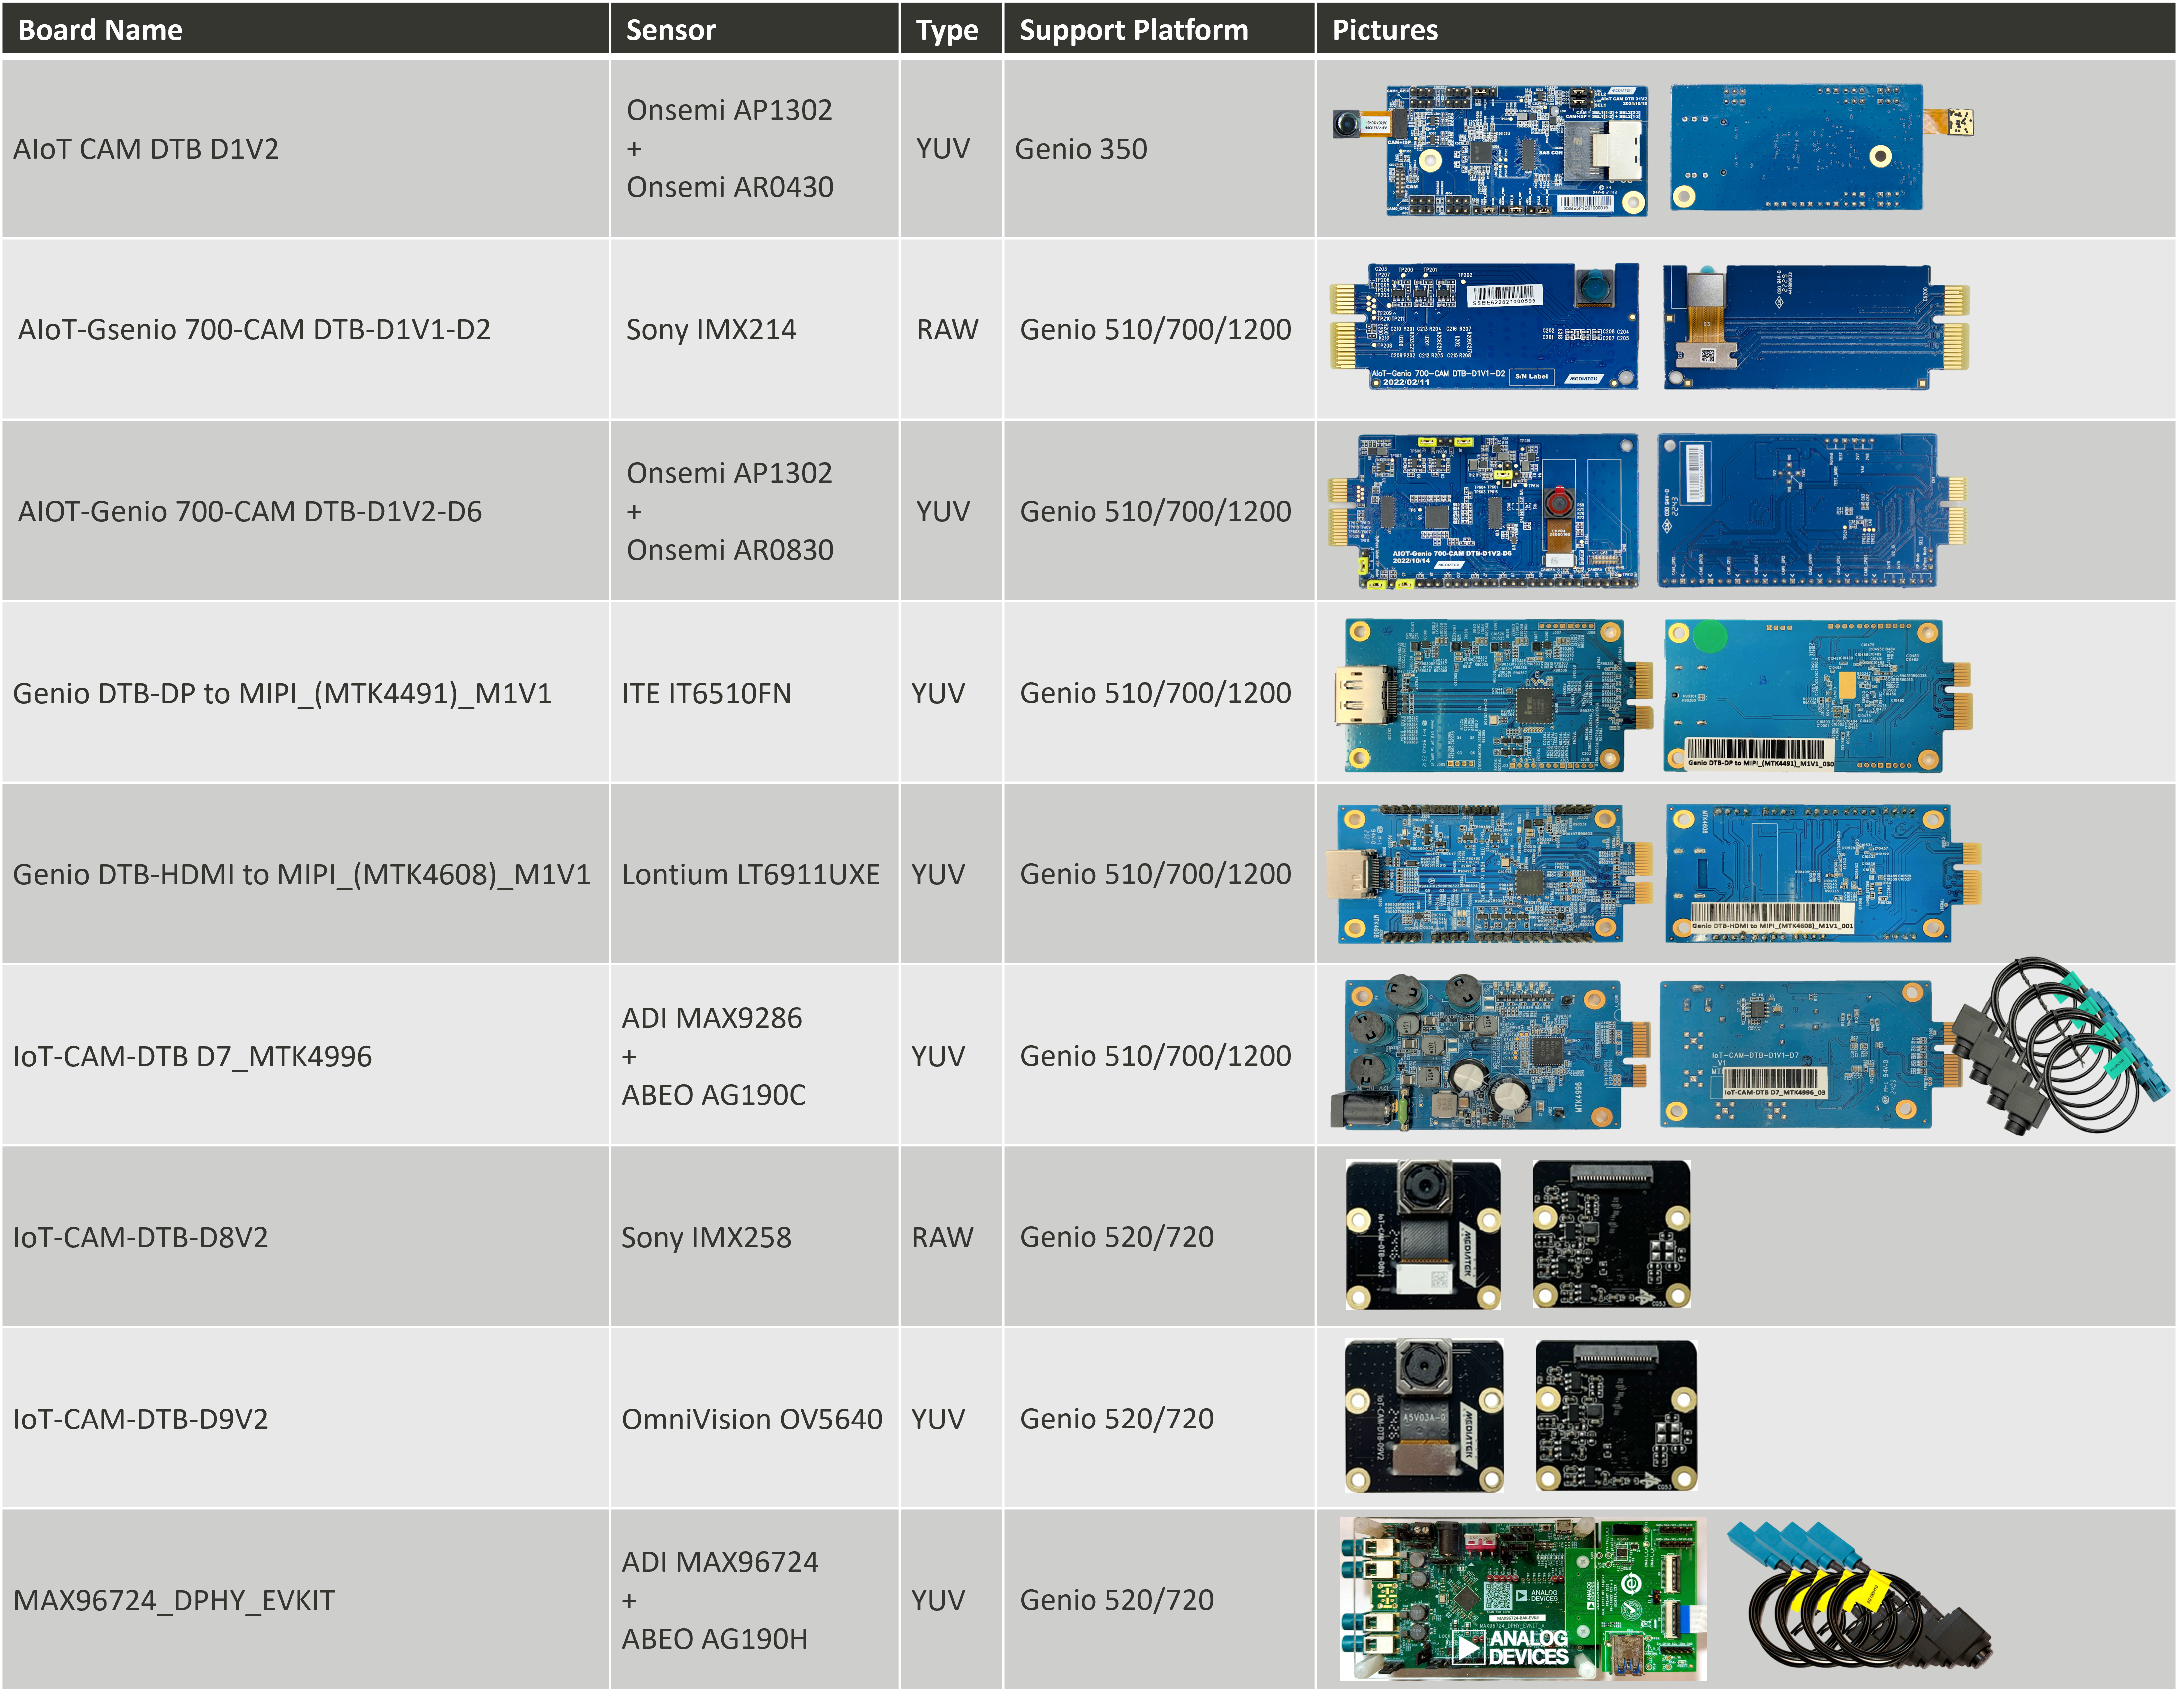
IoT Yocto Supported Camera Daughter Boards
Architecture |
Sensor |
Genio 350 |
Genio 510 |
Genio 700 |
Genio 1200 |
Genio 520 |
Genio 720 |
|---|---|---|---|---|---|---|---|
MediaTek Imgsensor |
RAW |
N/A |
Yes |
Yes |
Yes |
N/A |
N/A |
MediaTek Imgsensor |
YUV |
N/A |
Yes |
Yes |
Yes |
N/A |
N/A |
MediaTek Imgsensor |
RAW+YUV, YUV+YUV, RAW+RAW… |
N/A |
Yes |
Yes |
Yes (*1) |
N/A |
N/A |
MediaTek Imgsensor |
Virtual Channel (RAW) |
N/A |
N/A |
N/A |
N/A |
N/A |
N/A |
MediaTek Imgsensor |
Virtual Channel (YUV) |
N/A |
N/A |
N/A |
N/A |
N/A |
N/A |
V4L2 Sensor |
RAW |
Yes |
Yes |
Yes |
Yes |
Yes |
Yes |
V4L2 Sensor |
YUV |
Yes |
Yes |
Yes |
Yes |
Yes |
Yes |
V4L2 Sensor |
YUV+YUV |
Yes |
Yes |
Yes |
Yes (*2) |
Yes |
Yes |
V4L2 Sensor |
Virtual Channel (RAW) |
N/A |
N/A |
N/A |
N/A |
N/A |
N/A |
V4L2 Sensor |
Virtual Channel (YUV) |
N/A |
Yes (*3) |
Yes (*3) |
Yes (*4) |
Yes (*5) |
Yes (*5) |
(*1) Genio 1200 SoC shall support RAW+RAW, but cannot open multiple sensors simultaneously due to EVK design limitation.
(*2) Genio 1200 SoC shall support YUV+YUV, but cannot verify on EVK due to EVK design limitation.
(*3) Genio 510/700 SoC & EVK support up to 8 channels.
(*4) Genio 1200 SoC shall support up to 6 channels but can only verify 4 channels on EVK due to EVK design limitation.
(*5) Genio 520/720 SoC & EVK support up to 6 channels.
Platform |
CSI0 |
CSI1 |
DTBO |
Camera Arch |
Support Version |
|---|---|---|---|---|---|
Genio 350-EVK |
AR0430 |
x |
camera-ar0430-single-csi0.dtbo |
|
v24.1+ |
Genio 350-EVK |
x |
AR0430 |
camera-ar0430-single-csi1.dtbo |
|
v24.1+ |
Genio 350-EVK |
AR0430 |
AR0430 |
camera-ar0430-dual.dtbo |
|
v24.1+ |
Genio 350-EVK |
AP1302+ AR0430 |
x |
camera-ap1302-ar0430-single-csi0.dtbo |
|
v21.3+ |
Genio 350-EVK |
x |
AP1302+ AR0430 |
camera-ap1302-ar0430-single-csi1.dtbo |
|
v21.3+ |
Genio 350-EVK |
AP1302+ AR0430 |
AP1302+ AR0430 |
camera-ap1302-ar0430-dual.dtbo |
|
v21.3+ |
Platform |
CSI0 |
CSI1 |
DTBO |
Camera Arch |
Support Version |
|---|---|---|---|---|---|
Genio 510/700-EVK |
AP1302+ AR0830 |
x |
camera-ar0830-ap1302-csi0.dtbo |
|
(G700) v23.1+ (G510) v23.2+ |
Genio 510/700-EVK |
AP1302+ AR0830 (2 lane) |
x |
camera-ar0830-ap1302-2lanes-csi0.dtbo |
|
(G700) v23.1+ (G510) v23.2+ |
Genio 510/700-EVK |
x |
AP1302+ AR0830 |
camera-ar0830-ap1302-csi1.dtbo |
|
(G700) v23.1+ (G510) v23.2+ |
Genio 510/700-EVK |
AP1302+ AR0830 |
AP1302+ AR0830 |
camera-ar0830-ap1302-csi0-ar0830-ap1302-csi1.dtbo |
|
v24.0+ |
Genio 510/700-EVK |
AP1302+ AR0830 |
IMX214 |
camera-ar0830-ap1302-csi0-imx214-csi1.dtbo |
|
v24.0+ |
Genio 510/700-EVK |
IMX214 |
x |
camera-imx214-csi0.dtbo |
|
v24.0+ |
Genio 510/700-EVK |
IMX214 (2 lane) |
x |
camera-imx214-2lanes-csi0.dtbo |
|
v24.0+ |
Genio 510/700-EVK |
x |
IMX214 |
camera-imx214-csi1.dtbo |
|
v24.0+ |
Genio 510/700-EVK |
IMX214 |
IMX214 |
camera-imx214-csi0-imx214-csi1.dtbo |
|
v24.0+ |
Genio 510/700-EVK |
IMX214 |
AP1302+ AR0830 |
camera-imx214-csi0-ar0830-ap1302-csi1.dtbo |
|
v24.0+ |
Genio 510/700-EVK |
IMX214 |
x |
camera-imx214-csi0-std.dtbo |
|
v24.1+ |
Genio 510/700-EVK |
x |
IMX214 |
camera-imx214-csi1-std.dtbo |
|
v24.1+ |
Genio 510/700-EVK |
AP1302+ AR0830 |
x |
camera-ar0830-ap1302-csi0-std.dtbo |
|
v23.2+ |
Genio 510/700-EVK |
AP1302+ AR0830 |
AP1302+ AR0830 |
camera-ar0830-ap1302-dual-std.dtbo |
|
v23.2+ |
Genio 510/700-EVK |
AP1302+ AR0830 |
IT6510FN |
camera-ar0830-ap1302-csi0-it6510-csi1-std.dtbo |
|
v23.2+ |
Genio 510/700-EVK |
IT6510FN |
x |
camera-it6510-csi0-std.dtbo |
|
v23.2+ |
Genio 510/700-EVK |
IT6510FN |
IT6510FN |
camera-it6510-dual-std.dtbo |
|
v23.2+ |
Genio 510/700-EVK |
LT6911UXE |
x |
camera-lt6911uxe-csi0-std.dtbo |
|
v24.0+ |
Genio 510/700-EVK |
LT6911UXE |
LT6911UXE |
camera-lt6911uxe-dual-std.dtbo |
|
v24.0+ |
Genio 510/700-EVK |
MAX9286+AG190C |
x |
camera-ag190c-max9286-csi0-std.dtbo |
|
v24.0+ |
Genio 510/700-EVK |
MAX9286+AG190C |
MAX9286+AG190C |
camera-ag190c-max9286-dual-std.dtbo |
|
v24.0+ |
Platform |
CSI0 |
CSI1 |
CSI2 |
DTBO |
Camera Arch |
Support Version |
|---|---|---|---|---|---|---|
Genio 1200-EVK |
AP1302+ AR0830 |
x |
x |
camera-ar0830-ap1302-csi0.dtbo |
|
v23.0+ |
Genio 1200-EVK |
AP1302+ AR0830 (2 lane) |
x |
x |
camera-ar0830-ap1302-2lanes-csi0.dtbo |
|
v23.0+ |
Genio 1200-EVK |
x |
AP1302+ AR0830 |
x |
camera-ar0830-ap1302-csi1.dtbo |
|
v23.0+ |
Genio 1200-EVK |
x |
x |
AP1302+ AR0830 |
camera-ar0830-ap1302-csi2.dtbo |
|
v23.0+ |
Genio 1200-EVK |
AP1302+ AR0830 |
x |
AP1302+ AR0830 |
camera-ar0830-ap1302-csi0-ar0830-ap1302-csi2.dtbo |
|
v24.0+ |
Genio 1200-EVK |
IMX214 |
x |
x |
camera-imx214-csi0.dtbo |
|
v22.2+ |
Genio 1200-EVK |
IMX214 (2 lane) |
x |
x |
camera-imx214-2lanes-csi0.dtbo |
|
v22.2+ |
Genio 1200-EVK |
x |
IMX214 |
x |
camera-imx214-csi1.dtbo |
|
v22.2+ |
Genio 1200-EVK |
x |
x |
IMX214 |
camera-imx214-csi2.dtbo |
|
v22.2+ |
Genio 1200-EVK |
IMX214 |
x |
IMX214 |
camera-imx214-csi0-imx214-csi2.dtbo |
|
v24.0+ |
Genio 1200-EVK |
IMX214 |
AP1302+ AR0830 |
x |
camera-imx214-csi0-ar0830-ap1302-csi1.dtbo |
|
v24.0+ |
Genio 1200-EVK |
IMX214 |
x |
AP1302+ AR0830 |
camera-imx214-csi0-ar0830-ap1302-csi2.dtbo |
|
v24.0+ |
Genio 1200-EVK |
IMX214 |
AP1302+ AR0830 |
AP1302+ AR0830 |
camera-imx214-csi0-ar0830-ap1302-csi1-ar0830-ap1302-csi2.dtbo |
|
v24.0+ |
Genio 1200-EVK |
IMX214 |
AP1302+ AR0830 |
IMX214 |
camera-imx214-csi0-ar0830-ap1302-csi1-imx214-csi2.dtbo |
|
v24.0+ |
Genio 1200-EVK |
IMX214 |
x |
x |
camera-imx214-csi0-std.dtbo |
|
v24.1+ |
Genio 1200-EVK |
x |
IMX214 |
x |
camera-imx214-csi1-std.dtbo |
|
v24.1+ |
Genio 1200-EVK |
x |
x |
IMX214 |
camera-imx214-csi2-std.dtbo |
|
v24.1+ |
Genio 1200-EVK |
AP1302+ AR0830 |
x |
x |
camera-ar0830-ap1302-csi0-std.dtbo |
|
v23.2+ |
Genio 1200-EVK |
IT6510FN |
x |
x |
camera-it6510-csi0-std.dtbo |
|
v23.2+ |
Genio 1200-EVK |
LT6911UXE |
x |
x |
camera-lt6911uxe-csi0-std.dtbo |
|
v24.0+ |
Genio 1200-EVK |
MAX9286+AG190C |
x |
x |
camera-ag190c-max9286-csi0-std.dtbo |
|
v24.0+ |
Platform |
CSI0 |
CSI1 |
DTBO |
Camera Arch |
Support Version |
|---|---|---|---|---|---|
Genio 520/720-EVK |
IMX258 |
x |
camera-imx258-csi0-std.dtbo |
|
v25.1+ |
Genio 520/720-EVK |
x |
IMX258 |
camera-imx258-csi1-std.dtbo |
|
v25.1+ |
Genio 520/720-EVK |
IMX258 |
IMX258 |
camera-imx258-dual-std.dtbo |
|
v25.1+ |
Genio 520/720-EVK |
OV5640 |
x |
camera-ov5640-csi0-std.dtbo |
|
v25.1+ |
Genio 520/720-EVK |
x |
OV5640 |
camera-ov5640-csi1-std.dtbo |
|
v25.1+ |
Genio 520/720-EVK |
OV5640 |
OV5640 |
camera-ov5640-dual-std.dtbo |
|
v25.1+ |
Genio 520/720-EVK |
IMX258 |
OV5640 |
camera-imx258-csi0-ov5640-csi1-std.dtbo |
|
v25.1+ |
Genio 520/720-EVK |
MAX96724 + 4x AG190H |
x |
camera-ag190h-max96724-csi0-std.dtbo |
|
v25.1+ |
Genio 520/720-EVK |
x |
MAX96724 + 2x AG190H |
camera-ag190h-max96724-csi1-std.dtbo |
|
v25.1+ |
Genio 520/720-EVK |
MAX96724 + 4x AG190H |
MAX96724 + 2x AG190H |
camera-ag190h-max96724-dual-std.dtbo |
|
v25.1+ |
Note
All cmd operations presented in this chapter are based on Genio 350-EVK. You might get different operation results depending on the platform you use.
Video 4 Linux 2 Utility - v4l2-ctl
v4l2-ctl is a useful tool to dump the information of v4l2 devices.
You can obtain the supported format, resolution, and controls.
For more details, you can use the command v4l2-ctl -h.
To list all available devices on the board:
v4l2-ctl --list-devices
...
mtk-camsys-3.0 (platform:15040000.seninf):
/dev/media1
mtk-camsv-isp30 (platform:15050000.camsv):
/dev/video3
mtk-camsv-isp30 (platform:15050800.camsv):
/dev/video4
USB2.0 Camera: USB2.0 Camera (usb-11200000.xhci-2):
/dev/video5
/dev/video6
/dev/media2
...
To obtain the format and the resolution supported by a video device:
v4l2-ctl -d /dev/video3 --all
...
Video input : 0 (1a051000.camsv video stream: ok)
Format Video Capture Multiplanar:
        Width/Height      : 2316/1746
        Pixel Format      : 'UYVY'
        Field             : None
        Number of planes  : 1
        Flags             :
        Colorspace        : sRGB
        Transfer Function : Default
        YCbCr/HSV Encoding: Default
        Quantization      : Default
        Plane 0           :
           Bytes per Line : 4632
           Size Image     : 8087472
GStreamer Pipeline Example
V4L2
The camera implementation follows the V4L2 standard.
Therefore, you can operate the camera through the GStreamer element, v4l2src.
For more details about GStreamer, please refer to GStreamer.
In this section, there are two scenarios demonstrated:
Show camera images on the screen
Store camera images in the file
Show Camera Images on the Screen
First, you need to find out which device node is the camera you want.
The video device node which points to seninf will be the camera.
In this example, the camera is /dev/video3.
ls -l /sys/class/video4linux/ | grep seninf
total 0
...
lrwxrwxrwx 1 root root 0 Sep 20  2020 video3 -> ../../devices/platform/soc/15040000.seninf/video4linux/video3
...
Then you can show the full-size camera image to the screen through waylandsink.
gst-launch-1.0 v4l2src device=/dev/video3 ! video/x-raw,width=2316,height=1746,format=UYVY ! videoconvert ! waylandsink sync=false
You may feel that the image is too big to be accommodated on the screen.
In this case, you can use the GStreamer element, v4l2convert, which will use the hardware converter, MDP, to resize the image.
gst-launch-1.0 v4l2src device=/dev/video3 ! video/x-raw,width=2316,height=1746,format=UYVY ! v4l2convert output-io-mode=dmabuf-import ! video/x-raw,width=400,height=300 ! waylandsink sync=false
Store Camera Images in the File
To store camera images, you can use filesink as output.
By the following command, the camera images will be saved in /root/out.yuv
gst-launch-1.0 v4l2src device=/dev/video3 num-buffers=1 ! video/x-raw,width=2316,height=1746,format=UYVY ! filesink location=/root/out.yuv
You can use filesrc to show the saved images.
gst-launch-1.0 filesrc location=/root/out.yuv blocksize=8087472 ! videoparse width=2316 height=1746 format=uyvy framerate=1 ! videoconvert ! waylandsink
Encode Audio and Video to MP4 File
To encode audio and video to an MP4 file, you can use the following plugins:
Input:
audiosrcandv4l2srcOutput:
filesinkConverter:
v4l2convertandaudioconvertEncoder:
v4l2h264encandavenc_aacMuxer:
mp4mux.
By the following command, the 20 seconds 720P MP4 file will be saved in /root/out.mp4
gst-launch-1.0 -e -v v4l2src device=/dev/video3 ! video/x-raw,width=2316,height=1746,format=UYVY,framerate=30/1 ! \
capssetter replace=true caps="video/x-raw, width=2316, height=1746, framerate=(fraction)30/1, multiview-mode=(string)mono, interlace-mode=(string)progressive, format=(string)UYVY,colorimetry=(string)bt709" ! \
v4l2convert output-io-mode=5 ! video/x-raw,width=1280,height=720,framerate=30/1 ! \
v4l2h264enc extra-controls="cid,video_gop_size=30" capture-io-mode=mmap ! h264parse ! queue ! mux.video_0 \
alsasrc device=dmic ! audio/x-raw,rate=48000,channels=2,format=S16LE ! audioconvert ! avenc_aac ! aacparse ! queue ! mux.audio_0 \
mp4mux name=mux ! filesink location=/root/out.mp4 & \
pid=$! sleep 20 && kill -INT $!
Note
GStreamer utilizes PTS (Presentation Timestamp) as a reference for encoding files. However, there are situations where the camera or audio data may experience latency during startup, resulting in a dummy period in the encoded file. For instance, if the camera takes 2 seconds to fully start up, the content within the first 2 seconds of the encoded file will be dummy. This situation is known to occur specifically on the Genio 510-EVK, Genio 700-EVK, and the Genio 1200-EVK with Onsemi AP1302 ISP and AR0830 sensor. The launch time for this configuration is approximately 3 seconds. For a detailed analysis of the launch time, please refer to Sensor Launch Time.
Working with GStreamer
On IoT Yocto, you can also use the GStreamer element, libcamerasrc, to demonstrate the camera pipeline.
First, you need to determine which camera you want to use. The libcamera utility cam can help.
cam -l
Available cameras:
1: Internal front camera (/base/soc/i2c@11009000/camera@3d)
2: Internal front camera (/base/soc/i2c@1100f000/camera@3d)
3: 'USB2.0 Camera: USB2.0 Camera' (/base/soc/usb@11201000/xhci@11200000-2:1.0-1e4e:0102)
Second, select the camera you want and record its name.
For example, the name of the first camera above is /base/soc/i2c@11009000/camera@3d.
Third, use the GStreamer command with a specified camera name to show the camera images on the screen.
gst-launch-1.0 libcamerasrc camera-name="/base/soc/i2c@11009000/camera@3d" ! video/x-raw,format=RGB ! v4l2convert output-io-mode=dmabuf-import ! video/x-raw,width=400,height=300 ! waylandsink sync=false
For more details about the GStreamer elements, libcamerasrc, you can use gst-inspect-1.0 command to list details, templates, and properties.
gst-inspect-1.0 libcamerasrc
...
Plugin Details:
  Name                     libcamera
  Description              libcamera capture plugin
  Filename                 /usr/lib64/gstreamer-1.0/libgstlibcamera.so
...
Pad Templates:
  SRC template: 'src'
    Availability: Always
    Capabilities:
      video/x-raw
      image/jpeg
    Type: GstLibcameraPad
    Pad Properties:
      stream-role         : The selected stream role
                            flags: readable, writable, changeable only in NULL or READY state
                            Enum "GstLibcameraStreamRole" Default: 2, "video-recording"
                               (1): still-capture    - libcamera::StillCapture
                               (2): video-recording  - libcamera::VideoRecording
                               (3): view-finder      - libcamera::Viewfinder
...
Element Properties:
  camera-name         : Select by name which camera to use.
                        flags: readable, writable, changeable only in NULL or READY state
                        String. Default: null
  name                : The name of the object
                        flags: readable, writable
                        String. Default: "libcamerasrc0"
  parent              : The parent of the object
                        flags: readable, writable
                        Object of type "GstObject"
...
USB Camera
IoT Yocto supports USB Video Class (UVC). You can use a USB webcam as a v4l2 video device and operate through GStreamer. To find out the USB camera, you can use the following two methods:
For v4l2 device node
ls -l /sys/class/video4linux
...
lrwxrwxrwx 1 root root 0 Oct  8 01:29 video5 -> ../../devices/platform/soc/11201000.usb/11200000.xhci/usb1/1-1/1-1.3/1-1.3:1.0/video4linux/video5
...
For libcamera name
cam -l
Available cameras:
1: Internal front camera (/base/soc/i2c@11009000/camera@3d)
2: Internal front camera (/base/soc/i2c@1100f000/camera@3d)
3: 'USB2.0 Camera: USB2.0 Camera' (/base/soc/usb@11201000/xhci@11200000-1.3:1.0-1e4e:0102)
In this example, the video device node of the USB camera is /dev/video5, and the camera name is /base/soc/usb@11201000/xhci@11200000-1.3:1.0-1e4e:0102.
Next, you can operate your camera through GStreamer, given either the device node or the libcamera name.
To use
v4l2src
gst-launch-1.0 v4l2src device=/dev/video5 io-mode=mmap ! videoconvert ! waylandsink sync=false
Note
UVC driver uses CPU to compose the frame buffer from several USB packets, so the memory mode should be mmap.
Otherwise, if the memory mode is dmabuf, the consumer of UVC won’t flush the CPU cache leading to the dirty image issue.
To use
libcamerasrc
gst-launch-1.0 libcamerasrc camera-name="/base/soc/usb@11201000/xhci@11200000-1.3:1.0-1e4e:0102" ! videoconvert ! waylandsink sync=false