Secure Boot
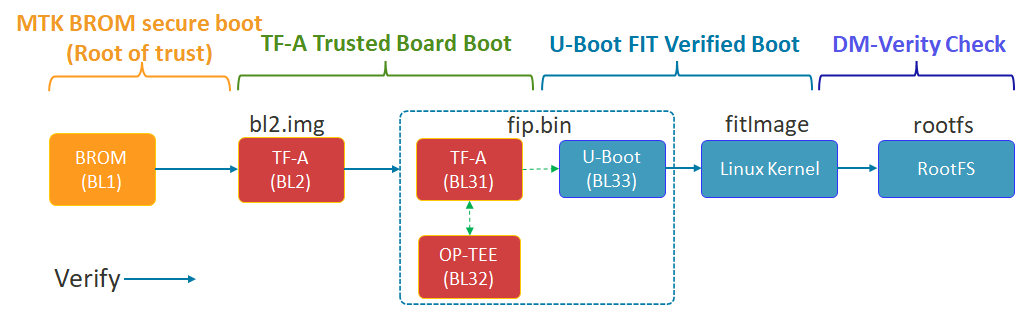
Secure boot is a mechanism that establishes a Chain of Trust (CoT) on all system boot images. Secure boot relies on cryptography to verify image signatures before their execution.
- Root of Trusted Boot
The RoT (Root of Trusted) is MediaTek BootROM on MediaTek platform
The BootROM verifies TF-A (BL2 image) with BROM secure boot mechanism
- Chain of Trusted Boot
TF-A (BL2) verifies the BL3x image (
fip.bin) which includes TF-A (BL31), OP-TEE (BL32) and U-Boot (BL33) with TF-A Trusted Board Boot mechanismU-Boot (BL33) verifies Linux Kernel image with U-Boot FIT Verified Boot mechanism
Linux Kernel provides transparent integrity checking of the root filesystem
This document explain how to secure each boot transition.
Secure Boot: BL1 to Download Agent
The Download Agent (DA) is important to complete the flashing process. If the device is hard bricked, you will need the Download Agent binary (lk.bin) to access the internal storage and download process via USB interface.
You can ensure trusted Download Agent (DA) through MediaTek BootROM secure boot. On the secure boot mechanism, Download Agent Authentication would be enabled to support download agent verification by BL1 (BootROM) through the following sequence of steps.
First, BL1 loads auth file (
auth_sv5.auth), Download Agent binary (lk.bin) and the signature (lk.sig) into SRAM.
BL1 will verify the auth file based on root of trust public key (ROTPK).
And then BL1 will use the auth file to authenticate the Download Agent binary with the signature.
It is recommended to generate a different key for the Download Agent (DA) signing:
openssl genrsa -out ${KEYDIR}/da.pem 3072
By default, IoT Yocto will use a development key for demonstration purposes, and print a warning about it. Please see the README for more information. Then, update local.conf to tell IoT Yocto to use your key:
DA_KEY = "${KEYDIR}/da.pem"
DA_SIGN_ENABLE = "1"
If the Download Agent binary is not signed or signed with another key, it will rise this kind of errors:
Failed to send auth: -5
Note
DAA has been supported on all platforms. Currently, the platforms include Genio 350-EVK, Genio 510-EVK, Genio 700-EVK and Genio 1200-EVK. Since DAA relies on secure boot, please follow the section Secure Boot: BL1 to BL2 to make sure that secure boot is enabled for DAA enablement.
Secure Boot: BL1 to BL2
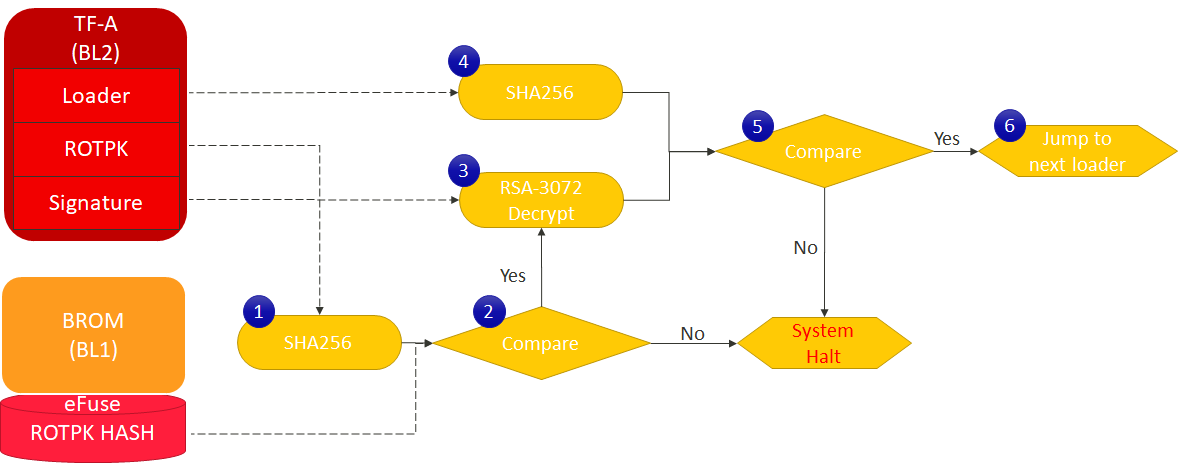
When we power-up the device, the BL1 (ROM code) is the first code run. The BL2 (TF-A) is verified through the following sequence of steps for Genio 1200-EVK.
BL1 loads a hash based on root of trust public key (ROTPK) from the eFuse and calculates the SHA-256 hash of that ROTPK in BL2 image.
The hash of ROTPK is compared with the one from the eFuse. If the comparison passed, BL1 would do signature verification in the next steps. If any failure, the system will halt.
& 4. BL1 loads the BL2 loader and calculates the SHA-256 hash from the BL2 loader. In the meantime, BL1 decrypts the signature of BL2 loader based on RSA-3072.
& 6. If the comparison succeeds, the system jumps to BL2 loader. Otherwise, the system halt.
This ROM code cannot be modified, however we can enable secure boot feature through eFuse settings. Users can refer to the steps below to enable the secure boot (BL1 to BL2).
Important
When the Secure-Boot feature is enabled starting from IoT Yocto v24.0, images are signed with RSA3072 by default.
For Genio 510-EVK and Genio 700-EVK, you must refer to the eFuse Writer Development Guide to enable RSA3072 for images signed by default. If you want to use RSA2048 for Genio 510-EVK and Genio 700-EVK, you can skip enabling RSA3072 in eFuse, but you need to modify configurations to build IoT Yocto images with RSA2048. For more eFuse index information, please see the eFuse Writer Development Guide.
Enabling RSA3072 for enhanced security is strongly recommended starting from IoT Yocto v24.0.
For Genio 350-EVK and Genio 1200-EVK, RSA3072 is supported by default, no need to enable RSA3072 in eFuse. However, if you want to use RSA2048, you need to modify configurations to build IoT Yocto images with RSA2048.
1. Generate eFuse and DA key
Please add the following commands to generate keys for secure boot. Otherwise, IoT Yocto will use a development key for demonstration purposes, and print a warning about it. Please see the README for more information.
openssl genrsa -out ${KEYDIR}/efuse.pem 3072
openssl genrsa -out ${KEYDIR}/da.pem 3072
Warning
Enable SBC(Secure Boot Check)/DAA(Download Agent Authentication) and write the public key in eFuse are performed one time only.
The eFuse will be blown forever, we cannot override these fields after that.
The private keys efuse.pem and da.pem MUST NOT BE LOST.
Otherwise we won’t be able to sign/boot bl2.img and Download Agent (download mode).
Note
Download Agent (DA) is used on image flashing process only, and DA binary (lk.bin) is downloaded into SRAM (the same place that BootROM loads BL2 image) by BootROM via USB interface.
On the secure boot mechanism, DAA (Download Agent Authentication) can be enabled to support download agent verification by BootROM.
The concept is similar to BL2 verified by BootROM, but using a different key (DA_key) for DA signing and an eFuse control index (DAA_EN) for DAA enablement.
2. Set NDA_BUILD = “1” in Yocto build configuration
Secure boot support is NDA license required and the relevant tools are only provided with NDA license.
Please add the following line to your local.conf:
NDA_BUILD = "1"
Important
Secure boot support is NDA license required and the relevant tools are only provided with NDA license. Please contact your MediaTek customer window to have access permission of NDA resources.
3. Set the keys in Yocto build configuration
To set the keys in IoT Yocto to sign BL2 and Download Agent, please add the following lines to your local.conf. When EFUSE_KEY or DA_KEY is undefined, IoT Yocto will use a development key for demonstration purposes.
EFUSE_KEY = "${KEYDIR}/efuse.pem"
DA_KEY = "${KEYDIR}/da.pem"
BL2_SIGN_ENABLE = "1"
DA_SIGN_ENABLE = "1"
Note
If you would like to disable DAA (Download Agent Authentication) for the platform, please remove
DA_SIGN_ENABLE and DA_KEY from your local.conf.
Then build BL2 and DA(LK) using Yocto:
bitbake trusted-firmware-a
bitbake lk
This should generate a signed bl2.img and lk.bin in tmp/deploy/images/{MACHINE}.
4. Use eFuse Writer tool to enable secure boot (BL1 to BL2)
eFuse Writer is a user-space tool used to read and write eFuse fields. Users can write specific eFuse index to enable Secure Boot feature with using eFuse Writer.
Important
eFuse Writer tool and the user guide is only provided with NDA license. Please contact your MediaTek customer window to have access permission for eFuse Writer tool.
# ewriter --help
ewriter Usage:
ewriter CMD INDEX LENGTH [VALUE in HEX]
Mandatory and optional arguments.
  CMD:    0(read) or 1(write).
  INDEX:  the index number of an eFuse field.
  LENGTH: the length of the eFuse index.
  [VALUE in HEX]: the data in hex be written into the eFuse index,
                  only valid in writing eFuse (CMD=1).
The details about efuse index and length, please refer to platform ewriter user guide.
Examples:
(1) read efuse index 1 with byte length "32" -> # ewriter 0 1 32
(2) read efuse index 5 with byte length "1"  ->  # ewriter 0 5 1
(3) write efuse index 1 with byte length "32"
    -> # ewriter 1 1 32 0000000011111111222222223333333344444444555555556666666677777777
(4) write efuse index 5 -> # ewriter 1 5 1 1
ewriter 0 18 1  # read SBC efuse bit
efuse hex:
00
ewriter 0 19 1  # read DAA efuse bit
efuse hex:
00
ewriter 0 31 32  # read Public Key Hash0 efuse field
efuse hex:
00000000000000000000000000000000
00000000000000000000000000000000
5. Write public key hash and enable SBC/DAA on eFuse
5.1. Generate your own SBC public key hash:
Users can find the SBC public key hash by checking the build log of TF-A. For example, the build log file can be found under build/tmp/work/{MACHINE}-poky-linux/bl2/2.6-r0/temp/log.do_gen_bl2_img. Then, users can write the public key hash string into eFuse with using eFuse writer as explained in section 5.2.
=== Public Key Hash ===
b'0e9b206f5936612793001deec2802b66491c0c1e46e44c0c551784626997d5d9'
Users can also generate public key hash manually by following these steps:
git clone https://gitlab.com/mediatek/aiot/nda/mtk-secure-boot-tools
cd mtk-secure-boot-tools
python3 sign-image_v2/pbp.py -j efuse.pem -func keyhash_pss -o keyhash
The output keyhash is the binary blob of public key hash.
5.2. Enable SBC/DAA on eFuse:
Caution
The eFuse index is different on different platforms. Please check the eFuse index before writing eFuse fields. The eFuse index information is only provided with NDA license. Please contact your MediaTek customer window to have access permission for eFuse index information.
Please visit the MediaTek On-Line and find the eFuse Writer Development Guide of the platform by the keyword IoT_Yocto_eFuse_Writer_Development_Guide. It will assist you to generate the correct public key hash for Public Key Hash0 eFuse field.
ewriter 1 18 1 1 # enable SBC efuse bit
efuse hex:
01
ewriter 1 19 1 1 # enable DAA efuse bit
efuse hex:
01
ewriter 1 31 32 <EFUSE_PUBLIC_KEY_HASH> # write your own Public Key Hash0 efuse field
efuse hex:
<EFUSE_PUBLIC_KEY_HASH>
6. Read back the Secure boot eFuse settings
ewriter 0 18 1  # read SBC efuse bit
efuse hex:
01
ewriter 0 19 1  # read DAA efuse bit
efuse hex:
01
ewriter 0 31 32 # read Public Key Hash0 efuse field
efuse hex:
<EFUSE_PUBLIC_KEY_HASH>
7. Flash “bl2.img” with genio-bootrom (optional)
If you would like to update BL2 image only, you could refer to the commands below.
If DAA is enabled, the auth_sv5.auth is required and BROM will load/verify/boot Download Agent.
Please make sure the auth_sv5.auth file is existed in the deploy/images/<machine> folder.
unzip -j secure-genio-350-evk.zip auth_sv5.auth
genio-bootrom -b lk.bin -s lk.sign
fastboot flash mmc0boot0 bl2.img
Note
Please make sure the genio-tools are up-to-date, otherwise -s might not be supported in your genio-bootrom version.
Secure Boot: BL2 to FIP images
The BL2 image contains an RSA public key and will use it to verify FIP images (signed with the private key).
To generate own private key:
openssl genrsa -out ${KEYDIR}/rot_key.pem 3072
When SECURE_BOOT_ROT_KEY is undefined, IoT Yocto will use a development key for demonstration purposes, and print a warning about it. Please see the README for more information. Then, update local.conf to tell IoT Yocto to use your key:
SECURE_BOOT_ROT_KEY = "${KEYDIR}/rot_key.pem"
If the FIP images is not signed or signed with another key, BL2 will detect it and rise this kind of errors: (baudrate 115200):
[EMI] mcp_dram_num:0,discrete_dram_num:1,enable_combo_dis:0
[EMI] MDL number = 0
[MEM] complex R/W mem test pass
ERROR:   BL2: Failed to load image id 3 (-2)
Secure Boot: FIP Images to FitImage
The FIP images contains an RSA public key and will use it to verify fitImage (signed with the private key). By default, if there are no keys provided, IoT Yocto will not sign the fitImage and U-Boot will not complain about it. IoT Yocto will use a development key for demonstration purposes. Please see the README for more information.
Important
Users should remove the IoT Yocto development key installed for demonstration purposes. Please remove these commands for the production.
To generate the keys and sign the fitImage, add the following variables to your local.conf:
DISTRO_FEATURES:append = " secure-boot"
UBOOT_SIGN_KEYNAME="u-boot"
UBOOT_SIGN_IMG_KEYNAME="u-boot-img"
UBOOT_SIGN_KEYDIR = "${KEYDIR}"
If the keys do not exist, Yocto will create them and put them in ${KEYDIR}.
The fitImage will be signed, in addition of the kernel and the device tree and
the U-Boot device tree will be update with the public key required to check fitImage signature.
To generate own private key:
openssl genrsa -out ${KEYDIR}/u-boot.key 3072
openssl genrsa -out ${KEYDIR}/u-boot-img.key 3072
openssl req -x509 -key ${KEYDIR}/u-boot.key -out ${KEYDIR}/u-boot.crt
openssl req -x509 -key ${KEYDIR}/u-boot-img.key -out ${KEYDIR}/u-boot-img.crt
Then, update local.conf to tell IoT Yocto to use your key:
UBOOT_SIGN_KEYNAME="u-boot"
UBOOT_SIGN_IMG_KEYNAME="u-boot-img"
UBOOT_SIGN_KEYDIR = "${KEYDIR}"
If the fitImage is not signed or signed with another key, U-Boot will detect it and rise this kind of errors:
No 'signature' subnode found for '<NULL>' hash node in 'conf-mediatek_mt8365-evk.dtb' config node
Failed to verify required signature 'key-u-boot'
Bad Data Hash
ERROR: can't get kernel image!
Secure Boot: fitImage to RootFS
Linux kernel provides the optional dm-verity feature for transparent integrity checking of block devices. The dm-verity prevents persistent root privileges or unauthorized services that could compromise the device and ensures the device is in the same state as it was last used.
Note
By default, dm-verity feature is disabled. The root filesystem will be configured to read-only when dm-verity feature is enabled for transparent integrity checking. Please refer to Adjust storage partition section in Board Bring Up to modify additional user’s home directory configuration.
Since this is a transparent integrity check of the block device, the user’s home directory must be the independent partition.
To enable the dm-verity feature, add the following variables to your local.conf:
DISTRO_FEATURES:append = " security"
IMAGE_CLASSES += " dm-verity-img"
DM_VERITY_IMAGE = "rity-demo-image"
DM_VERITY_IMAGE_TYPE = "ext4"
INITRAMFS_IMAGE = "dm-verity-image-initramfs"
INITRAMFS_IMAGE_BUNDLE = "1"
For further information and full specification about dm-verity, please refer to the page: Kernel Documentation
Secure Boot: Summary
For building signed images and enable secure boot, there are total 5 steps:
1. Update the local.conf to enable secure boot
NDA_BUILD = "1"

DISTRO_FEATURES:append = " secure-boot"
BL2_SIGN_ENABLE = "1"
DA_SIGN_ENABLE = "1"
UBOOT_SIGN_KEYNAME="u-boot"
UBOOT_SIGN_IMG_KEYNAME="u-boot-img"
The “SECURE_ZIP_ENABLE” is optional. It is used to generate the secure package for all keys used. If the user does not need it, it can be turned off without affecting functionality.
# Generate the secure package
SECURE_ZIP_ENABLE = "1"
2. Generate the Product Keys
If you want to build a Rity image with demo keys for demo purposes only, you can skip this step, otherwise you should generate your product keys.
export KEYDIR=${HOME}/keys
mkdir -p ${KEYDIR}
openssl genrsa -out ${KEYDIR}/efuse.pem 3072
openssl genrsa -out ${KEYDIR}/da.pem 3072
openssl genrsa -out ${KEYDIR}/rot_key.pem 3072
Then, update local.conf to use your key:
KEYDIR = "${HOME}/keys"
EFUSE_KEY = "${KEYDIR}/efuse.pem"
DA_KEY = "${KEYDIR}/da.pem"
SECURE_BOOT_ROT_KEY = "${KEYDIR}/rot_key.pem"
UBOOT_SIGN_KEYDIR = "${KEYDIR}"
3. Build a Rity image
Build all images using the following command:
DISTRO=rity-demo bitbake rity-demo-image
Note
After Secure Boot is enabled, some environment variables related to boot configuration will be built in U-Boot device tree. This means it cannot be modified arbitrarily at runtime to prevent tampering maliciously.
Please make sure Python tool is v3.10 or later to build the signed image.
For example, if secure boot is enabled, you cannot modify the boot_conf variable in u-boot-initial-env or modify boot arguments with the genio-flash tool. Please refer to the variables in U-Boot bbappend file for Secure Boot is enabled.
4. Enable Secure Boot with Using EFuse Writer Tool
Please refer to section Use eFuse Writer tool.
Important
eFuse Writer tool and the user guide is only provided with NDA license. Please contact your MediaTek customer window to have access permission for eFuse Writer tool.
5. Flash the whole image using genio-tools
> genio-flash --daa
Note
Please make sure the genio-tools are up-to-date, otherwise --daa might not be supported in your genio-flash version.