Genio 350-EVK
Overview
On Genio 350-EVK, there are 3 playback hardware and 3 capture hardware.
- Playback
Line-Out Jack
Headset-Out Jack
HDMI Audio Out
- Capture
Headset-In Jack
AMIC In
DMIC In
One line-out jack is used for the external amplifier. One headset jack can be connected to the earphone which has both playback and capture functions. AMIC is a mono analog microphone on the board. DMIC is a stereo digital microphone on the board.
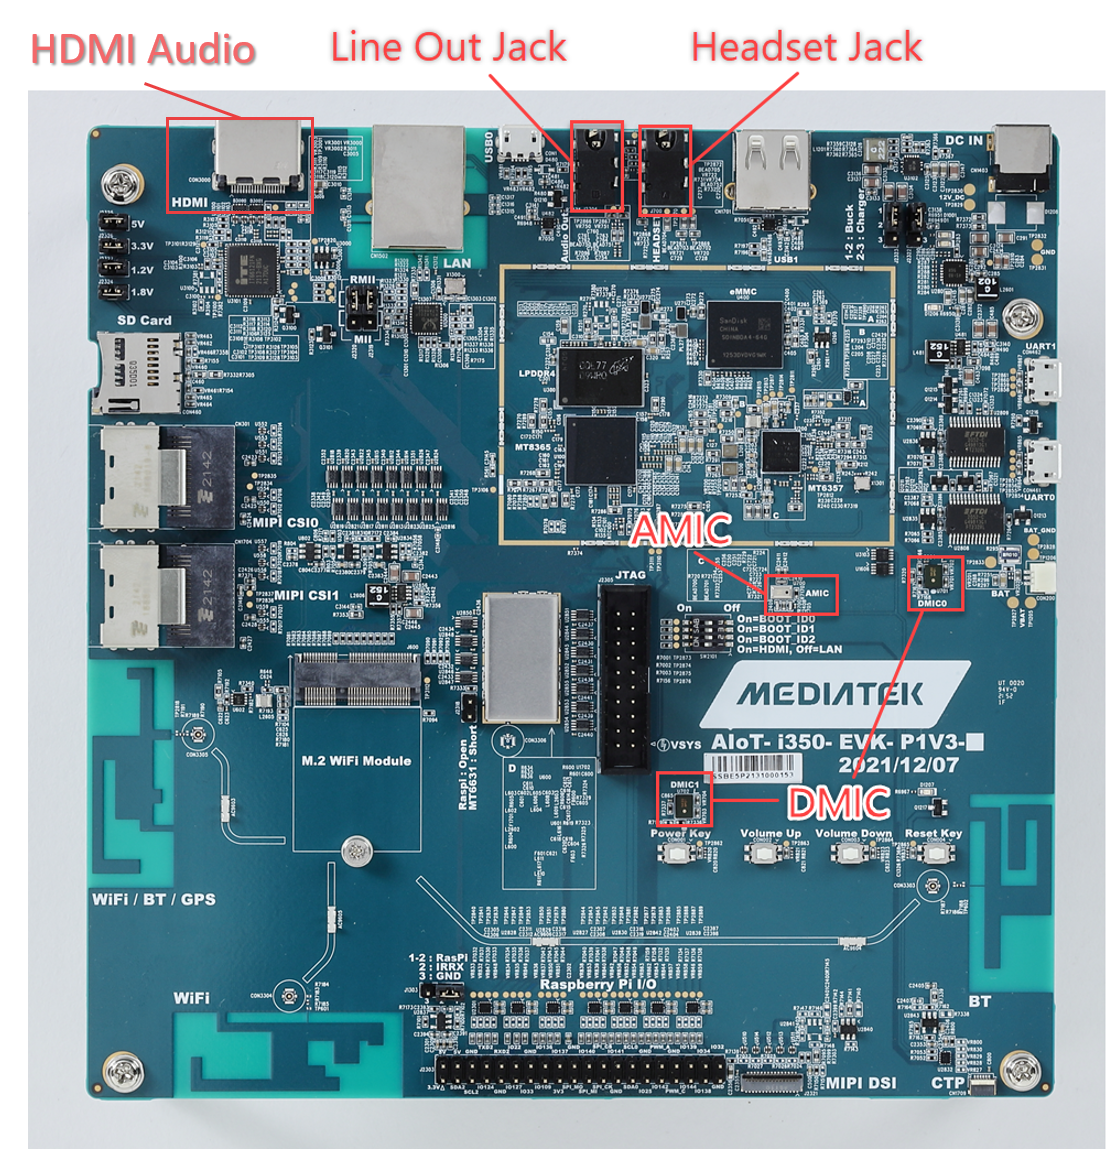
Audio hardware position
The default routing is shown below. There are 2 playback nodes and 2 capture nodes.

The route between hardware and device node
pcmC0D0pplays the sound to eitherLine-Out JackorHeadset-Out Jack.pcmC0D1pplays the sound toHDMI Audio Out.pcmC0D2crecords the voice from eitherHeadset-In JackorAMIC.pcmC0D3crecords the voice from2-ch DMIC.
Playback
Headset Jack Speaker
By default, the Genio 350-EVK board plays the audio to the first jack connector (headset) and the second jack (line-out) is disabled.
To play the music through the jack, you can use either gst-play-1.0 or aplay.
gst-play-1.0 is a tool used to test basic playback using the GStreamer element playbin.
For more details about gst-play-1.0, please refer to gst-play-1.0.
gst-play-1.0 sample.mp3
aplay is a command-line sound file player for the ALSA sound card driver.
For more details about aplay, please refer to aplay.
aplay -D jack_speaker sample.wav
It is possible to switch to the second line. To do that, you will need to change some ALSA settings by using the following commands:
To disable the headset-out jack and enable the line-out jack:
amixer cset -c mtsndcard name='Audio_Amp_L_Switch' 0
amixer cset -c mtsndcard name='Audio_Amp_R_Switch' 0
amixer cset -c mtsndcard name='Speaker_Amp_Switch' 1
To switch back to the headset-out jack:
amixer cset -c mtsndcard name='Audio_Amp_L_Switch' 1
amixer cset -c mtsndcard name='Audio_Amp_R_Switch' 1
amixer cset -c mtsndcard name='Speaker_Amp_Switch' 0
There are gain controls for the audio outputs. You can use these controls to adjust the volume:
To control the gain of the headset-out jack:
# Max volume
amixer cset -c mtsndcard name='Headset_PGAL_GAIN' 0
numid=131,iface=MIXER,name='Headset_PGAL_GAIN'
  ; type=ENUMERATED,access=rw------,values=1,items=32
  ; Item #0 '8Db'
  ; Item #1 '7Db'
  ...
  ; Item #30 '-22Db'
  ; Item #31 '-40Db'
  : values=0
# Min volume
amixer cset -c mtsndcard name='Headset_PGAL_GAIN' 31
numid=131,iface=MIXER,name='Headset_PGAL_GAIN'
  ; type=ENUMERATED,access=rw------,values=1,items=32
  ; Item #0 '8Db'
  ; Item #1 '7Db'
  ...
  ; Item #30 '-22Db'
  ; Item #31 '-40Db'
  : values=31
To control the gain of the line-out jack:
amixer cset -c mtsndcard name='Lineout_PGAL_GAIN' 0
numid=135,iface=MIXER,name='Lineout_PGAL_GAIN'
  ; type=ENUMERATED,access=rw------,values=1,items=20
  ; Item #0 '8Db'
  ; Item #1 '7Db'
  ...
  ; Item #18 '-10Db'
  ; Item #19 '-40Db'
  : values=0
amixer cset -c mtsndcard name='Lineout_PGAL_GAIN' 19 numid=135,iface=MIXER,name='Lineout_PGAL_GAIN' ; type=ENUMERATED,access=rw------,values=1,items=20 ; Item #0 '8Db' ; Item #1 '7Db' ... ; Item #18 '-10Db' ; Item #19 '-40Db' : values=19
HDMI Speaker
To play the audio through HDMI, use the following command:
aplay -D hdmi_out sample.wav
Capture
Headset Jack Microphone
By default, the Genio 350-EVK board records the voice from the headset jack microphone. The following command is an example that will start a mono record with 48KHz sampling rate and signed 32bits bit format:
arecord -D jack_mic -r 48000 -f S32_LE sample.wav
Digital Microphone
You can record the voice from the 2 PDM mics on the board. In this case, the device will need to be specified explicitly as follows:
arecord -D dmic -r 48000 -f S32_LE -c 2 sample.wav
Analog Microphone
You can record the voice from the analog mic on the board. In that case, you will need to switch from the jack mic to the analog mic by using the following command:
# Switch microphone to AMIC
amixer cset -c mtsndcard name='Audio_MicSource1_Setting' 0
numid=161,iface=MIXER,name='Audio_MicSource1_Setting'
  ; type=ENUMERATED,access=rw------,values=1,items=4
  ; Item #0 'ADC1'
  ; Item #1 'ADC2'
  ; Item #2 'ADC3'
  ; Item #3 'ADC4'
  : values=0
arecord -D jack_mic -r 48000 -f S32_LE sample.wav
To switch back to the jack mic, use the following command:
# Switch microphone to headset-in jack
amixer cset -c mtsndcard name='Audio_MicSource1_Setting' 1
numid=161,iface=MIXER,name='Audio_MicSource1_Setting'
  ; type=ENUMERATED,access=rw------,values=1,items=4
  ; Item #0 'ADC1'
  ; Item #1 'ADC2'
  ; Item #2 'ADC3'
  ; Item #3 'ADC4'
  : values=1
arecord -D jack_mic -r 48000 -f S32_LE sample.wav
Loopback Test
There’s a loopback audio test that directly transfers the input voice to the output audio. For example:
To transfer DMIC to headset-out jack:
# Enable headset-out jack and disable line-out jack
amixer cset -c mtsndcard name='Audio_Amp_L_Switch' 1
amixer cset -c mtsndcard name='Audio_Amp_R_Switch' 1
amixer cset -c mtsndcard name='Speaker_Amp_Switch' 0
# Transfer DMIC to headset-out jack
arecord -D dmic -r 48000 -f S32_LE -c 2 | aplay -D jack_speaker -r 48000 -f S32_LE -c 2
To transfer AMIC to line-out jack:
# Enable line-out jack and disable headset-out jack
amixer cset -c mtsndcard name='Audio_Amp_L_Switch' 0
amixer cset -c mtsndcard name='Audio_Amp_R_Switch' 0
amixer cset -c mtsndcard name='Speaker_Amp_Switch' 1
# Select AMIC
amixer cset -c mtsndcard name='Audio_MicSource1_Setting' 0
# Transfer AMIC to line-out jack
arecord -D jack_mic -r 48000 -f S32_LE | aplay -D jack_speaker -r 48000 -f S32_LE
To transfer headset-in jack to headset-out jack:
# Enable headset-out jack and disable line-out jack
amixer cset -c mtsndcard name='Audio_Amp_L_Switch' 1
amixer cset -c mtsndcard name='Audio_Amp_R_Switch' 1
amixer cset -c mtsndcard name='Speaker_Amp_Switch' 0
# Select headset-in jack
amixer cset -c mtsndcard name='Audio_MicSource1_Setting' 1
# Transfer headset-in jack to headset-out jack
arecord -D jack_mic -r 48000 -f S32_LE | aplay -D jack_speaker -r 48000 -f S32_LE
To transfer headset-in jack to HDMI audio out:
# Enable headset-out jack and disable line-out jack
amixer cset -c mtsndcard name='Audio_Amp_L_Switch' 1
amixer cset -c mtsndcard name='Audio_Amp_R_Switch' 1
amixer cset -c mtsndcard name='Speaker_Amp_Switch' 0
# Select headset-in jack
amixer cset -c mtsndcard name='Audio_MicSource1_Setting' 1
# Transfer headset-in jack to headset-out jack
arecord -D jack_mic -r 48000 -f S32_LE | aplay -D hdmi_out -r 48000 -f S32_LE
Audio DSP
Introduction
The Audio Digital Signal Processor (ADSP) is a specialized microprocessor designed for processing audio signals in real time. ADSPs perform complex audio processing tasks such as filtering, equalization, compression, noise reduction, and effects like reverb and echo. ADSPs are also designed to be highly efficient in power consumption and processing speed, making them ideal for use in IoT devices and various other applications.
The Genio boards utilize Cadence’s Xtensa HiFi4 and HiFi5 DSPs, which leverage the Sound Open Firmware (SOF) framework, an open-source project aimed at providing an efficient and flexible firmware stack for audio DSPs.
Supported Platforms and ADSP Specifications
Platform |
SoC |
ADSP Architecture |
Cores/Clocks |
DRAM |
SRAM |
|---|---|---|---|---|---|
Genio 1200 |
MT8395 |
Xtensa HiFi4 |
1 @ 220 MHz - 720 MHz |
16 MB |
256 KB |
Genio 700 |
MT8390 |
Xtensa HiFi5 |
1 @ 260 MHz - 800 MHz |
17 MB |
512 KB |
Genio 510 |
MT8370 |
Xtensa HiFi5 |
1 @ 260 MHz - 800 MHz |
17 MB |
512 KB |
Genio 350 |
MT8365 |
Xtensa HiFi4 |
1 @ 312 MHz - 600 MHz |
16 MB |
480 KB |
Usage
To use audio DSP, flash the image onto Genio 350-EVK with audio-sof.dtbo.
genio-flash --load-dtbo audio-sof.dtbo
Genio 350-EVK supports DSP playback of headphones, and supports DSP capture of headset & DMIC.
DSP Playback
The two PCM device nodes,
hw:0,16andhw:0,17, are linked to theSOF_DL1andSOF_DL2, both connected to the DSP headphone playback.root@genio-350-evk:~# aplay -l **** List of PLAYBACK Hardware Devices **** card 0: sofmt8365evk [sof-mt8365-evk], device 16: SOF_DL1 (*) [] Subdevices: 1/1 Subdevice #0: subdevice #0 card 0: sofmt8365evk [sof-mt8365-evk], device 17: SOF_DL2 (*) [] Subdevices: 1/1 Subdevice #0: subdevice #0The following is an example of using DSP headphone playback.
aplay -D hw:0,16 -c 2 -f S16_LE -r 48000 test.wavThis is a GStreamer DSP headphones playback test. A sine wave of 440 Hz will be played through the headphones.
gst-launch-1.0 audiotestsrc freq=440 ! audioconvert ! audioresample ! alsasink device=hw:0,17DSP Capture
The
hw:0,18is linked to theSOF_AWB, connected to the DSP headset capture; and thehw:0,19is linked to theSOF_VUL, connected to the DSP DMIC capture.root@genio-350-evk:~# arecord -l **** List of CAPTURE Hardware Devices **** card 0: sofmt8365evk [sof-mt8365-evk], device 18: SOF_AWB (*) [] Subdevices: 1/1 Subdevice #0: subdevice #0 card 0: sofmt8365evk [sof-mt8365-evk], device 19: SOF_VUL (*) [] Subdevices: 1/1 Subdevice #0: subdevice #0The following is an example of DSP headset capture.
arecord -D hw:0,18 -c 2 -f S16_LE -r 48000 -d 10 test_headset.wavThe following is an example of DSP DMIC capture.
arecord -D hw:0,19 -c 2 -f S16_LE -r 48000 -d 10 test_dmic.wavLoopback test
This test involves using GStreamer for loopback testing. Speak into the microphone of the headset, and you should be able to hear your voice from headphones.
gst-launch-1.0 alsasrc device=hw:0,18 ! audio/x-raw,rate=48000 ! alsasink device=hw:0,16