Stress Test Suite
The stress test is used for verifying long-term stability and robustness of a system. By exercising different subsystems in parallel under different conditions, we can explore the behavior of a system under heavy loading, and design applications according to those characteristics.
MediaTek provides a stress test suite to allow customers for evaluating Genio platforms. Since v25.0, the suite has been integrated into IoT Yocto and can be run on the EVK board if the user is flashing it with the prebuilt image.
Currently the stress test suite supports following boards:
The following sections will describe how to build and run the stress suite.
Tools
The stress test suite uses following tools for stressing system:
Category |
Tool |
Project URL |
|---|---|---|
CPU/Memory/IO |
stress-ng |
|
Disk IO |
fio |
|
Networking |
iperf3 |
|
GPU |
glmark2 |
|
MDLA/VPU |
neuronrt |
N/A (MediaTek proprietary tool) |
Note
Only specific platforms support MDLA (MediaTek Deep Learning Accelerator).
Testing Setup
The testing setup is depicted in following diagram (Genio 1200 EVK board in this case):
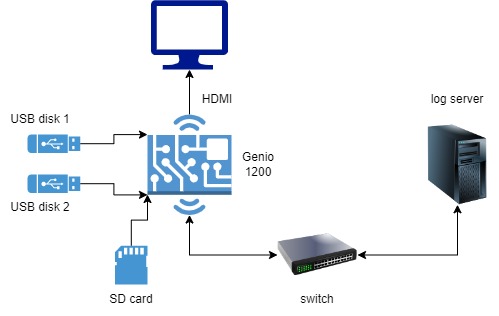
The testing board is connected to a log server via GiB Ethernet connection. The switch used in the test should also support GiB Ethernet.
The board has following peripherals connected to it:
A monitor connected via HDMI
2 USB disks
1 MicroSD card
The log server also acts as a iperf3 server for sending/receiving network traffic.
Note
The testing setup is based on Genio 1200 EVK board. It might vary depending on different development boards.
Building Stress Test Suite
Starting from v25.0, the stress test suite is now integrated into IoT Yocto, eliminating the need for any special setup. If you use rity-demo-image as the BitBake target, the resulting image will include the stress test suite by default.
Host System Setup
To receive logs sent from target board, the host system needs to have NFS server installed. To install a NFS service, run following command (take Ubuntu as an example):
$ sudo apt install nfs-kernel-server
# Edit /etc/exports to add filesystems to be exported.
$ sudo vi /etc/exports
$ sudo systemctl restart nfs-kernel-server
Note
For details on NFS configuration, please visit Ubuntu document.
The host system also needs to have iperf3 server running:
$ sudo apt install iperf3
$ iperf3 -s
Note
On Ubuntu system, the iperf3 server needs to be run manually, thus it’s recommended to open another terminal to do the task.
Running Stress Test Suite
Before running the stress suite, please connect following peripherals to the board:
USB disks
HDMI monitor
MicroSD card
Ethernet
Note
Which peripherals are needs depends on different board configurations. Please consult related documents for more information.
Before running the test, please edit the script start.py:
# cd ~/stress_scripts
# vi start.py
to update global variables according to your testing setup. Here are several settings worth being mentioned:
NFS_SERVER: This variable specifies the path of NFS server in your environment.IPERF_SERVER: The IP address of iperf3 server for receiving/sending network traffic.IPERF_BANDWIDTH: The default bandwidth used in test is 20MB/s. The value can be increased if the environment can afford larger bandwidth.MEM_SIZE: The total memory used for memory stress test. Please note that other stress tools also occupy large amount of memory, so you can experiment with different values and find an appropriate one.DISK_RATIO: The ratio of portion of disk spaces are used for running stress test. The larger the ratio, the longer it might take to populate test files before starting stressing.
After finishing editing, in the command prompt of target board, run following commands:
# cd ~/stress_scripts
# ./start.py
The output should look like following:
[05-05 07:38:30] Mounting NFS folder...
emmc mounted
Mounting usb1 (/dev/sda1 => /mnt/disk1)
Mounting usb2 (/dev/sdb1 => /mnt/disk2)
Mounting sd (/dev/mmcblk1p1 => /mnt/sd)
[05-05 07:38:31] Test starting...
[05-05 07:38:31] Start collecting data...
How to Read Logs
When exercising a system, multiple stressors are run concurrently, which stress different parts of the system. Each stressor writes logs to NFS server, in the logs folder under the root folder of the server. After finishing stressing, the listing of log files may look like this:
cpu_220504093357.log
cpu_220504100007.log
cpu_220504102727.log
....
disk_220504093357.log
disk_220505053152.log
disk_220505054124.log
....
ethernet_220505053152.log
ethernet_220505054124.log
ethernet_220505054227.log
....
gpu_220504101603.log
gpu_220504102210.log
gpu_220504102816.log
....
sar_220505054124.data
sar_220505054124.log
sar_220505073831.data
sar_220505073831.log
....
The filename of a log file starts with the category of stressor, followed by a timestamp created when running a stressor, in the format of <YYMMDDhhmmss>. To interpret log content generated by stressors, please consult documents of corresponding tools listed in Tools.
There are special files with filename starting with sar_ (e.g. sar_220505054124.data),
which are generated by sar tool. sar is an utility
provided by sysstat for
collecting system statistics. Developers can analyze system performance during stressing
by drawing graphs using sadf tool (another utility of sysstat) with collected data files:
Please refer to sysstat documentation to understand more information.