GitLab Account Setup
IoT Yocto is currently hosted on http://www.gitlab.com/mediatek/aiot and is available in two different configurations:
Public configurations are built with packages and recipes that are openly available. This configuration lacks some proprietary features. Furthermore, certain proprietary components, such as
libdram, are provided in binary-only format.Private configurations are a functional superset of the public configurations, and require access to private repositories. The additional features are:
MT7663 proprietary Wi-Fi driver on Genio 350
eFuse writer on all Genio platform
ISP support on Genio 1200
For example, the Linux kernel fork for IoT Yocto is hosted in https://gitlab.com/mediatek/aiot/bsp/linux and you can access it without a GitLab account. However, certain proprietary packages are permission controlled, and require different license agreements. These packages are currently located under the https://gitlab.com/mediatek/aiot/nda namespace. Building these proprietary packages is disabled by default and can be enabled during the build process.
The prebuilt images for private configurations are available in the Download page.
Important
You may skip to Environment Setup if you don’t intend to build the private configuration. If you want to build the private configuration, please continue to read the following sections.
Since v25.0, the accessing protocol of NDA repositories is changed to HTTPS instead of SSH. If the user has not yet setup the access token for HTTPS protocol, please read below.
Private Configuration Overview
To access these permission controlled packages and tools, you need to:
Sign up for a GitLab account.
Request access permission from your MediaTek contact window through email.
Generate access tokens for tools such as git to access source code repositories.
Setup GitLab Account
Please visit https://gitlab.com/users/sign_up to create an account if you don’t have one. The GitLab Username and Email are required for permission setup.
Steps
Visit https://gitlab.com/users/sign_up and fill the following information:
Email Please use your company email for registration, e.g. firstname.lastname@your.company.domain if possible.
Username Please choose an username that is similar to your email address, e.g. firstname.lastname or firstname.lastname.company if possible.
Install a 2FA authenticator on your mobile device. The following applications are known to work with gitlab.com:
Android: Google Authenticator
iOS: Google Authenticator, LastPass Authenticator
Check your email inbox and click the validation link in the confirmation email sent from gitlab.com. You might want to check your junk mailbox if you didn’t see it in your inbox.
Log in to http://www.gitlab.com/mediatek/aiot with your username and password.
Setup a 2FA authenticator according to the instructions on the website.
Warning
Unlike logging in to the website with a browser, you cannot use the login password to fetch source code. Instead, you need to create an access token and use the token as your git password. Please continue to following sections for permission and access token setup.
Apply for Access Permission
Please email your GitLab Username and Email to your MediaTek contact window for account permission setup.
Once the permission has been granted, you should receive a notification email from GitLab.com.
After receiving the notification from GitLab.com or from your MediaTek contact window, you should also be able to visit the following URL to confirm that you’ve been granted permissions to access IoT Yocto repositories:
https://gitlab.com/mediatek/aiot/nda
If you get a login page, a 404 error page or permission error page instead, please notify your MediaTek contact window.
GitLab and JiHu
If you are based in China, Macao, and Hong Kong, you may find that https://gitlab.com/mediatek/aiot/nda/ is being redirected to JiHu (https://gitlab.cn).
As described in the official GitLab announcement, JiHu’s SaaS service (GitLab.cn) and GitLab Inc.’s SaaS service (GitLab.com) share no common infrastructure, networking connectivity, systems, services, data, or resources.
In this case, you need to set up and re-configure your network, e.g. VPN, proxy, or DNS settings, so that you can log in to https://gitlab.com instead of https://gitlab.cn.
Generate Access Tokens
In order to fetch source code from git repositories via HTTPS protocol, instead of using the login password, you have to create an access token and use it as your git password. To create an access token, follow these steps:
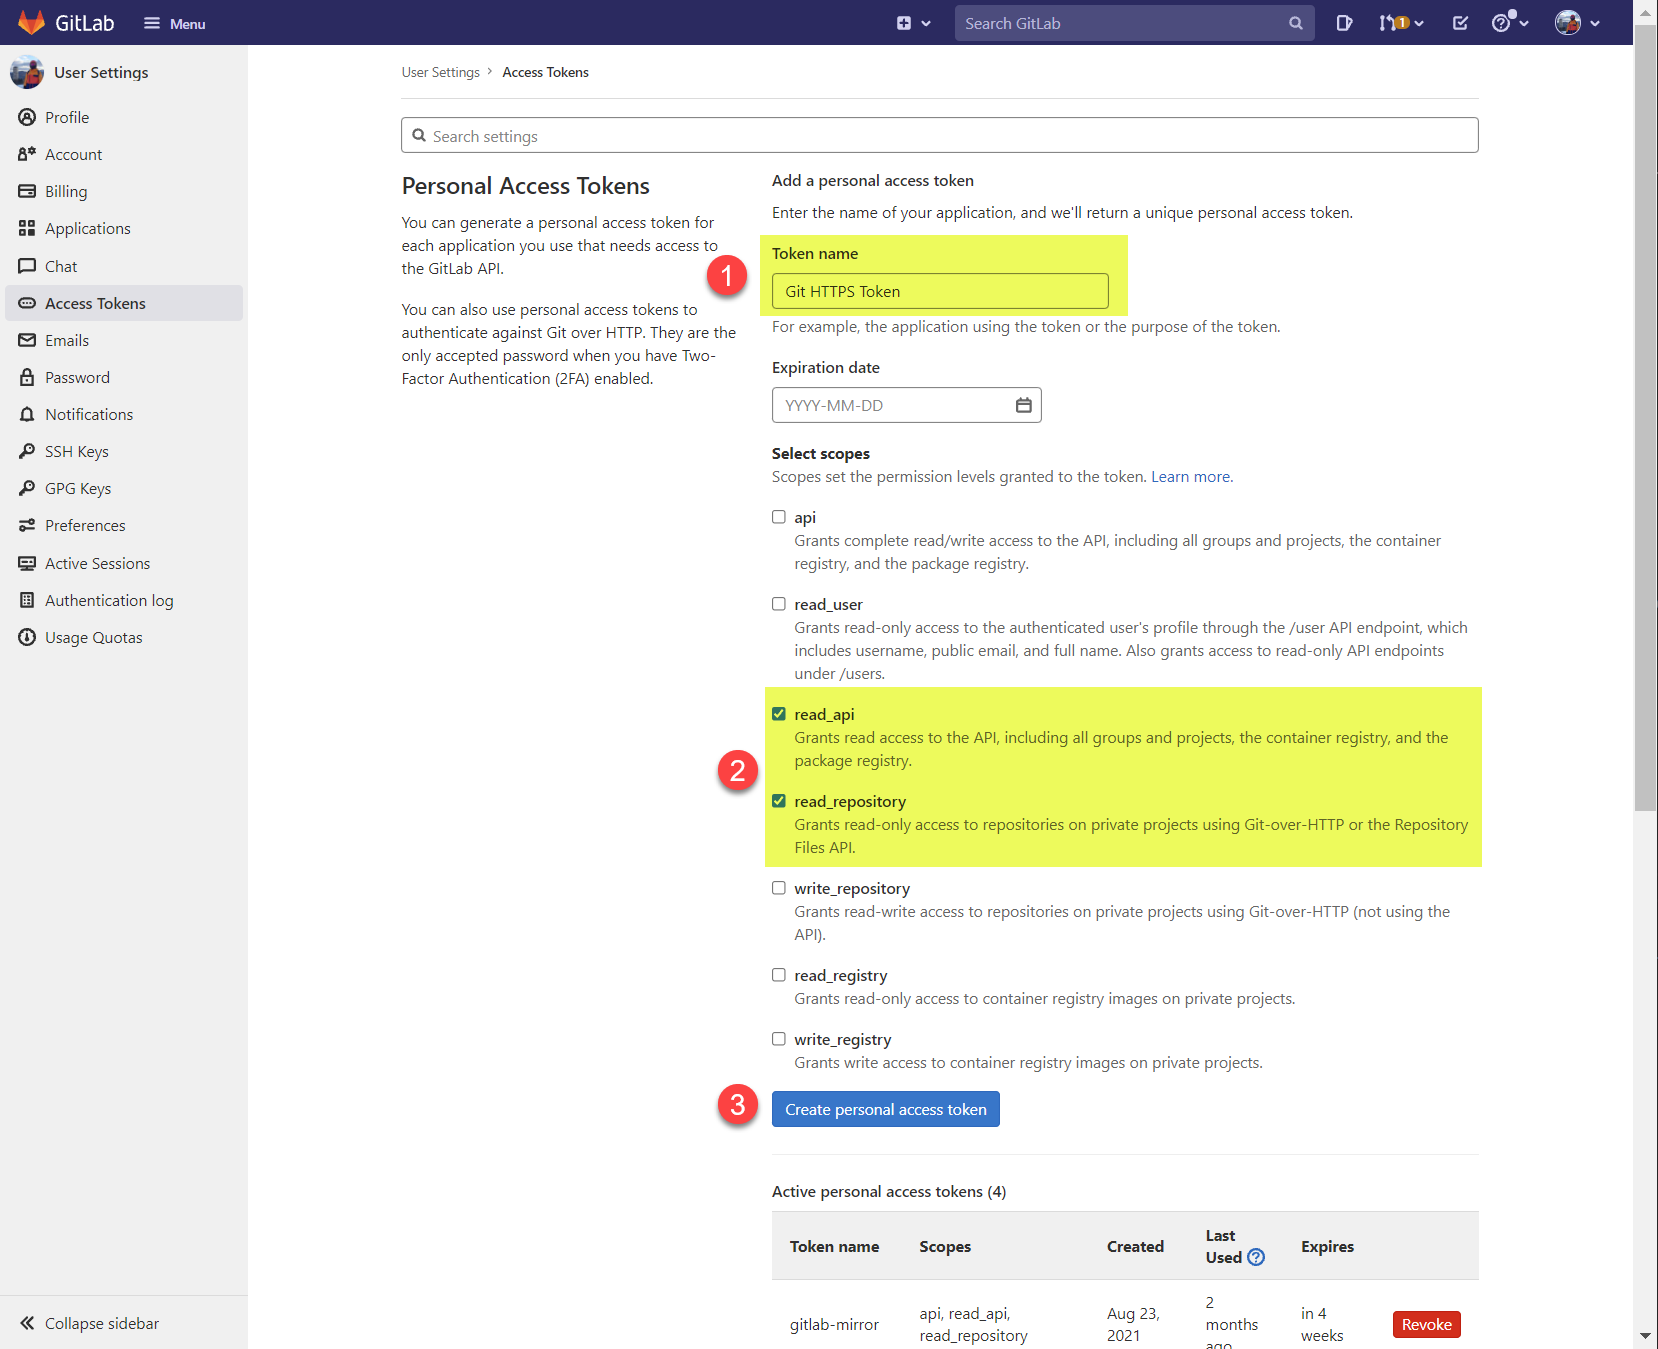
Visit https://gitlab.com/-/user_settings/personal_access_tokens, or choose Preference and then select Access Tokens on your GitLab personal page.
In the Personal Access Token section, fill the Token name, and make sure the following check boxes are ticked:
read_apiread_repository
Click the Create personal access token button.
A string representing the access token will be generated. Please store this token in a secure storage, preferably a password manager.
Update the
.netrcconfiguration file under the home directory to add your GitLab username and token:echo 'machine gitlab.com login <USERNAME> password <TOKEN>' >> $HOME/.netrc chmod 600 $HOME/.netrc
Note
If you lose your access token, you can always revoke it in the web UI and create a new one. For additional details, please refer to GitLab documentation.
Please make sure there are not multiple
machine gitlab.com ...entries in your.netrcsettings. Otherwise it may cause authentication failure.
Confirm Your Account Setup
You might want to try the following steps before proceeding to fetch and build IoT Yocto:
Confirm account permission: Do you see the web page when visiting https://gitlab.com/mediatek/aiot/nda?
Confirm git HTTPS configuration: Can you fetch the repository to your Linux host machine using the following command?
# Use generated access token as password, not your GitLab password.
git clone https://gitlab.com/mediatek/aiot/nda/libdram.git
If successful, delete the
libdramdirectory that’s created:rm -Rf libdram
Please check your access token settings if any of the steps above fail.