RAW Sensor
Note
All command operations presented in this chapter are based on the IoT Yocto v23.1, Genio 1200-EVK and Sony IMX214 sensor. You might get the different operation result depending on the platform you use.
Camera Package And Specification
The RAW camera DTB for Genio 1200-EVK is CAM DTB-D2.
It contains SONY IMX214 CMOS Image Sensor.
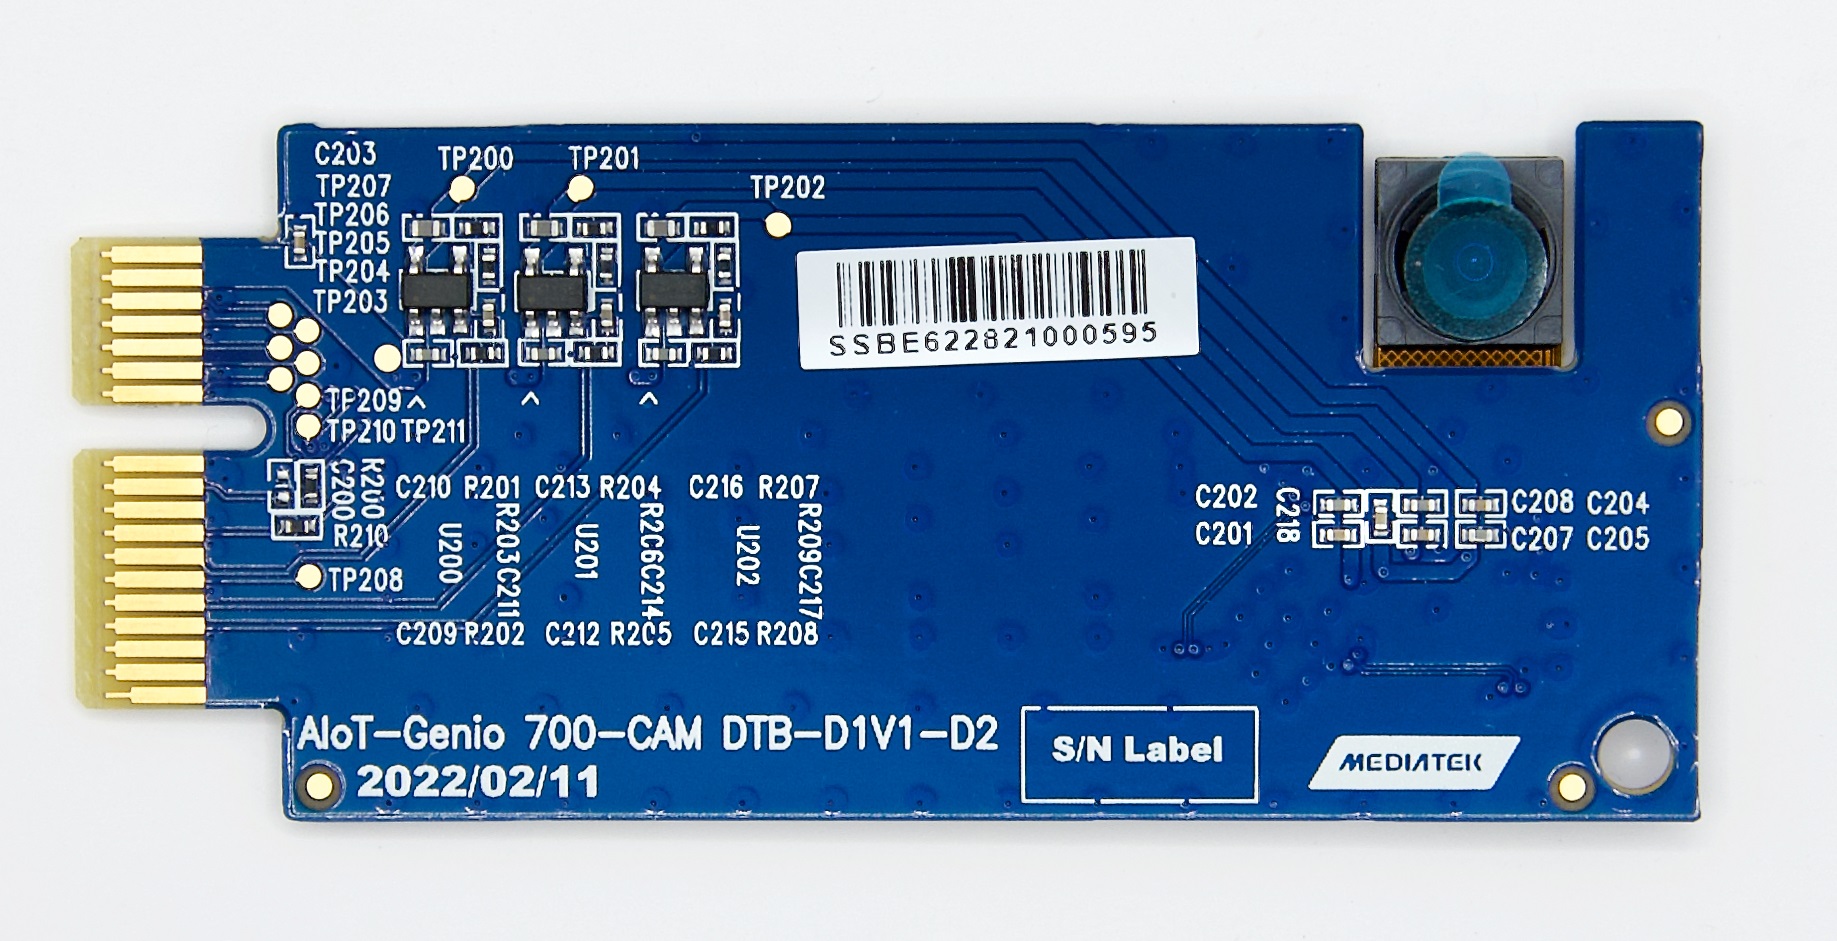
Camera DTB D2 - SONY IMX214 Sensor
Connect The Camera To The EVK
There are 3 MIPI-CSI slots on Genio 1200-EVK, which are CSI0, CSI1, and CSI2.
In the following figure, the camera DTB is connected to the CSI0 slot.
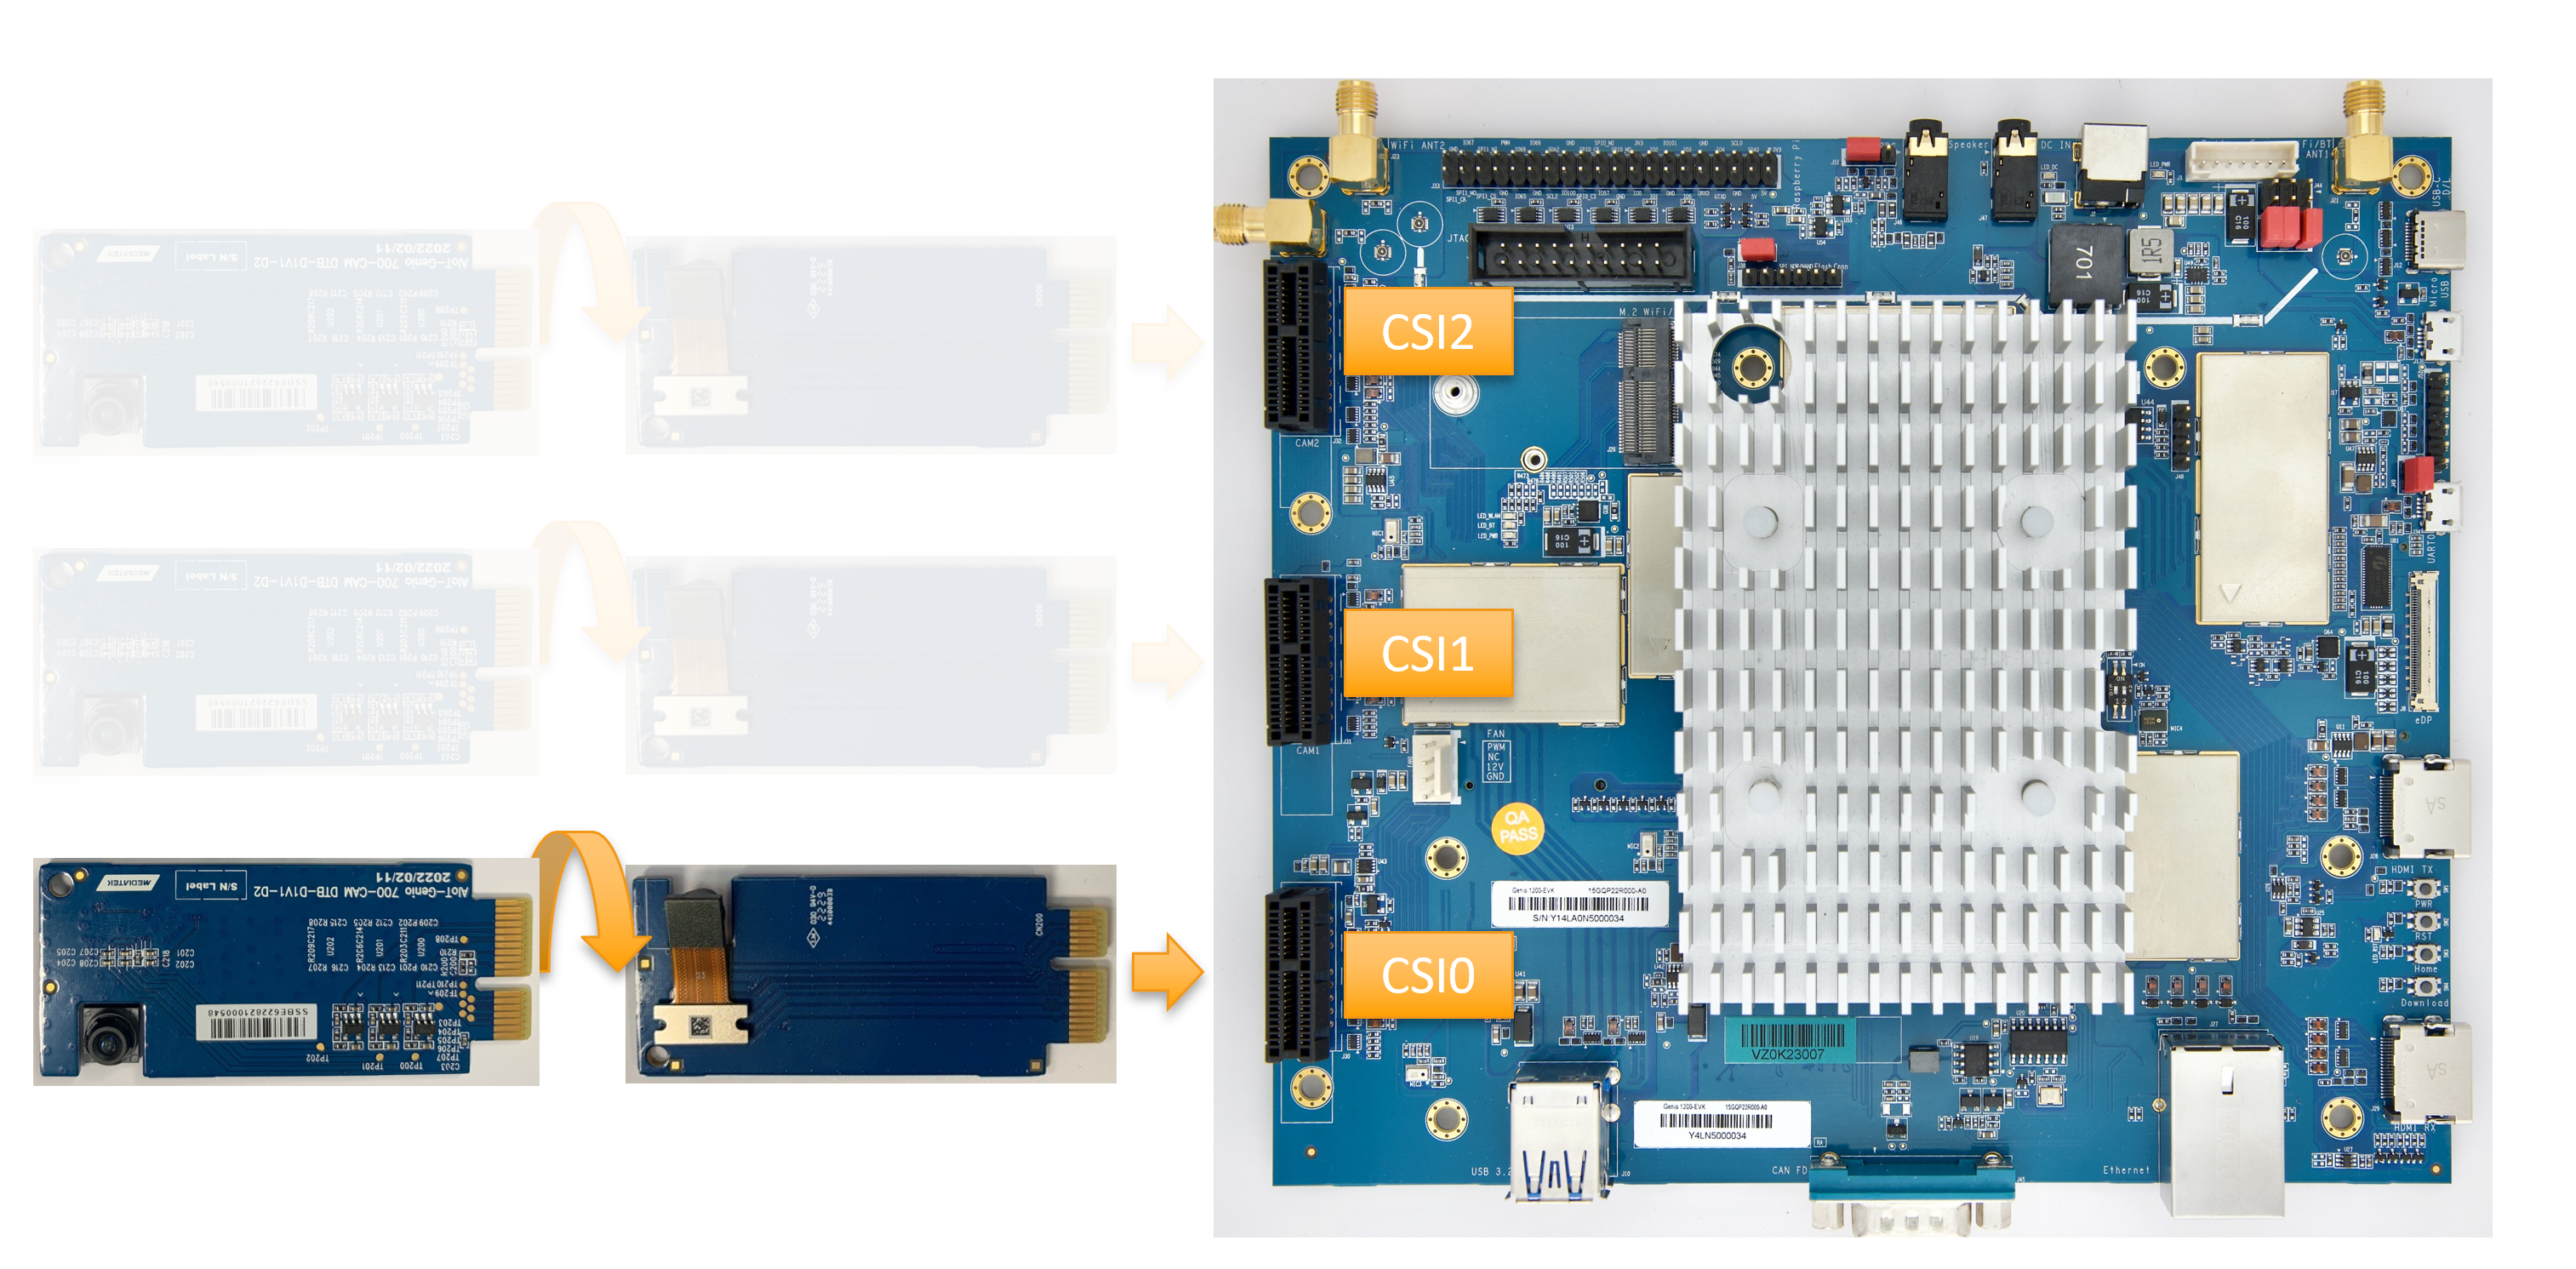
Connect Camera DTB D2 to Genio 1200-EVK (Schematic)
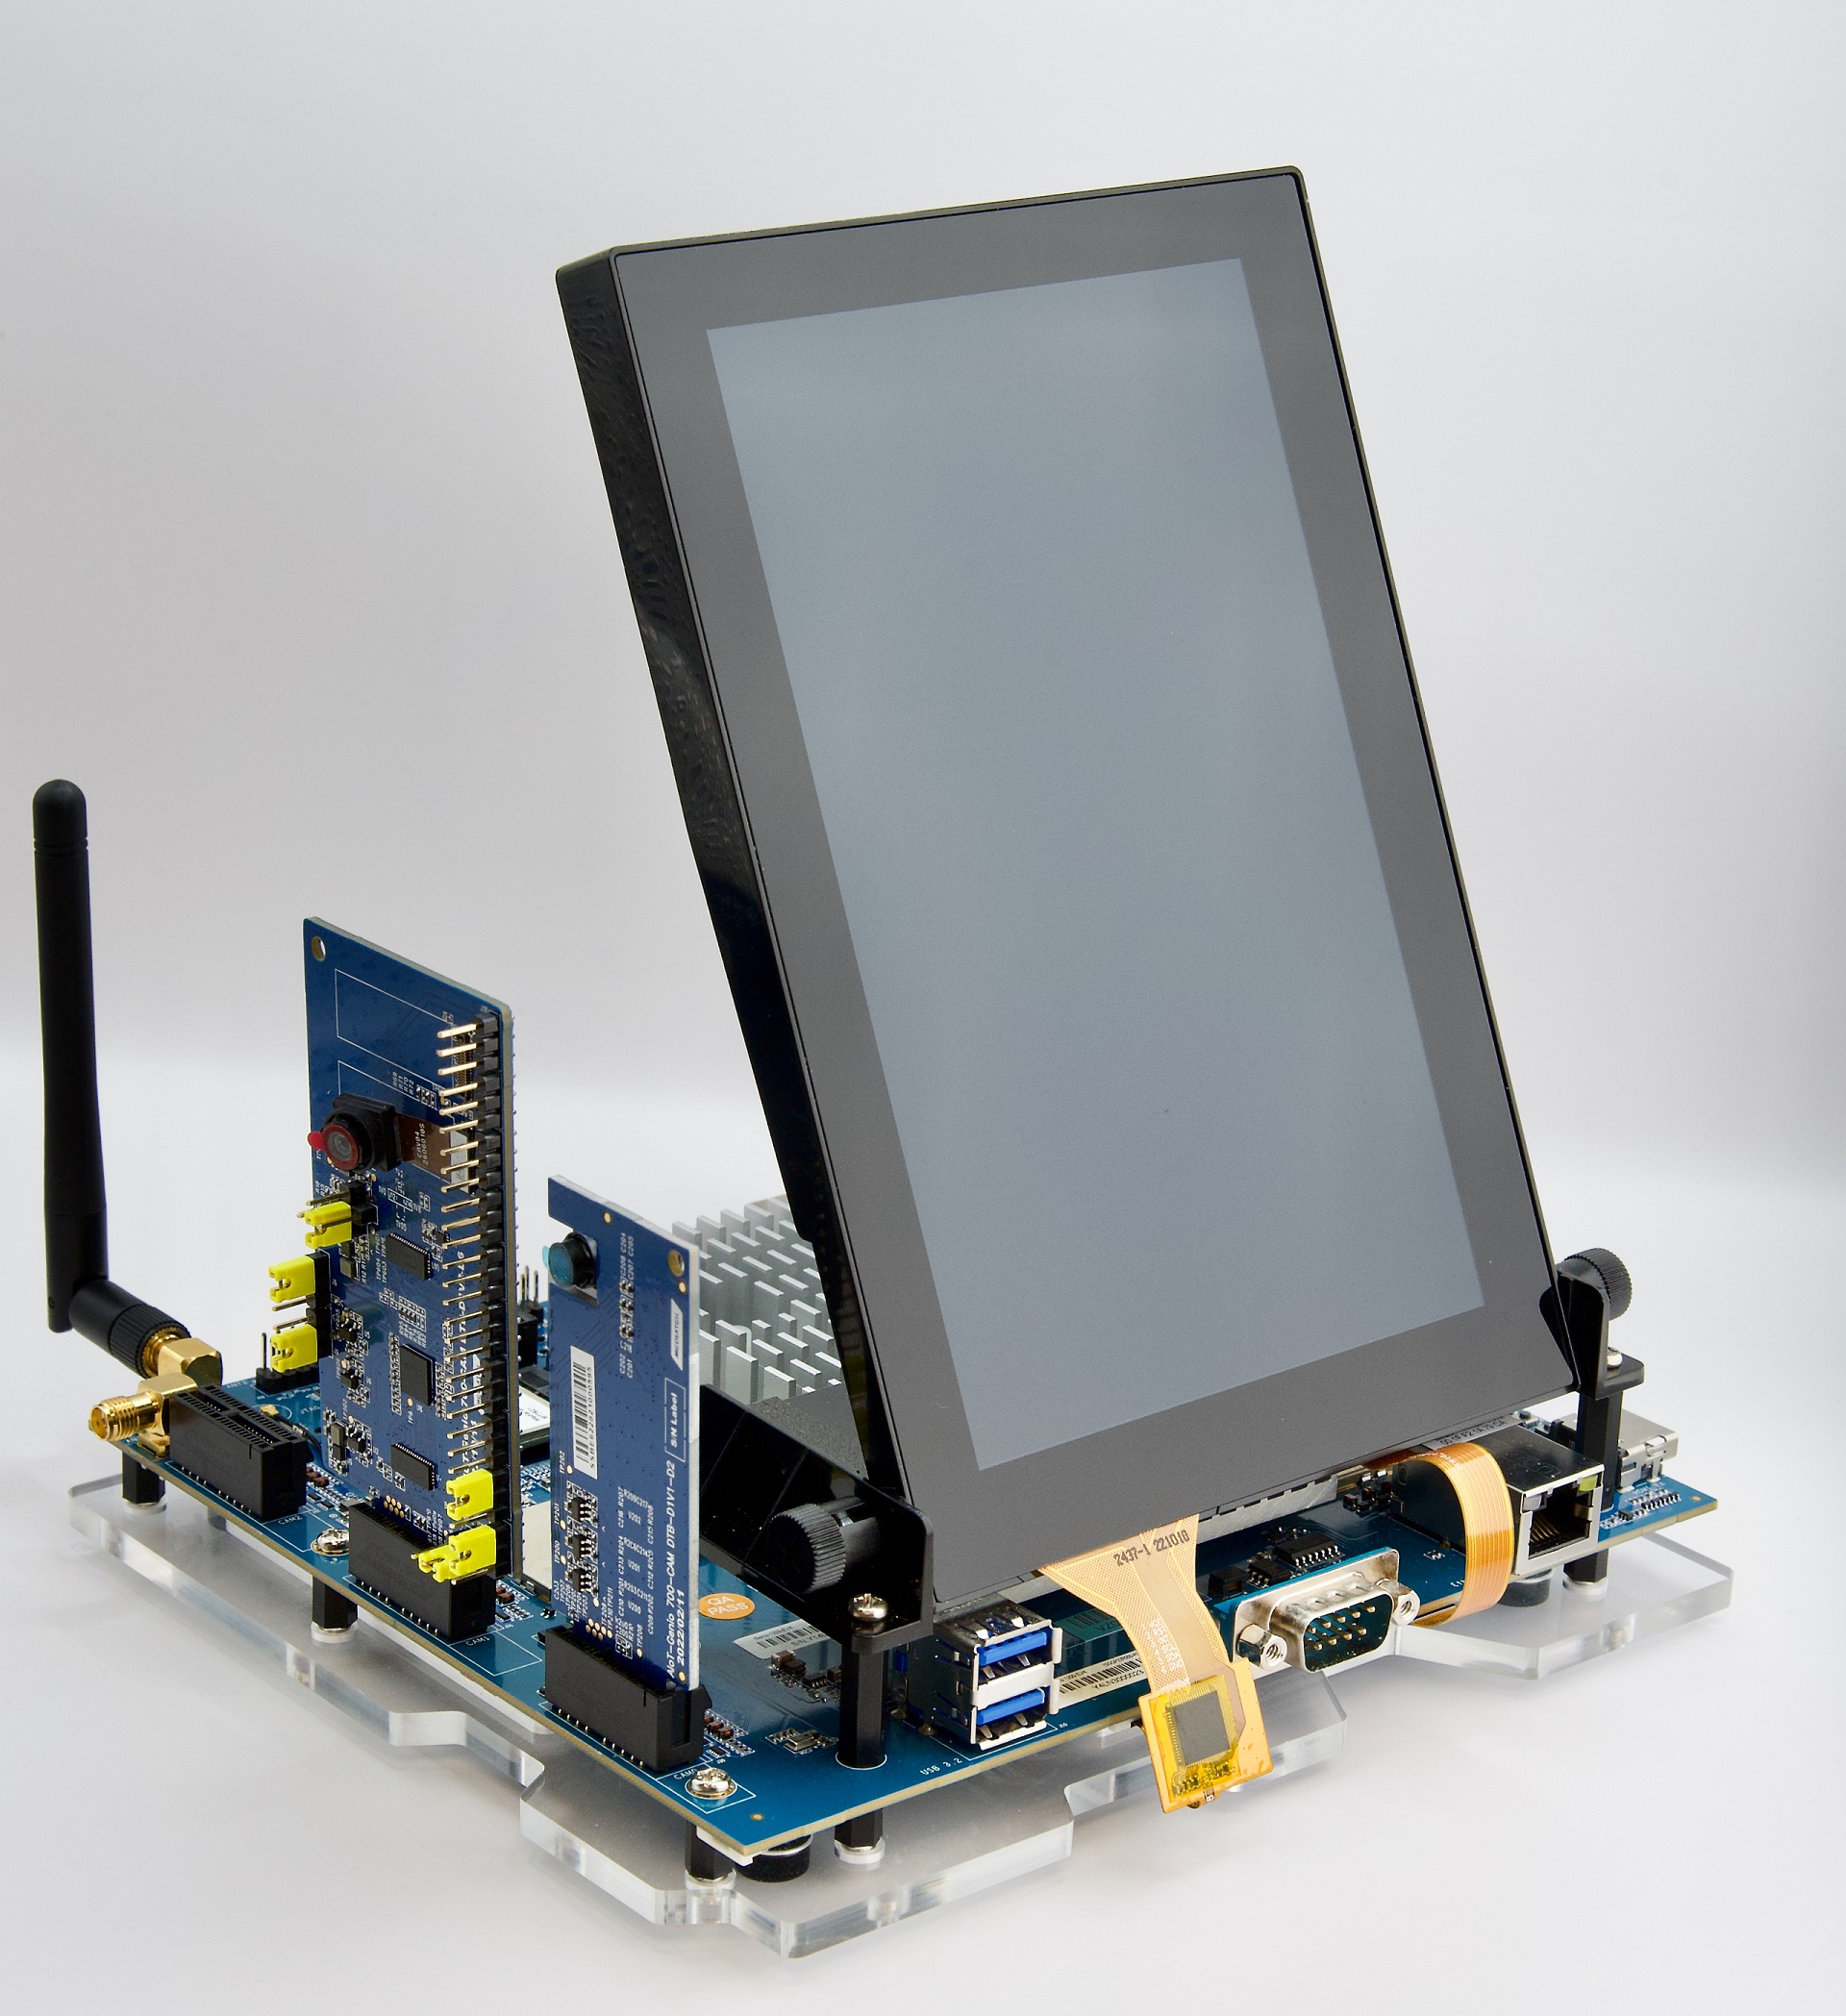
Connect Camera DTB D2 to Genio 1200-EVK (Entity)
Note
All three CSI slots are available. The user can connect the camera sensor to any slot.
Select Camera Device Tree Blob Overlay
The camera device is inactive by default, so the kernel has to load a specific device tree blob overlay to enable it. Please refer to bl33u-boot for more details.
Platform |
Camera DTBO |
Description |
|---|---|---|
Genio 1200-EVK |
camera-imx214-2lanes-csi0.dtbo |
CAM-DTB-D2 w/ Sony IMX214 sensor, connected to CSI0, use 2-lane MIPI CSI |
Genio 1200-EVK |
camera-imx214-csi0.dtbo |
CAM-DTB-D2 w/ Sony IMX214 sensor, connected to CSI0, use 4-lane MIPI CSI |
Genio 1200-EVK |
camera-imx214-csi1.dtbo |
CAM-DTB-D2 w/ Sony IMX214 sensor, connected to CSI1, use 4-lane MIPI CSI |
Genio 1200-EVK |
camera-imx214-csi2.dtbo |
CAM-DTB-D2 w/ Sony IMX214 sensor, connected to CSI2, use 4-lane MIPI CSI |
genio-flash --list-dtbo
List of available DTBO:
- camera-imx214-2lanes-csi0.dtbo
- camera-imx214-csi0.dtbo
- camera-imx214-csi1.dtbo
- camera-imx214-csi2.dtbo
- ...
genio-flash --load-dtbo camera-imx214-csi0.dtbo --load-dtbo gpu-mali.dtbo --load-dtbo apusys.dtbo --load-dtbo video.dtbo
Warning
Please select the DTBO according to the CSI slot to which the camera sensor is connected.
For example, if the camera is connected to the CSI0 slot, please load the dtbo camera-imx214-csi0.dtbo.
Otherwise, the camera initialization will fail.
Supported Formats And Sizes
The following table shows the supported formats and resolutions for each stream.

Supported formats and Sizes
Note
The supported format, resoulution, and framerate are related to the capability of the sensor and SoC.
V4L2 Device Node
Camera ISP is a complicated feature that has a large number of device nodes. The camera ISP driver creates 125 video devices in total.
MTK-ISP-DIP-V4L2has 68 devicesmtk-camhas 54 devicesmtk-v4l2-camerahas 3 devices
MTK-ISP-DIP-V4L2 and mtk-cam are used by the camera ISP middleware.
The user can just focus on mtk-v4l2-camera which is for streaming.
v4l2-ctl --list-devices
...
MTK-ISP-DIP-V4L2 (platform:15000000.imgsys_fw):
(68 video devices)
/dev/media0
mtk-cam (platform:16000000.camisp):
(54 video devices)
/dev/media2
mtk-v4l2-camera (platform:mtkcam0):
/dev/video74
/dev/video75
/dev/video76
Launch Camera
The V4L2 nodes with the name mtk-v4l2-camera can be used for streaming.
There are 3 V4L2 devices representing Preview, Video, and Capture streams.
The user can find the devices by the following command:
v4l2-ctl --list-device
mtk-v4l2-camera (platform:mtkcam0):
        /dev/video74
        /dev/video75
        /dev/video76
cat /sys/class/video4linux/video{74,75,76}/name
mtk-v4l2-camera@0-Preview
mtk-v4l2-camera@0-Video
mtk-v4l2-camera@0-Capture
Important
The above v4l2 device node number is for example. The node number may change every time the system boots.
To quickly fetch the correct node and assign the environment variable:
declare -a video=(`v4l2-ctl --list-devices | grep mtk-v4l2-camera -A 3 | grep video | tr -d "\n"`)
printf "Preview Node\t= ${video[0]}\nVideo Node\t= ${video[1]}\nCapture Node\t= ${video[2]}\n"
Preview Node    = /dev/video74
Video Node      = /dev/video75
Capture Node    = /dev/video76
The Preview and Video streams can deliver raw format images. The Capture stream is for JPEG outputs. The Capture stream is used to fetch the image that the user sees on the Preview or Video stream. The 3A configuration of the Capture stream relies on the Preview or Video stream. Therefore, before starting the Capture stream, make sure one of the Preview and Video streams is running.
Section Supported formats and Sizes shows the supported formats and sizes.
The user can also use the v4l2 utility, v4l2-ctl, to list formats.
v4l2-ctl -d ${video[0]} --list-formats-ext    # List formats/sizes of Preview Stream
ioctl: VIDIOC_ENUM_FMT
        Type: Video Capture Multiplanar

        [0]: 'RGB3' (24-bit RGB 8-8-8)
                Size: Discrete 640x360
                        Interval: Discrete 0.033s (30.000 fps)
        ...
        [1]: 'YUYV' (YUYV 4:2:2)
                Size: Discrete 640x360
                        Interval: Discrete 0.033s (30.000 fps)
        ...
v4l2-ctl -d ${video[2]} --list-formats-ext    # List formats/sizes of Capture Stream
ioctl: VIDIOC_ENUM_FMT
        Type: Video Capture Multiplanar

        [0]: 'JPEG' (JFIF JPEG, compressed)
                Size: Discrete 320x240
                        Interval: Discrete 0.033s (30.000 fps)
        ...
To launch the camera, the user can use v4l2-ctl, gst-launch-1.0, or other V4L2 applications.
Use
v4l2-ctlv4l2-ctl -d ${video[0]} --set-fmt-video=width=1920,height=1080,pixelformat=YUYV --stream-mmap --stream-count=1 --stream-to=/tmp/preview.yuv --verboseUse
gst-launch-1.0gst-launch-1.0 v4l2src device=${video[0]} ! video/x-raw,width=640,height=480,format=YUY2 ! waylandsink sync=false & gst-launch-1.0 v4l2src device=${video[1]} ! video/x-raw,width=640,height=480,format=NV12 ! waylandsink sync=false & gst-launch-1.0 v4l2src device=${video[2]} ! image/jpeg,width=640,height=480,format=JPEG ! jpegdec ! waylandsink sync=false &
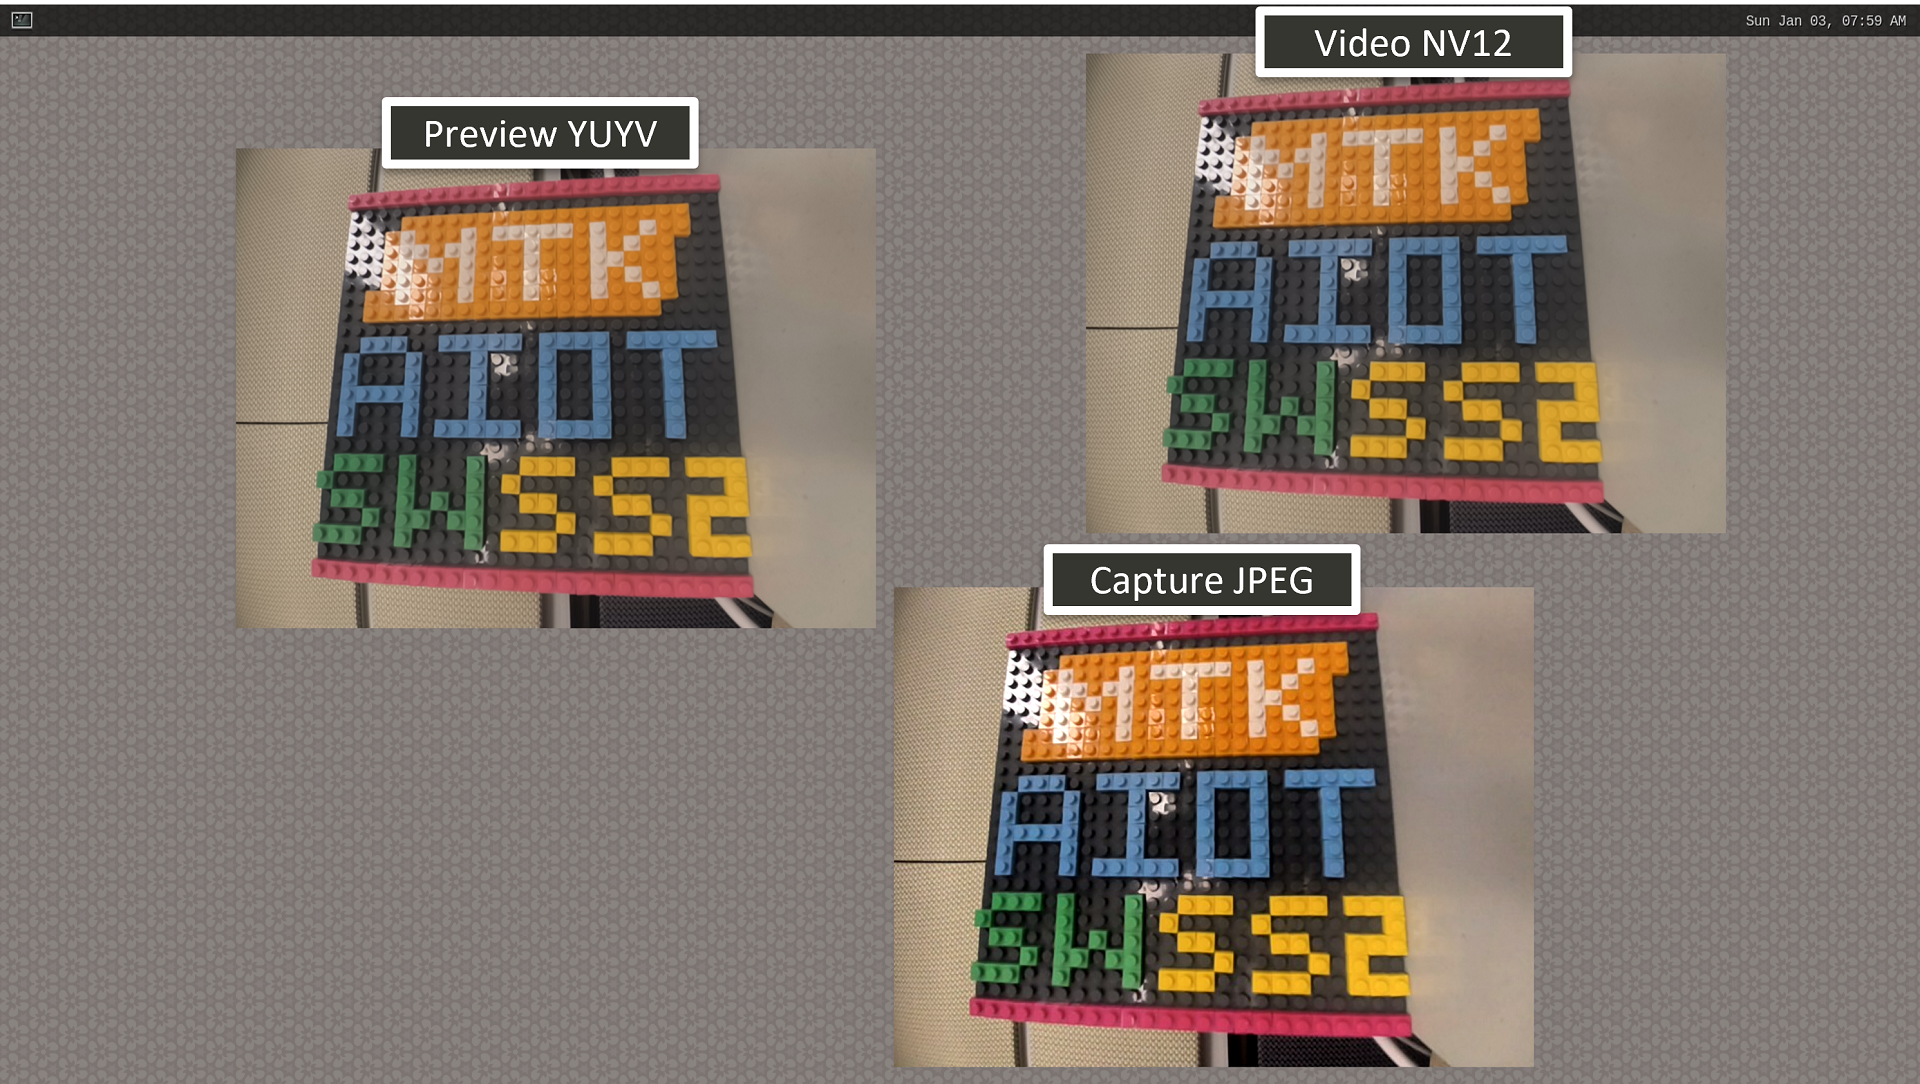
Show Preview/Video/Capture streams on Weston
Moreover, the user can show 720P Preview content on Weston, record 10 seconds of FHD Video to an mp4 file, and Capture 4K JPEG images by the following commands:
# Show 720P Preview on Weston
gst-launch-1.0 v4l2src device=${video[0]} ! video/x-raw,width=1280,height=720,format=YUY2 ! waylandsink sync=false &
# Record 10 seconds of FHD Video
gst-launch-1.0 v4l2src device=${video[1]} num-buffers=300 ! video/x-raw,width=1920,height=1080,format=NV12 ! v4l2h264enc ! h264parse ! queue ! mp4mux ! filesink location=video.mp4 &
# Capture 4K JPEG image
v4l2-ctl -d ${video[2]} --set-fmt-video=width=3840,height=2160,pixelformat=JPEG,sizeimage=4194304 --stream-mmap=1 --stream-count=1 --stream-to=capture.jpg --verbose
Important
JPEG is a compression format, so the size of the compressed result may vary each time.
The user should ensure that the buffer size is large enough to accommodate the worst case compressed size.
Otherwise, the JPEG content may be incomplete.
To set the buffer size, the user can refer to the above example sizeimage=4194304.
Note
To use MediaTek video codec and mdp hardware, the user needs to load video.dtbo. For more details, please refer to Genio 1200-EVK Video Codec.
Set Camera ISP Controls
For each stream, there are several controls that can be set. The following table shows the available controls. There are 12 V4L2 standard controls and 1 vendor-specific control. The user can use the control to set 3A (Auto Focus, Auto Exposure, and Auto White Balance) and ISP pipeline feature (Brightness, Contrast, Saturation, and Sharpness).

Available camera controls
The user can also use v4l2-ctl to list all controls by the following command:
v4l2-ctl --list-ctrls -d ${video[0]}

User Controls

                     brightness 0x00980900 (int)    : min=0 max=100 step=1 default=0 value=0 flags=slider
                       contrast 0x00980901 (int)    : min=0 max=10 step=1 default=0 value=0 flags=slider
                     saturation 0x00980902 (int)    : min=0 max=10 step=1 default=0 value=0 flags=slider
                            hue 0x00980903 (int)    : min=0 max=100 step=1 default=0 value=0 flags=slider
        white_balance_automatic 0x0098090c (bool)   : default=1 value=1
                       exposure 0x00980911 (int)    : min=-40 max=40 step=1 default=0 value=0
           power_line_frequency 0x00980918 (menu)   : min=0 max=3 default=3 value=3 (Auto)
      white_balance_temperature 0x0098091a (int)    : min=2700 max=6500 step=1 default=6500 value=6500
                      sharpness 0x0098091b (int)    : min=0 max=10 step=1 default=0 value=0 flags=slider
                            iso 0x009819a9 (int)    : min=100 max=6400 step=100 default=100 value=100

Camera Controls

                  auto_exposure 0x009a0901 (menu)   : min=0 max=1 default=0 value=0 (Auto Mode)
         exposure_time_absolute 0x009a0902 (int)    : min=100000 max=100000000 step=1 default=33000000 value=33000000
                 focus_absolute 0x009a090a (int)    : min=0 max=255 step=1 default=0 value=0
     focus_automatic_continuous 0x009a090c (bool)   : default=0 value=0
Note
Preview stream and Video stream share the same control setting, so the user modifies one and affects another. However, the control setting of Capture is separated, it doesn’t affect others.
Auto Focus
Note
The SONY IMX214 sensor doesn’t support AF, so this is not yet available.
Auto Exposure
Auto Exposure can be set to AUTO mode and MANUAL mode.
In AUTO mode, the exposure is calculated automatically. The user can set exposure compensation to adjust the exposure level.
v4l2-ctl -d ${video[0]} -c auto_exposure=0                    # AUTO
v4l2-ctl -d ${video[0]} -c exposure=-40                       # MIN
v4l2-ctl -d ${video[0]} -c exposure=0                         # DEFAULT
v4l2-ctl -d ${video[0]} -c exposure=40                        # MAX
In MANUAL mode, the exposure is decided manually by the user. The user can set exposure time and ISO to adjust the exposure level.
v4l2-ctl -d ${video[0]} -c auto_exposure=1                    # MANUAL
v4l2-ctl -d ${video[0]} -c exposure_time_absolute=100000      # MIN
v4l2-ctl -d ${video[0]} -c exposure_time_absolute=100000000   # MAX
v4l2-ctl -d ${video[0]} -c iso=100                            # MIN
v4l2-ctl -d ${video[0]} -c iso=6400                           # MAX
Auto White Balance
Auto White Balance can be set to AUTO mode or MANUAL mode.
In AUTO mode, the white balance value is calculated automatically.
v4l2-ctl -d ${video[0]} -c white_balance_automatic=1 # AUTO
In MANUAL mode, the white balance value is decided manually by the user. The user can set the white balance temperature value.
v4l2-ctl -d ${video[0]} -c white_balance_automatic=0          # MANUAL
v4l2-ctl -d ${video[0]} -c white_balance_temperature=2800     # INCANDESCENT
v4l2-ctl -d ${video[0]} -c white_balance_temperature=3300     # WARM_FLUORESCENT
v4l2-ctl -d ${video[0]} -c white_balance_temperature=3800     # TWILIGHT
v4l2-ctl -d ${video[0]} -c white_balance_temperature=4400     # FLUORESCENT
v4l2-ctl -d ${video[0]} -c white_balance_temperature=5200     # DAYLIGHT
v4l2-ctl -d ${video[0]} -c white_balance_temperature=5800     # CLOUDY_DAYLIGHT
v4l2-ctl -d ${video[0]} -c white_balance_temperature=6300     # SHADE
Note
Although the temperature value is consecutive, the white balance change is discrete. Because the value is mapped to a white balance mode, such as INCANDESCENT, DAYLIGHT, etc.
ISP Pipeline Feature
There are 4 ISP pipeline feature controls (brightness, contrast, saturation, sharpness, and hue). The user can set them and observe the image quality change.
v4l2-ctl -d ${video[0]} -c brightness=0                       # MIN
v4l2-ctl -d ${video[0]} -c brightness=100                     # MAX
v4l2-ctl -d ${video[0]} -c contrast=0                         # MIN
v4l2-ctl -d ${video[0]} -c contrast=10                        # MAX
v4l2-ctl -d ${video[0]} -c saturation=0                       # MIN
v4l2-ctl -d ${video[0]} -c saturation=10                      # MAX
v4l2-ctl -d ${video[0]} -c sharpness=0                        # MIN
v4l2-ctl -d ${video[0]} -c sharpness=10                       # MAX
v4l2-ctl -d ${video[0]} -c hue=0                              # MIN
v4l2-ctl -d ${video[0]} -c hue=10                             # MAX
Camera Integration
The user who wants to use other sensors will need to integrate the sensor driver into MediaTek Imgsensor. For more details, please refer to the sensor porting guide on MediaTek On-Line:
Sensor Type |
Document Path |
|---|---|
RAW |
IoT/Software/Genio Series SoC/Genio 1200/IoT Yocto/Camera/MTK_MT8395_IoT_Yocto_RAW_Image_Sensor_Driver_Development_Guide_v1.4.docx |
YUV |
IoT/Software/Genio Series SoC/Genio 1200/IoT Yocto/Camera/MTK_MT8395_IoT_Yocto_YUV_Image_Sensor_Driver_Development_Guide_v1.4.docx |
Calibration and Tuning
Camera Calibration
In camera sensor calibration, several parameters are calibrated to ensure optimal image quality and accurate performance. Here is an overview of the key calibration items that the MediaTek calibration tool supports:
- Optical Black (OB) Calibration
The optical black level is subtracted from the image data to remove the dark current and produce a corrected image with better image quality.
- Auto White Balance (AWB) Calibration
This process corrects color temperature variations in different lighting conditions. It involves adjusting the camera’s white balance settings to accurately reproduce colors under various lighting sources.
- Auto Exposure (AE) Calibration
AE calibration determines the camera’s exposure settings to achieve accurate exposure levels in different lighting conditions. Through algorithms and analysis, the calibration determines the appropriate exposure time, Gain, ISO sensitivity, and other parameters to capture well-exposed images while maintaining details in high-contrast scenes.
- Lens Shading Calibration
Shading refers to variations in brightness or color across the image sensor due to factors like lens vignetting or uneven illumination. Shading correction involves estimating the shading pattern across the sensor and applying corrections to ensure uniform brightness and color reproduction throughout the image.
We offer the MediaToolKit to assist with camera calibration (Require NDA). For detailed information on how to use the MediaToolKit, please refer to the user documentation available on MediaTek On-Line document path: IoT/Software/Genio Series SoC/Genio 1200/IoT Yocto/Camera/Camera Tuning Tool/MediaToolKit/
Camera Tuning
Camera tuning will primarily involve adjusting the relevant parameters of the ISP (Image Signal Processor) module and aims to reproduce the captured image to closely resemble what is perceived by the human eye. This involves enhancing various visual aspects such as saturation, sharpness, de-noise, and even stylization, if desired.
Within the realm of camera tuning, we offer the ImagiqSimulator to provide the following features:
- Parameter Adjustment
It allows for the manipulation and adjustment of various ISP parameters to fine-tune the image processing pipeline.
- Image Comparison
It enables users to compare the original image with the processed image to evaluate the effectiveness of parameter adjustments.
- Parameter Import/Export
It provides parameters DB tool to allow for the importation/exportation of tuned parameter sets, which can be extracted/applied directly on target devices or integrated into the codebase.
- Batch Processing
It supports batch processing, enabling users to apply the same set of parameter adjustments to multiple images automatically.
To obtain more detailed information about the ImagiqSimulator (Require NDA), please refer to the user documentation available on MediaTek On-Line document path: IoT/Software/Genio Series SoC/Genio 1200/IoT Yocto/Camera/Camera Tuning Tool/ImagiqSimulator5/
Known Issues
ID |
Description |
|---|---|
AUTO00270926 |
[G1200-evk][Camera][RAW] Random crash after open/close the preview/video/capture streams in stress environment |