Flash Image to Board
This guide shows how to “flash” (write) the system image into the non-volatile flash memory of Genio EVKs. The flashing process is performed over a USB connection between the target board and the host computer containing the image.
In order to write the on-board storage with Genio Tools, you need to set the SoC in download mode, which allows Genio Tools to transfer a download agent binary to the SRAM of SoC. The download agent then provides a fastboot interface for subsequent image transfer and storage write operations.
Note
Make sure you have installed the Genio Tools on your Linux or Windows host before continuing the process.
Note
These pages are only a quick guide on using Genio Tools to flash images. Please read Genio Tools in order to get the most out of Genio Tools.
Note
For Genio 520/720, install the development version of genio-tools:
pip install -U --pre genio-tools
The --pre option installs development versions.
After installation, check the version of the genio-flash command:
genio-flash --version
It should be 1.7.0a2 or later. Earlier versions do not support Genio 720/520 EVK, primarily because the bootstrapping address has changed from 0x201000 to 0x2001000.
The flash tool needs to detect the SoC family and update the bootstrap address accordingly.
To download the latest download agent for the respective Genio EVK boards, please refer to the section titled pre-built board image.
Once you have downloaded the
aiotXXXX_raw.zipfile, proceed to unarchive it. For example, if you downloaded “aiot8395p6_64_bsp_alps-vf-mp-t0.mp5-mp-u0.mp5-V7.6.V4.7_user_raw.zip”, extracting this file will yield the following files: “mmc0boot0.bin”, “mmc0boot1.bin”, “mmc0.bin”, and “lk.bin”.
Important
In case of Genio 520/720, once you have downloaded the aiotXXXX_raw.zip file, proceed to unarchive it. For example, if you downloaded “aiot8391p2_64_bsp_alps-vf-mp-u0.mp5-mp-v0.mp5-V7.48.V4.47_user_raw.zip”, extracting this file will yield the following files: ufs_lu2.bin, ufs_lu0_lu1.bin, and lk.bin.
Create the respective “genio-XXX-evk” folder under “Genio-Flash-Tool-Path” and copy the shared eMMC Android image files i.e “mmc0boot0.bin”, “mmc0boot1.bin” and “mmc0.bin” into it.
Important
In case of Genio 520/720, create the respective “genio-XXX-evk” folder under “Genio-Flash-Tool-Path” and copy the shared UFS Android image files, i.e. ufs_lu2.bin, ufs_lu0_lu1.bin, and lk.bin into it.
Open Windows command line and execute “genio-flash erase-mmc”.
genio-flash erase-mmcshould print logs to the terminal similar to this:D:\<Genio-Flash-Tool-Path>\genio-350-evk>genio-flash erase-mmcgenio-flash erase-mmcshould print logs to the terminal similar to this:D:\<Genio-Flash-Tool-Path>\genio-350-evk>genio-flash erase-mmc Genio Tools: v1.6a3 Raw Image: name: eMMC Disk Image (Sparse Image) machine: Unspecified WARNING:root:Cannot find any FTDI device WARNING:root:Unable to find and reset the board. Possible causes are: 1. This is not a Genio 350/700 EVK, nor a Pumpkin board. 2. The board port UART0 is not connected. 3. The UART0 port is being opened by another tool, such as TeraTerm on Windows. You can now manually reset the board into DOWNLOAD mode. INFO:root:Continue flashing... Looking for MediaTek SoC matching USB device 0e8d:0003D:\<Genio-Flash-Tool-Path>\genio-510-evk>genio-flash erase-mmcgenio-flash erase-mmcshould print logs to the terminal similar to this:D:\<Genio-Flash-Tool-Path>\genio-510-evk>genio-flash erase-mmc Genio Tools: v1.6a3 Raw Image: name: eMMC Disk Image (Sparse Image) machine: Unspecified WARNING:root:FTDI D2xx library not found WARNING:root:Unable to find and reset the board. Possible causes are: 1. This is not a Genio 350/700 EVK, nor a Pumpkin board. 2. The board port UART0 is not connected. 3. The UART0 port is being opened by another tool, such as TeraTerm on Windows. You can now manually reset the board into DOWNLOAD mode.D:\<Genio-Flash-Tool-Path>\genio-700-evk>genio-flash erase-mmcgenio-flash erase-mmcshould print logs to the terminal similar to this:D:\<Genio-Flash-Tool-Path>\genio-700-evk>genio-flash erase-mmc Genio Tools: v1.6a3 Raw Image: name: eMMC Disk Image (Sparse Image) machine: Unspecified WARNING:root:FTDI D2xx library not found WARNING:root:Unable to find and reset the board. Possible causes are: 1. This is not a Genio 350/700 EVK, nor a Pumpkin board. 2. The board port UART0 is not connected. 3. The UART0 port is being opened by another tool, such as TeraTerm on Windows. You can now manually reset the board into DOWNLOAD mode. INFO:root:Continue flashing... Looking for MediaTek SoC matching USB device 0e8d:0003D:\<Genio-Flash-Tool-Path>\genio-1200-evk>genio-flash erase-mmcgenio-flash erase-mmcshould print logs to the terminal similar to this:D:\<Genio-Flash-Tool-Path>\genio-1200-evk>genio-flash erase-mmc Genio Tools: v1.6a3 Genio Tools: v1.6a3 Raw Image: name: eMMC Disk Image (Sparse Image) machine: Unspecified WARNING:root:Cannot find any FTDI device WARNING:root:Unable to find and reset the board. Possible causes are: 1. This is not a Genio 350/700 EVK, nor a Pumpkin board. 2. The board port UART0 is not connected. 3. The UART0 port is being opened by another tool, such as TeraTerm on Windows. You can now manually reset the board into DOWNLOAD mode. INFO:root:Continue flashing... Looking for MediaTek SoC matching USB device 0e8d:0003D:\<Genio-Flash-Tool-Path>\genio-520-evk>genio-flash erase-mmcgenio-flash erase-mmcshould print logs to the terminal similar to this:D:\<Genio-Flash-Tool-Path>\genio-520-evk>genio-flash erase-mmc Genio Tools: v1.7.0a2 Genio Tools: v1.7.0a2 Raw Image: name: UFS Disk Image (Sparse Image) machine: Unspecified WARNING:root:Cannot find any FTDI device WARNING:root:Unable to find and reset the board. Possible causes are: 1. This is not a Genio 350/700 EVK, nor a Pumpkin board. 2. The board port UART0 is not connected. 3. The UART0 port is being opened by another tool, such as TeraTerm on Windows. You can now manually reset the board into DOWNLOAD mode. INFO:root:Continue flashing... Looking for MediaTek SoC matching USB device 0e8d:0003D:\<Genio-Flash-Tool-Path>\genio-720-evk>genio-flash erase-mmcgenio-flash erase-mmcshould print logs to the terminal similar to this:D:\<Genio-Flash-Tool-Path>\genio-520-evk>genio-flash erase-mmc Genio Tools: v1.7.0a2 Genio Tools: v1.7.0a2 Raw Image: name: UFS Disk Image (Sparse Image) machine: Unspecified WARNING:root:Cannot find any FTDI device WARNING:root:Unable to find and reset the board. Possible causes are: 1. This is not a Genio 350/700 EVK, nor a Pumpkin board. 2. The board port UART0 is not connected. 3. The UART0 port is being opened by another tool, such as TeraTerm on Windows. You can now manually reset the board into DOWNLOAD mode. INFO:root:Continue flashing... Looking for MediaTek SoC matching USB device 0e8d:0003D:\<Genio-Flash-Tool-Path>\genio-360-evk>genio-flash erase-mmcgenio-flash erase-mmcshould print logs to the terminal similar to this:D:\<Genio-Flash-Tool-Path>\genio-360-evk>genio-flash erase-mmc Genio Tools: v1.6a3 Raw Image: name: eMMC Disk Image (Sparse Image) machine: Unspecified WARNING:root:FTDI D2xx library not found WARNING:root:Unable to find and reset the board. Possible causes are: 1. This is not a Genio 350/700 EVK, nor a Pumpkin board. 2. The board port UART0 is not connected. 3. The UART0 port is being opened by another tool, such as TeraTerm on Windows. You can now manually reset the board into DOWNLOAD mode. INFO:root:Continue flashing... Looking for MediaTek SoC matching USB device 0e8d:0003
Enter Download Mode
Follow these steps to make the Genio EVK enter download mode:
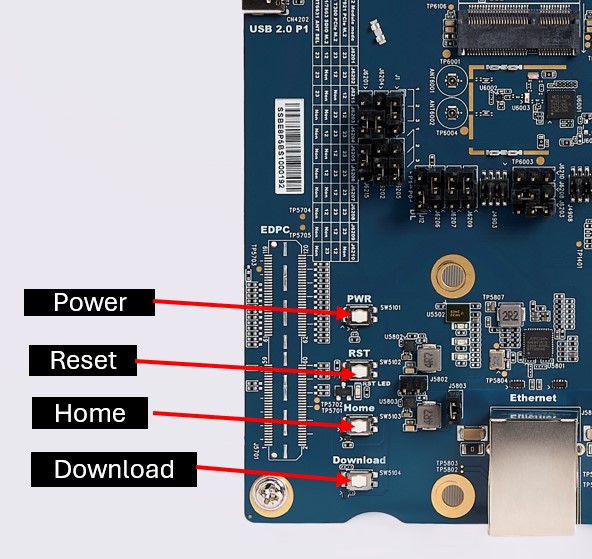
Locate the push buttons on the board:
Press and keep pressing the volume up button.
Press and release the reset button.
Release the volume up button.
Locate the push buttons on the board:
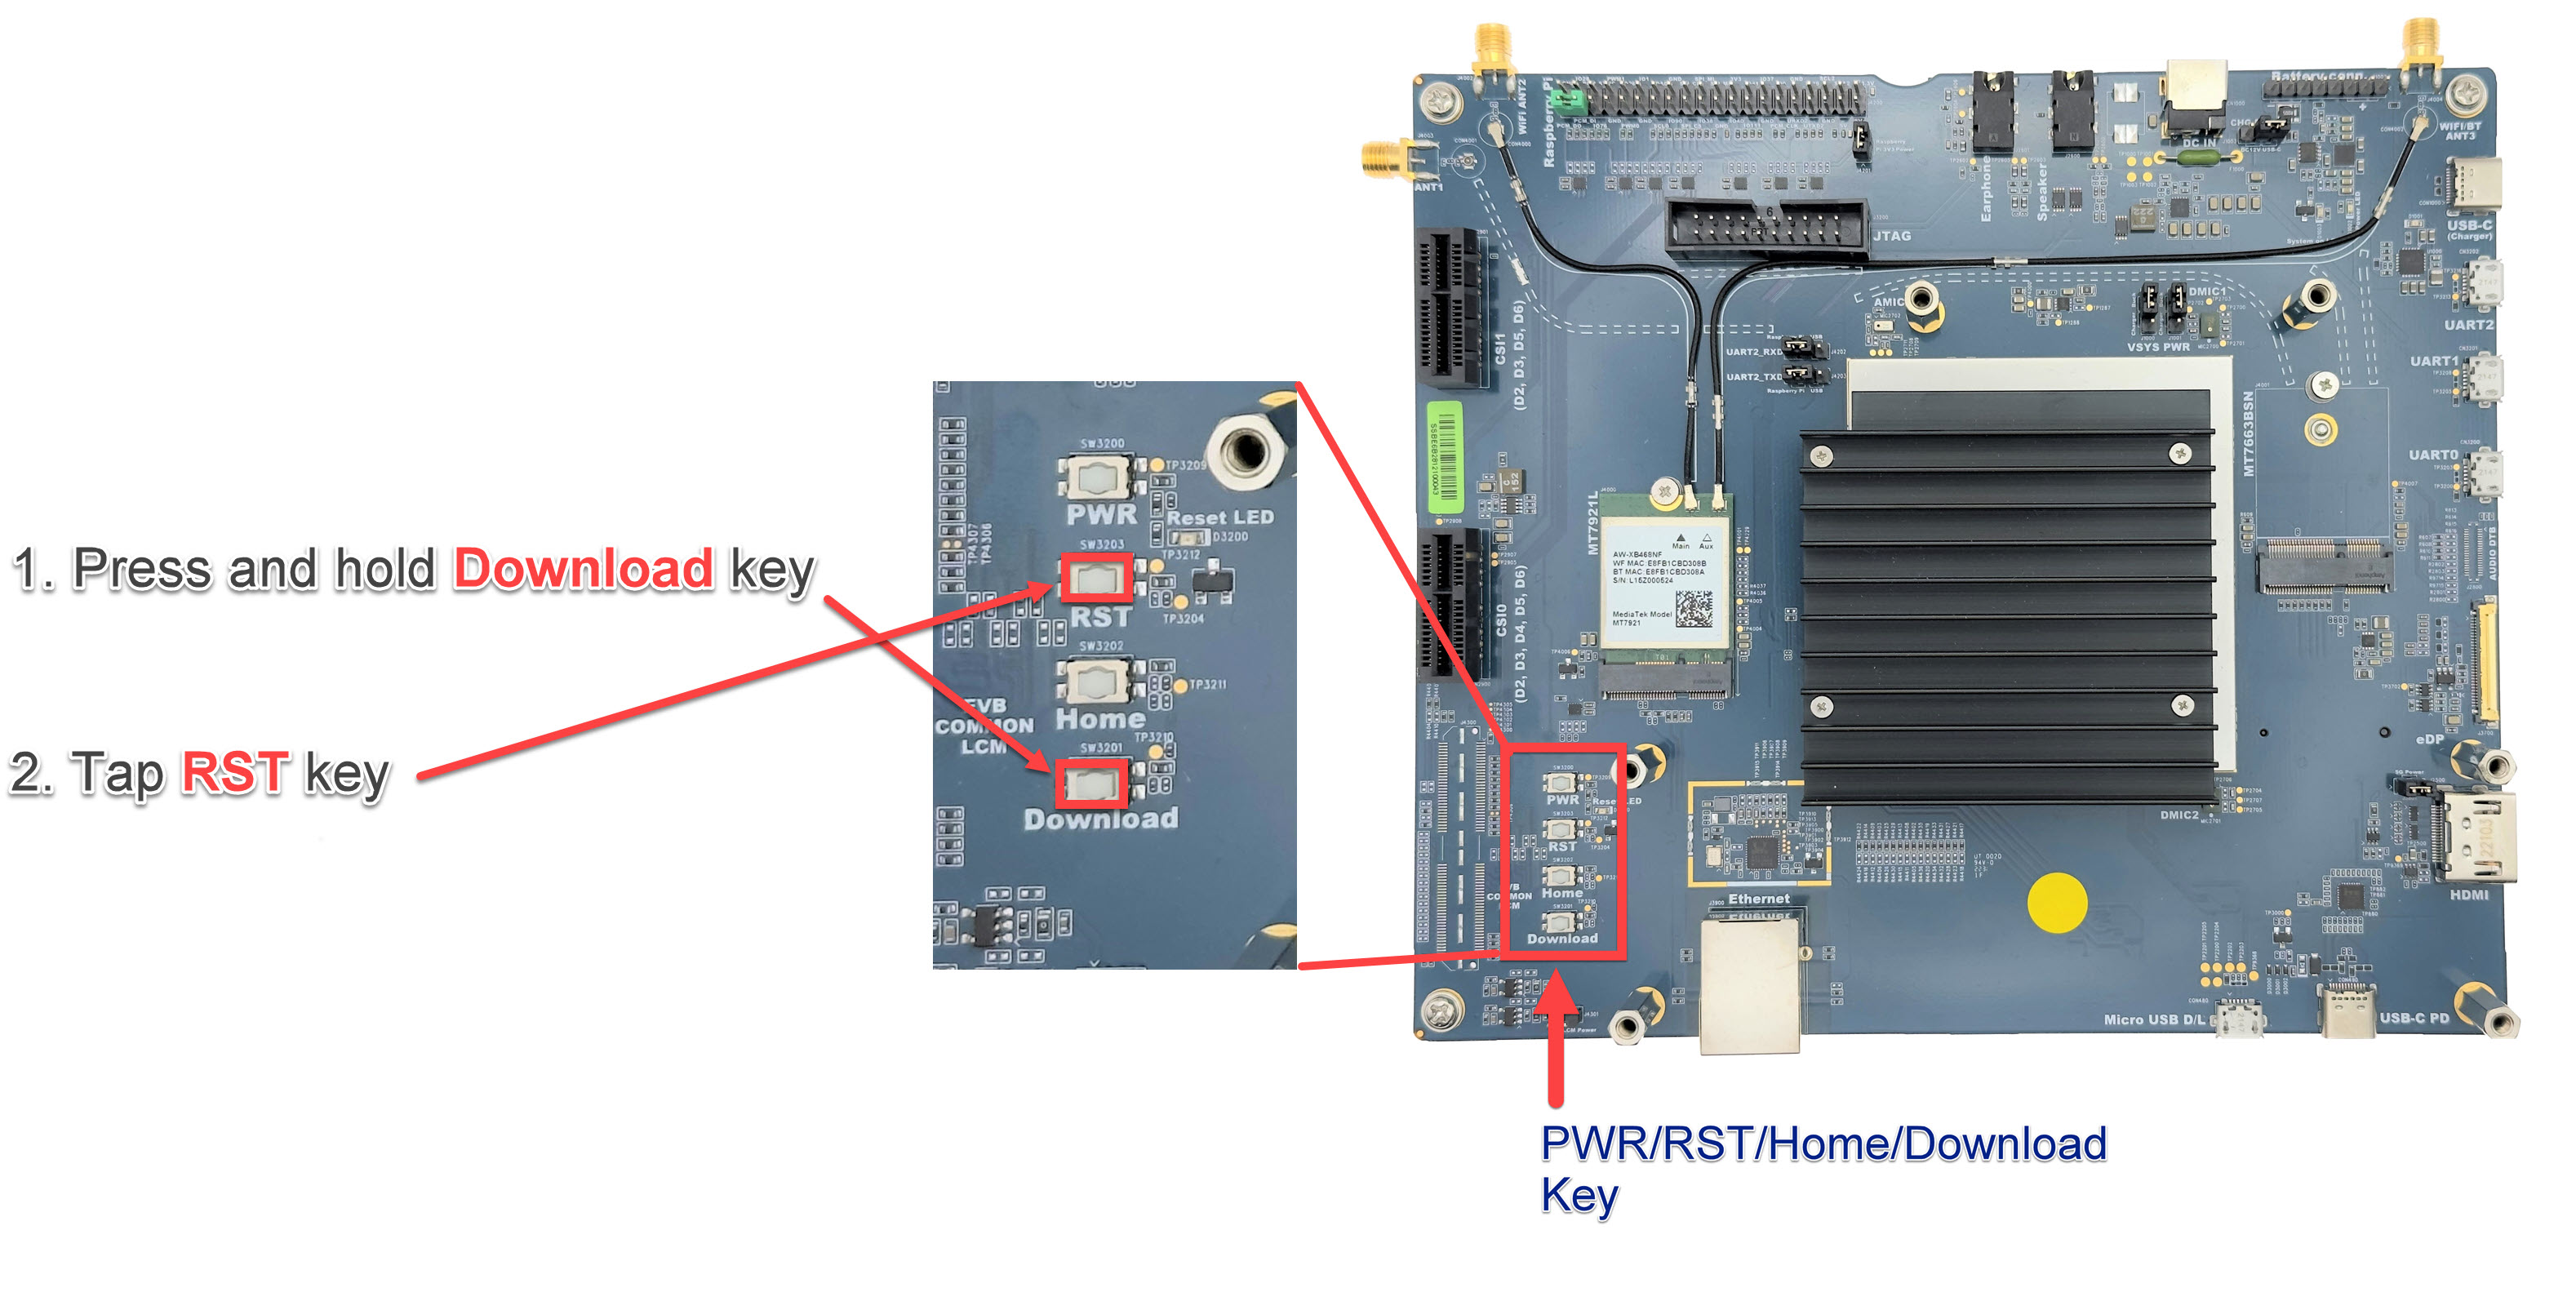
Press and keep pressing the Download button.
Press and release the RST button.
Hold the Download button until you see the log
Erasing 'mmc0'message, as shown below:
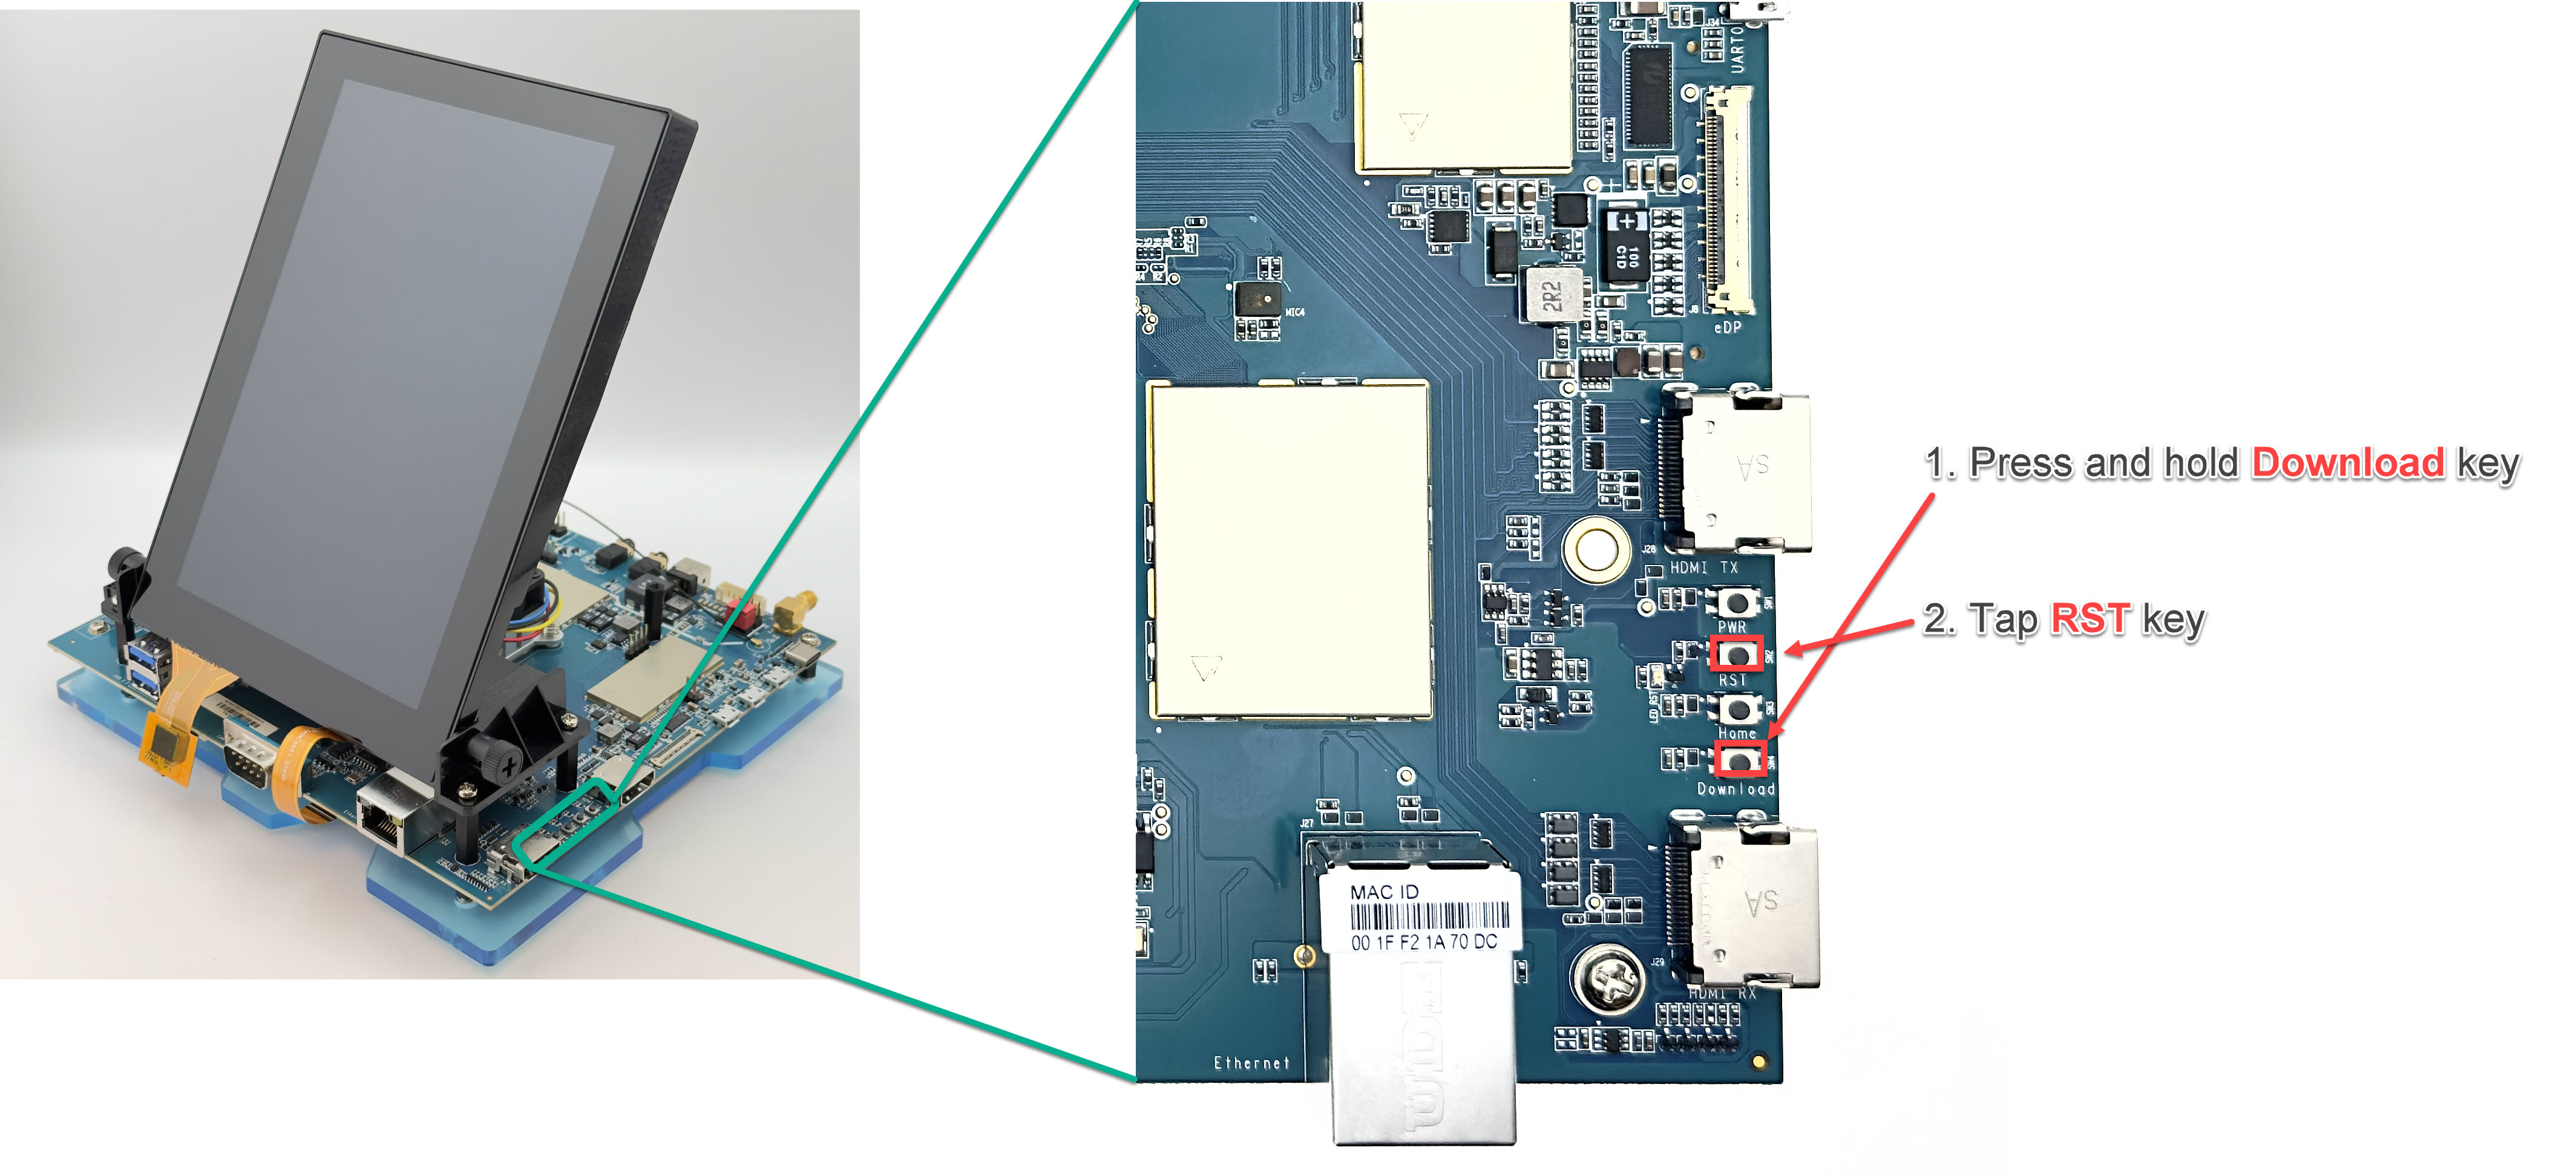
Locate the push buttons on the board:
Press and keep pressing the Download button.
Press and release the RST button.
Hold the Download button until you see the log
Erasing 'mmc0'message, as shown below:
Locate the push buttons on the board:
Press and keep pressing the Download button.
Press and release the RST button.
Hold the Download button until you see the log
Erasing 'mmc0'message, as shown below:
Locate the push buttons on the board:
Press and keep pressing the Download button.
Press and release the RST button.
Hold the Download button until you see the log
Erasing 'mmc0'message, as shown below:
Locate the push buttons on the board:
Press and keep pressing the Download button.
Press and release the RST button.
Hold the Download button until you see the log
Erasing 'mmc0'message, as shown below:
Locate the push buttons on the board:
Press and keep pressing the Download button.
Press and release the RST button.
Hold the Download button until you see the log
Erasing 'mmc0'message, as shown below:
First, press and hold the Download key without releasing it. While holding the Download key, press and release the Reset key. Finally, release the Download key. The target board will then proceed with partition erasure.
INFO:root:Continue flashing...
Looking for MediaTek SoC matching USB device 0e8d:0003
Opening COM8 using baudrate=115200
Connected to MediaTek SoC: hw_code[0x8168]
Sending bootstrap to address: 0x201000
Jumping to bootstrap at address 0x201000 in AArch64 mode
erasing mmc0
< waiting for any device >
Erasing 'mmc0'                                     (bootloader) request sz: 0xe8f800000, real erase len: 0x0
OKAY [  0.474s]
Finished. Total time: 0.481s
erasing mmc0boot0
Erasing 'mmc0boot0'                                (bootloader) request sz: 0x400000, real erase len: 0x400000
OKAY [  0.007s]
Finished. Total time: 0.011s
erasing mmc0boot1
Erasing 'mmc0boot1'                                (bootloader) request sz: 0x400000, real erase len: 0x400000
OKAY [  0.008s]
Finished. Total time: 0.013s
Rebooting                                          OKAY [  0.002s]
Finished. Total time: 0.003s
INFO:root:Continue flashing... Looking for MediaTek SoC matching USB device 0e8d:0003 Opening COM6 using baudrate=115200 Connected to MediaTek SoC: hw_code[0x8188] Sending bootstrap to address: 0x201000 Jumping to bootstrap at address 0x201000 in AArch64 mode erasing mmc0 < waiting for any device > Erasing 'mmc0' (bootloader) request sz: 0xece000000, real erase len: 0x0 OKAY [ 0.295s] Finished. Total time: 0.306s erasing mmc0boot0 Erasing 'mmc0boot0' (bootloader) request sz: 0x400000, real erase len: 0x400000 OKAY [ 0.010s] Finished. Total time: 0.017s erasing mmc0boot1 Erasing 'mmc0boot1' (bootloader) request sz: 0x400000, real erase len: 0x400000 OKAY [ 0.008s] Finished. Total time: 0.014s Rebooting OKAY [ 0.002s] Finished. Total time: 0.003sINFO:root:Continue flashing... Looking for MediaTek SoC matching USB device 0e8d:0003 Opening COM6 using baudrate=115200 Connected to MediaTek SoC: hw_code[0x8188] Sending bootstrap to address: 0x201000 Jumping to bootstrap at address 0x201000 in AArch64 mode erasing mmc0 < waiting for any device > Erasing 'mmc0' (bootloader) request sz: 0xece000000, real erase len: 0x0 OKAY [ 0.285s] Finished. Total time: 0.325s erasing mmc0boot0 Erasing 'mmc0boot0' (bootloader) request sz: 0x400000, real erase len: 0x400000 OKAY [ 0.007s] Finished. Total time: 0.012s erasing mmc0boot1 Erasing 'mmc0boot1' (bootloader) request sz: 0x400000, real erase len: 0x400000 OKAY [ 0.007s] Finished. Total time: 0.011s Rebooting OKAY [ 0.002s] Finished. Total time: 0.003sINFO:root:Continue flashing... Looking for MediaTek SoC matching USB device 0e8d:0003 Opening COM8 using baudrate=115200 Connected to MediaTek SoC: hw_code[0x8195] Sending bootstrap to address: 0x201000 Jumping to bootstrap at address 0x201000 in AArch64 mode erasing mmc0 < waiting for any device > Erasing 'mmc0' (bootloader) request sz: 0xece000000, real erase len: 0x0 OKAY [ 0.293s] Finished. Total time: 0.299s erasing mmc0boot0 Erasing 'mmc0boot0' (bootloader) request sz: 0x400000, real erase len: 0x400000 OKAY [ 0.008s] Finished. Total time: 0.013s erasing mmc0boot1 Erasing 'mmc0boot1' (bootloader) request sz: 0x400000, real erase len: 0x400000 OKAY [ 0.007s] Finished. Total time: 0.012s Rebooting OKAY [ 0.002s] Finished. Total time: 0.003sINFO:root:Continue flashing... Looking for MediaTek SoC matching USB device 0e8d:0003 Opening COM8 using baudrate=115200 Connected to MediaTek SoC: hw_code[0x8189] Sending bootstrap to address: 0x2001000 Jumping to bootstrap at address 0x2001000 in AArch64 mode erasing mmc0 < waiting for any device > Erasing 'mmc0' (bootloader) request sz: 0xece000000, real erase len: 0x0 OKAY [ 0.293s] Finished. Total time: 0.299s erasing mmc0boot0 Erasing 'mmc0boot0' (bootloader) request sz: 0x400000, real erase len: 0x400000 OKAY [ 0.008s] Finished. Total time: 0.013s erasing mmc0boot1 Erasing 'mmc0boot1' (bootloader) request sz: 0x400000, real erase len: 0x400000 OKAY [ 0.007s] Finished. Total time: 0.012s Rebooting OKAY [ 0.002s] Finished. Total time: 0.003sINFO:root:Continue flashing... Looking for MediaTek SoC matching USB device 0e8d:0003 Opening COM8 using baudrate=115200 Connected to MediaTek SoC: hw_code[0x8189] Sending bootstrap to address: 0x2001000 Jumping to bootstrap at address 0x2001000 in AArch64 mode erasing mmc0 < waiting for any device > Erasing 'mmc0' (bootloader) request sz: 0xece000000, real erase len: 0x0 OKAY [ 0.293s] Finished. Total time: 0.299s erasing mmc0boot0 Erasing 'mmc0boot0' (bootloader) request sz: 0x400000, real erase len: 0x400000 OKAY [ 0.008s] Finished. Total time: 0.013s erasing mmc0boot1 Erasing 'mmc0boot1' (bootloader) request sz: 0x400000, real erase len: 0x400000 OKAY [ 0.007s] Finished. Total time: 0.012s Rebooting OKAY [ 0.002s] Finished. Total time: 0.003sINFO:root:Continue flashing... Looking for MediaTek SoC matching USB device 0e8d:0003 Opening COM6 using baudrate=115200 Connected to MediaTek SoC: hw_code[0x8366] Sending bootstrap to address: 0x201000 Jumping to bootstrap at address 0x201000 in AArch64 mode erasing mmc0 < waiting for any device > Erasing 'mmc0' (bootloader) request sz: 0xece000000, real erase len: 0x0 OKAY [ 0.285s] Finished. Total time: 0.325s erasing mmc0boot0 Erasing 'mmc0boot0' (bootloader) request sz: 0x400000, real erase len: 0x400000 OKAY [ 0.007s] Finished. Total time: 0.012s erasing mmc0boot1 Erasing 'mmc0boot1' (bootloader) request sz: 0x400000, real erase len: 0x400000 OKAY [ 0.007s] Finished. Total time: 0.011s Rebooting OKAY [ 0.002s] Finished. Total time: 0.003s
Execute “genio-flash”.
You should see the flashing process start. A typical successful log looks like this:
D:\<Genio-Flash-Tool-Path>\genio-350-evk>genio-flash Genio Tools: v1.6a3 Raw Image: name: eMMC Disk Image (Sparse Image) machine: Unspecified WARNING:root:Cannot find any FTDI device WARNING:root:Unable to find and reset the board. Possible causes are: 1. This is not a Genio 350/700 EVK, nor a Pumpkin board. 2. The board port UART0 is not connected. 3. The UART0 port is being opened by another tool, such as TeraTerm on Windows. You can now manually reset the board into DOWNLOAD mode. INFO:root:Continue flashing... Looking for MediaTek SoC matching USB device 0e8d:0003 Opening COM8 using baudrate=115200 Connected to MediaTek SoC: hw_code[0x8168] Sending bootstrap to address: 0x201000 Jumping to bootstrap at address 0x201000 in AArch64 mode erasing mmc0 < waiting for any device > Erasing 'mmc0' (bootloader) request sz: 0xe8f800000, real erase len: 0x0 OKAY [ 0.062s] Finished. Total time: 0.068s erasing mmc0boot0 Erasing 'mmc0boot0' (bootloader) request sz: 0x400000, real erase len: 0x400000 OKAY [ 0.007s] Finished. Total time: 0.012s erasing mmc0boot1 Erasing 'mmc0boot1' (bootloader) request sz: 0x400000, real erase len: 0x400000 OKAY [ 0.007s] Finished. Total time: 0.013s flashing mmc0=mmc0.bin Sending sparse 'mmc0' 1/9 (257193 KB) OKAY [ 5.908s] Writing 'mmc0' OKAY [ 8.632s] Sending sparse 'mmc0' 2/9 (262000 KB) OKAY [ 6.115s] Writing 'mmc0' OKAY [ 8.629s] Sending sparse 'mmc0' 3/9 (262132 KB) OKAY [ 6.664s] Writing 'mmc0' OKAY [ 10.483s] Sending sparse 'mmc0' 4/9 (257220 KB) OKAY [ 6.512s] Writing 'mmc0' OKAY [ 9.199s] Sending sparse 'mmc0' 5/9 (261881 KB) OKAY [ 6.553s] Writing 'mmc0' OKAY [ 8.718s] Sending sparse 'mmc0' 6/9 (262044 KB) OKAY [ 5.874s] Writing 'mmc0' OKAY [ 8.642s] Sending sparse 'mmc0' 7/9 (249921 KB) OKAY [ 5.906s] Writing 'mmc0' OKAY [ 9.754s] Sending sparse 'mmc0' 8/9 (261760 KB) OKAY [ 6.619s] Writing 'mmc0' OKAY [ 8.725s] Sending sparse 'mmc0' 9/9 (190352 KB) OKAY [ 4.358s] Writing 'mmc0' OKAY [ 6.770s] Finished. Total time: 143.650s flashing mmc0boot0=mmc0boot0.bin Warning: skip copying mmc0boot0 image avb footer (mmc0boot0 partition size: 0, mmc0boot0 image size: 262144). Sending 'mmc0boot0' (256 KB) OKAY [ 0.008s] Writing 'mmc0boot0' OKAY [ 0.015s] Finished. Total time: 0.054s flashing mmc0boot1=mmc0boot1.bin Warning: skip copying mmc0boot1 image avb footer (mmc0boot1 partition size: 0, mmc0boot1 image size: 262144). Sending 'mmc0boot1' (256 KB) OKAY [ 0.008s] Writing 'mmc0boot1' OKAY [ 0.015s] Finished. Total time: 0.055s Rebooting OKAY [ 0.002s] Finished. Total time: 0.003sD:\<Genio-Flash-Tool-Path>\genio-510-evk>genio-flash Genio Tools: v1.6a3 Raw Image: name: eMMC Disk Image (Sparse Image) machine: Unspecified WARNING:root:FTDI D2xx library not found WARNING:root:Unable to find and reset the board. Possible causes are: 1. This is not a Genio 350/700 EVK, nor a Pumpkin board. 2. The board port UART0 is not connected. 3. The UART0 port is being opened by another tool, such as TeraTerm on Windows. You can now manually reset the board into DOWNLOAD mode. INFO:root:Continue flashing... Looking for MediaTek SoC matching USB device 0e8d:0003 Opening COM6 using baudrate=115200 Connected to MediaTek SoC: hw_code[0x8188] Sending bootstrap to address: 0x201000 Jumping to bootstrap at address 0x201000 in AArch64 mode erasing mmc0 < waiting for any device > Erasing 'mmc0' (bootloader) request sz: 0xece000000, real erase len: 0x0 OKAY [ 0.127s] Finished. Total time: 0.133s erasing mmc0boot0 Erasing 'mmc0boot0' (bootloader) request sz: 0x400000, real erase len: 0x400000 OKAY [ 0.014s] Finished. Total time: 0.024s erasing mmc0boot1 Erasing 'mmc0boot1' (bootloader) request sz: 0x400000, real erase len: 0x400000 OKAY [ 0.013s] Finished. Total time: 0.021s flashing mmc0=mmc0.bin Sending sparse 'mmc0' 1/7 (262141 KB) OKAY [ 8.565s] Writing 'mmc0' OKAY [ 10.543s] Sending sparse 'mmc0' 2/7 (262140 KB) OKAY [ 8.486s] Writing 'mmc0' OKAY [ 10.153s] Sending sparse 'mmc0' 3/7 (231216 KB) OKAY [ 7.461s] Writing 'mmc0' OKAY [ 8.956s] Sending sparse 'mmc0' 4/7 (262140 KB) OKAY [ 8.405s] Writing 'mmc0' OKAY [ 10.154s] Sending sparse 'mmc0' 5/7 (262140 KB) OKAY [ 8.392s] Writing 'mmc0' OKAY [ 10.164s] Sending sparse 'mmc0' 6/7 (236124 KB) OKAY [ 7.500s] Writing 'mmc0' OKAY [ 9.146s] Sending sparse 'mmc0' 7/7 (104548 KB) OKAY [ 3.353s] Writing 'mmc0' OKAY [ 5.833s] Finished. Total time: 127.855s flashing mmc0boot0=mmc0boot0.bin Warning: skip copying mmc0boot0 image avb footer (mmc0boot0 partition size: 0, mmc0boot0 image size: 524288). Sending 'mmc0boot0' (512 KB) OKAY [ 0.019s] Writing 'mmc0boot0' OKAY [ 0.027s] Finished. Total time: 0.090s flashing mmc0boot1=mmc0boot1.bin Warning: skip copying mmc0boot1 image avb footer (mmc0boot1 partition size: 0, mmc0boot1 image size: 524288). Sending 'mmc0boot1' (512 KB) OKAY [ 0.019s] Writing 'mmc0boot1' OKAY [ 0.026s] Finished. Total time: 0.089s Rebooting OKAY [ 0.002s] Finished. Total time: 0.006sD:\<Genio-Flash-Tool-Path>\genio-700-evk>genio-flash Genio Tools: v1.6a3 Raw Image: name: eMMC Disk Image (Sparse Image) machine: Unspecified WARNING:root:FTDI D2xx library not found WARNING:root:Unable to find and reset the board. Possible causes are: 1. This is not a Genio 350/700 EVK, nor a Pumpkin board. 2. The board port UART0 is not connected. 3. The UART0 port is being opened by another tool, such as TeraTerm on Windows. You can now manually reset the board into DOWNLOAD mode. INFO:root:Continue flashing... Looking for MediaTek SoC matching USB device 0e8d:0003 Opening COM6 using baudrate=115200 Connected to MediaTek SoC: hw_code[0x8188] Sending bootstrap to address: 0x201000 Jumping to bootstrap at address 0x201000 in AArch64 mode erasing mmc0 < waiting for any device > Erasing 'mmc0' (bootloader) request sz: 0xece000000, real erase len: 0x0 OKAY [ 0.123s] Finished. Total time: 0.130s erasing mmc0boot0 Erasing 'mmc0boot0' (bootloader) request sz: 0x400000, real erase len: 0x400000 OKAY [ 0.007s] Finished. Total time: 0.013s erasing mmc0boot1 Erasing 'mmc0boot1' (bootloader) request sz: 0x400000, real erase len: 0x400000 OKAY [ 0.007s] Finished. Total time: 0.012s flashing mmc0=mmc0.bin Sending sparse 'mmc0' 1/7 (262141 KB) OKAY [ 8.656s] Writing 'mmc0' OKAY [ 10.578s] Sending sparse 'mmc0' 2/7 (262140 KB) OKAY [ 7.834s] Writing 'mmc0' OKAY [ 10.148s] Sending sparse 'mmc0' 3/7 (229448 KB) OKAY [ 7.689s] Writing 'mmc0' OKAY [ 8.888s] Sending sparse 'mmc0' 4/7 (262140 KB) OKAY [ 9.124s] Writing 'mmc0' OKAY [ 10.148s] Sending sparse 'mmc0' 5/7 (262140 KB) OKAY [ 9.829s] Writing 'mmc0' OKAY [ 10.163s] Sending sparse 'mmc0' 6/7 (233616 KB) OKAY [ 8.056s] Writing 'mmc0' OKAY [ 9.047s] Sending sparse 'mmc0' 7/7 (105056 KB) OKAY [ 3.521s] Writing 'mmc0' OKAY [ 5.848s] Finished. Total time: 135.595s flashing mmc0boot0=mmc0boot0.bin Warning: skip copying mmc0boot0 image avb footer (mmc0boot0 partition size: 0, mmc0boot0 image size: 524288). Sending 'mmc0boot0' (512 KB) OKAY [ 0.021s] Writing 'mmc0boot0' OKAY [ 0.026s] Finished. Total time: 0.095s flashing mmc0boot1=mmc0boot1.bin Warning: skip copying mmc0boot1 image avb footer (mmc0boot1 partition size: 0, mmc0boot1 image size: 524288). Sending 'mmc0boot1' (512 KB) OKAY [ 0.021s] Writing 'mmc0boot1' OKAY [ 0.026s] Finished. Total time: 0.090s Rebooting OKAY [ 0.002s] Finished. Total time: 0.005sD:\<Genio-Flash-Tool-Path>\genio-1200-evk>genio-flash Genio Tools: v1.6a3 Raw Image: name: eMMC Disk Image (Sparse Image) machine: Unspecified WARNING:root:Cannot find any FTDI device WARNING:root:Unable to find and reset the board. Possible causes are: 1. This is not a Genio 350/700 EVK, nor a Pumpkin board. 2. The board port UART0 is not connected. 3. The UART0 port is being opened by another tool, such as TeraTerm on Windows. You can now manually reset the board into DOWNLOAD mode. INFO:root:Continue flashing... Looking for MediaTek SoC matching USB device 0e8d:0003 Opening COM8 using baudrate=115200 Connected to MediaTek SoC: hw_code[0x8195] Sending bootstrap to address: 0x201000 Jumping to bootstrap at address 0x201000 in AArch64 mode erasing mmc0 < waiting for any device > Erasing 'mmc0' (bootloader) request sz: 0xece000000, real erase len: 0x0 OKAY [ 0.121s] Finished. Total time: 0.127s erasing mmc0boot0 Erasing 'mmc0boot0' (bootloader) request sz: 0x400000, real erase len: 0x400000 OKAY [ 0.007s] Finished. Total time: 0.013s erasing mmc0boot1 Erasing 'mmc0boot1' (bootloader) request sz: 0x400000, real erase len: 0x400000 OKAY [ 0.008s] Finished. Total time: 0.014s flashing mmc0=mmc0.bin Sending sparse 'mmc0' 1/7 (262141 KB) OKAY [ 6.025s] Writing 'mmc0' OKAY [ 9.726s] Sending sparse 'mmc0' 2/7 (262140 KB) OKAY [ 6.072s] Writing 'mmc0' OKAY [ 9.240s] Sending sparse 'mmc0' 3/7 (233204 KB) OKAY [ 5.344s] Writing 'mmc0' OKAY [ 8.226s] Sending sparse 'mmc0' 4/7 (262140 KB) OKAY [ 5.973s] Writing 'mmc0' OKAY [ 9.243s] Sending sparse 'mmc0' 5/7 (262140 KB) OKAY [ 6.081s] Writing 'mmc0' OKAY [ 9.255s] Sending sparse 'mmc0' 6/7 (262140 KB) OKAY [ 6.044s] Writing 'mmc0' OKAY [ 9.243s] Sending sparse 'mmc0' 7/7 (131996 KB) OKAY [ 3.059s] Writing 'mmc0' OKAY [ 6.245s] Finished. Total time: 116.739s flashing mmc0boot0=mmc0boot0.bin Warning: skip copying mmc0boot0 image avb footer (mmc0boot0 partition size: 0, mmc0boot0 image size: 524288). Sending 'mmc0boot0' (512 KB) OKAY [ 0.014s] Writing 'mmc0boot0' OKAY [ 0.025s] Finished. Total time: 0.069s flashing mmc0boot1=mmc0boot1.bin Warning: skip copying mmc0boot1 image avb footer (mmc0boot1 partition size: 0, mmc0boot1 image size: 524288). Sending 'mmc0boot1' (512 KB) OKAY [ 0.014s] Writing 'mmc0boot1' OKAY [ 0.024s] Finished. Total time: 0.071s Rebooting OKAY [ 0.002s] Finished. Total time: 0.003sD:\<Genio-Flash-Tool-Path>\genio-520-evk>genio-flash Genio Tools: v1.7.0a2 Raw Image: name: UFS Disk Image (Sparse Image) machine: Unspecified WARNING:aiot:FTDI D2xx library not found WARNING:aiot:Unable to find and reset the board. Possible causes are: 1. This is not a Genio 350/700 EVK, nor a Pumpkin board. 2. The board port UART0 is not connected. 3. The UART0 port is being opened by another tool, such as TeraTerm on Windows. You can now manually reset the board into DOWNLOAD mode. INFO:aiot:Continue flashing... Looking for MediaTek SoC matching USB device 0e8d:0003 Opening COM8 using baudrate=115200 Connected to MediaTek SoC: hw_code[0x8189] Sending bootstrap to address: 0x2001000 Jumping to bootstrap at address 0x2001000 in AArch64 mode erasing mmc0 < waiting for any device > Erasing 'mmc0' (bootloader) request sz: 0x1dcb000000, real erase len: 0x0 OKAY [ 0.249s] Finished. Total time: 0.256s erasing mmc0boot0 Erasing 'mmc0boot0' (bootloader) request sz: 0x400000, real erase len: 0x400000 OKAY [ 0.007s] Finished. Total time: 0.015s erasing mmc0boot1 Erasing 'mmc0boot1' (bootloader) request sz: 0x400000, real erase len: 0x400000 OKAY [ 0.005s] Finished. Total time: 0.013s flashing mmc0=ufs_lu2.bin Sending sparse 'mmc0' 1/7 (262141 KB) OKAY [ 6.267s] Writing 'mmc0' OKAY [ 2.355s] Sending sparse 'mmc0' 2/7 (262140 KB) OKAY [ 6.028s] Writing 'mmc0' OKAY [ 1.957s] Sending sparse 'mmc0' 3/7 (262140 KB) OKAY [ 5.992s] Writing 'mmc0' OKAY [ 1.965s] Sending sparse 'mmc0' 4/7 (262140 KB) OKAY [ 5.909s] Writing 'mmc0' OKAY [ 1.970s] Sending sparse 'mmc0' 5/7 (262140 KB) OKAY [ 6.016s] Writing 'mmc0' OKAY [ 1.960s] Sending sparse 'mmc0' 6/7 (262140 KB) OKAY [ 6.031s] Writing 'mmc0' OKAY [ 1.959s] Sending sparse 'mmc0' 7/7 (208524 KB) OKAY [ 4.898s] Writing 'mmc0' OKAY [ 2.659s] Finished. Total time: 73.780s flashing mmc0boot0=ufs_lu0_lu1.bin Warning: skip copying mmc0boot0 image avb footer (mmc0boot0 partition size: 0, mmc0boot0 image size: 2097152). Sending 'mmc0boot0' (2048 KB) OKAY [ 0.048s] Writing 'mmc0boot0' OKAY [ 0.021s] Finished. Total time: 0.108s flashing mmc0boot1=ufs_lu0_lu1.bin Warning: skip copying mmc0boot1 image avb footer (mmc0boot1 partition size: 0, mmc0boot1 image size: 2097152). Sending 'mmc0boot1' (2048 KB) OKAY [ 0.051s] Writing 'mmc0boot1' OKAY [ 0.021s] Finished. Total time: 0.101s Rebooting OKAY [ 0.002s] Finished. Total time: 0.005sD:\<Genio-Flash-Tool-Path>\genio-720-evk>genio-flash Genio Tools: v1.7.0a2 Raw Image: name: eMMC Disk Image (Sparse Image) machine: Unspecified WARNING:aiot:FTDI D2xx library not found WARNING:aiot:Unable to find and reset the board. Possible causes are: 1. This is not a Genio 350/700 EVK, nor a Pumpkin board. 2. The board port UART0 is not connected. 3. The UART0 port is being opened by another tool, such as TeraTerm on Windows. You can now manually reset the board into DOWNLOAD mode. INFO:aiot:Continue flashing... Looking for MediaTek SoC matching USB device 0e8d:0003 Opening COM8 using baudrate=115200 Connected to MediaTek SoC: hw_code[0x8189] Sending bootstrap to address: 0x2001000 Jumping to bootstrap at address 0x2001000 in AArch64 mode erasing mmc0 < waiting for any device > Erasing 'mmc0' (bootloader) request sz: 0x1dcb000000, real erase len: 0x0 OKAY [ 0.249s] Finished. Total time: 0.256s erasing mmc0boot0 Erasing 'mmc0boot0' (bootloader) request sz: 0x400000, real erase len: 0x400000 OKAY [ 0.007s] Finished. Total time: 0.015s erasing mmc0boot1 Erasing 'mmc0boot1' (bootloader) request sz: 0x400000, real erase len: 0x400000 OKAY [ 0.005s] Finished. Total time: 0.013s flashing mmc0=ufs_lu2.bin Sending sparse 'mmc0' 1/7 (262141 KB) OKAY [ 6.267s] Writing 'mmc0' OKAY [ 2.355s] Sending sparse 'mmc0' 2/7 (262140 KB) OKAY [ 6.028s] Writing 'mmc0' OKAY [ 1.957s] Sending sparse 'mmc0' 3/7 (262140 KB) OKAY [ 5.992s] Writing 'mmc0' OKAY [ 1.965s] Sending sparse 'mmc0' 4/7 (262140 KB) OKAY [ 5.909s] Writing 'mmc0' OKAY [ 1.970s] Sending sparse 'mmc0' 5/7 (262140 KB) OKAY [ 6.016s] Writing 'mmc0' OKAY [ 1.960s] Sending sparse 'mmc0' 6/7 (262140 KB) OKAY [ 6.031s] Writing 'mmc0' OKAY [ 1.959s] Sending sparse 'mmc0' 7/7 (208524 KB) OKAY [ 4.898s] Writing 'mmc0' OKAY [ 2.659s] Finished. Total time: 73.780s flashing mmc0boot0=ufs_lu0_lu1.bin Warning: skip copying mmc0boot0 image avb footer (mmc0boot0 partition size: 0, mmc0boot0 image size: 2097152). Sending 'mmc0boot0' (2048 KB) OKAY [ 0.048s] Writing 'mmc0boot0' OKAY [ 0.021s] Finished. Total time: 0.108s flashing mmc0boot1=ufs_lu0_lu1.bin Warning: skip copying mmc0boot1 image avb footer (mmc0boot1 partition size: 0, mmc0boot1 image size: 2097152). Sending 'mmc0boot1' (2048 KB) OKAY [ 0.051s] Writing 'mmc0boot1' OKAY [ 0.021s] Finished. Total time: 0.101s Rebooting OKAY [ 0.002s] Finished. Total time: 0.005sD:\<Genio-Flash-Tool-Path>\genio-360-evk>genio-flash Genio Tools: v1.6a3 Raw Image: name: eMMC Disk Image (Sparse Image) machine: Unspecified WARNING:root:FTDI D2xx library not found WARNING:root:Unable to find and reset the board. Possible causes are: 1. This is not a Genio 350/700 EVK, nor a Pumpkin board. 2. The board port UART0 is not connected. 3. The UART0 port is being opened by another tool, such as TeraTerm on Windows. You can now manually reset the board into DOWNLOAD mode. INFO:root:Continue flashing... Looking for MediaTek SoC matching USB device 0e8d:0003 Opening COM6 using baudrate=115200 Connected to MediaTek SoC: hw_code[0x8366] Sending bootstrap to address: 0x201000 Jumping to bootstrap at address 0x201000 in AArch64 mode erasing mmc0 < waiting for any device > Erasing 'mmc0' (bootloader) request sz: 0xece000000, real erase len: 0x0 OKAY [ 0.123s] Finished. Total time: 0.130s erasing mmc0boot0 Erasing 'mmc0boot0' (bootloader) request sz: 0x400000, real erase len: 0x400000 OKAY [ 0.007s] Finished. Total time: 0.013s erasing mmc0boot1 Erasing 'mmc0boot1' (bootloader) request sz: 0x400000, real erase len: 0x400000 OKAY [ 0.007s] Finished. Total time: 0.012s flashing mmc0=mmc0.bin Sending sparse 'mmc0' 1/7 (262141 KB) OKAY [ 8.656s] Writing 'mmc0' OKAY [ 10.578s] Sending sparse 'mmc0' 2/7 (262140 KB) OKAY [ 7.834s] Writing 'mmc0' OKAY [ 10.148s] Sending sparse 'mmc0' 3/7 (229448 KB) OKAY [ 7.689s] Writing 'mmc0' OKAY [ 8.888s] Sending sparse 'mmc0' 4/7 (262140 KB) OKAY [ 9.124s] Writing 'mmc0' OKAY [ 10.148s] Sending sparse 'mmc0' 5/7 (262140 KB) OKAY [ 9.829s] Writing 'mmc0' OKAY [ 10.163s] Sending sparse 'mmc0' 6/7 (233616 KB) OKAY [ 8.056s] Writing 'mmc0' OKAY [ 9.047s] Sending sparse 'mmc0' 7/7 (105056 KB) OKAY [ 3.521s] Writing 'mmc0' OKAY [ 5.848s] Finished. Total time: 135.595s flashing mmc0boot0=mmc0boot0.bin Warning: skip copying mmc0boot0 image avb footer (mmc0boot0 partition size: 0, mmc0boot0 image size: 524288). Sending 'mmc0boot0' (512 KB) OKAY [ 0.021s] Writing 'mmc0boot0' OKAY [ 0.026s] Finished. Total time: 0.095s flashing mmc0boot1=mmc0boot1.bin Warning: skip copying mmc0boot1 image avb footer (mmc0boot1 partition size: 0, mmc0boot1 image size: 524288). Sending 'mmc0boot1' (512 KB) OKAY [ 0.021s] Writing 'mmc0boot1' OKAY [ 0.026s] Finished. Total time: 0.090s Rebooting OKAY [ 0.002s] Finished. Total time: 0.005s
Note
If you are experiencing issues flashing on Windows, please refer to the troubleshooting guide.
Hint
See the Genio Tools page for more information on how to utilise genio-flash.
After the successful flashing, the system will automatically boot into the Android home screen
In Andriod home screen go to settings/About phone and check the build number.
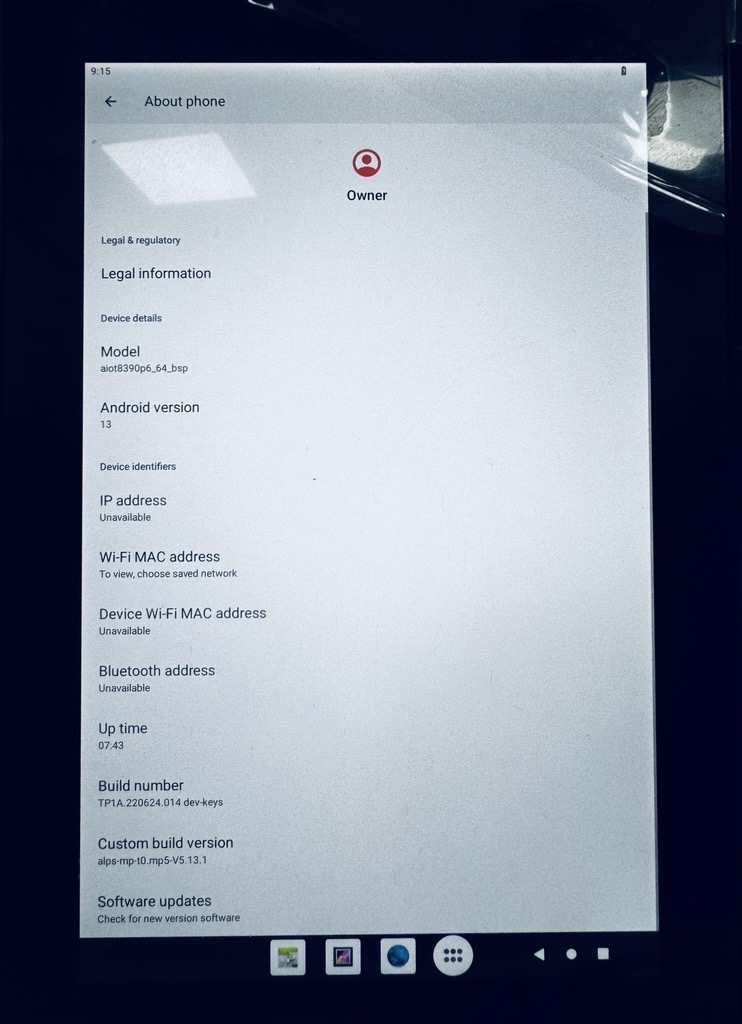
Android Boot Up Image with Version