Getting Started with Genio 350 Evaluation Kit
The Genio 350 EVK (evaluation kit) is suitable for our technology partners to evaluate the MT8365 processor for IoT solution design and development. Get started using Ubuntu on this kit by following the steps below.

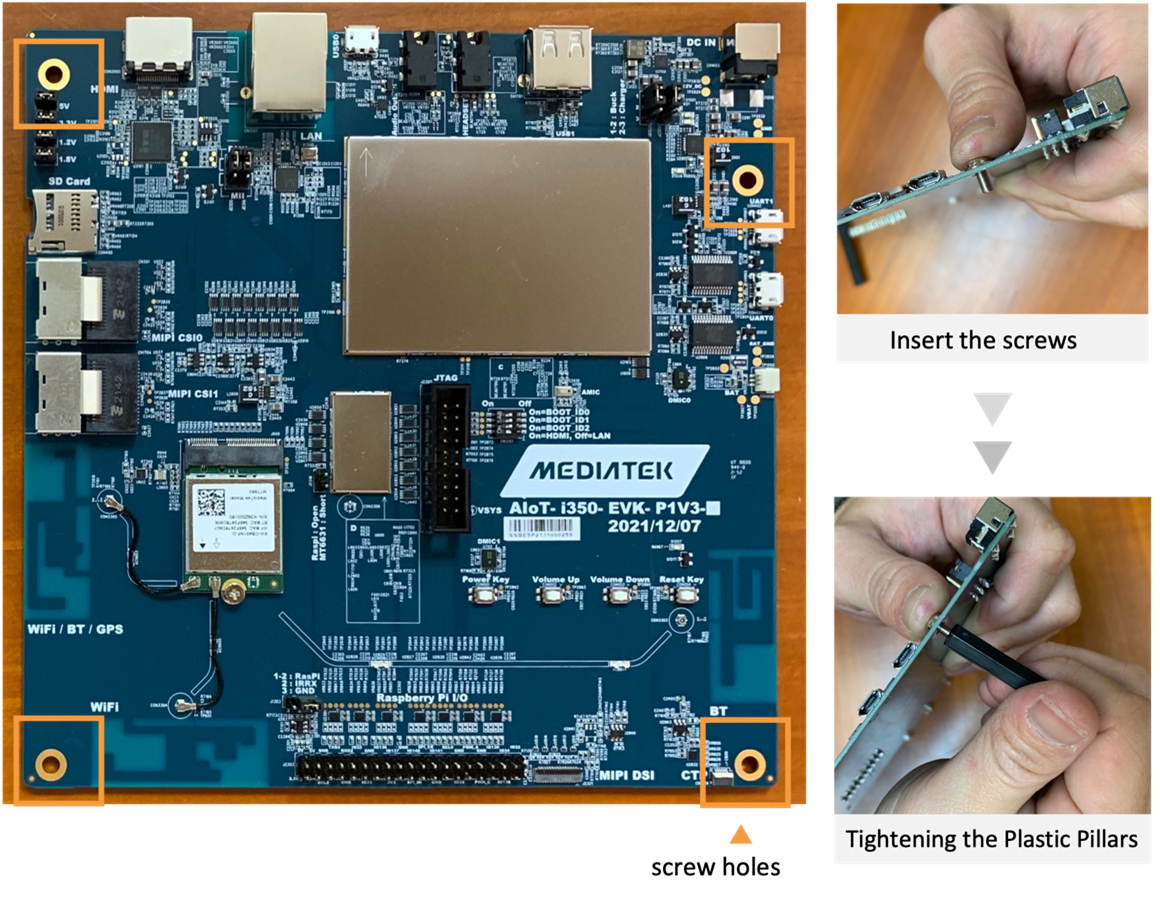
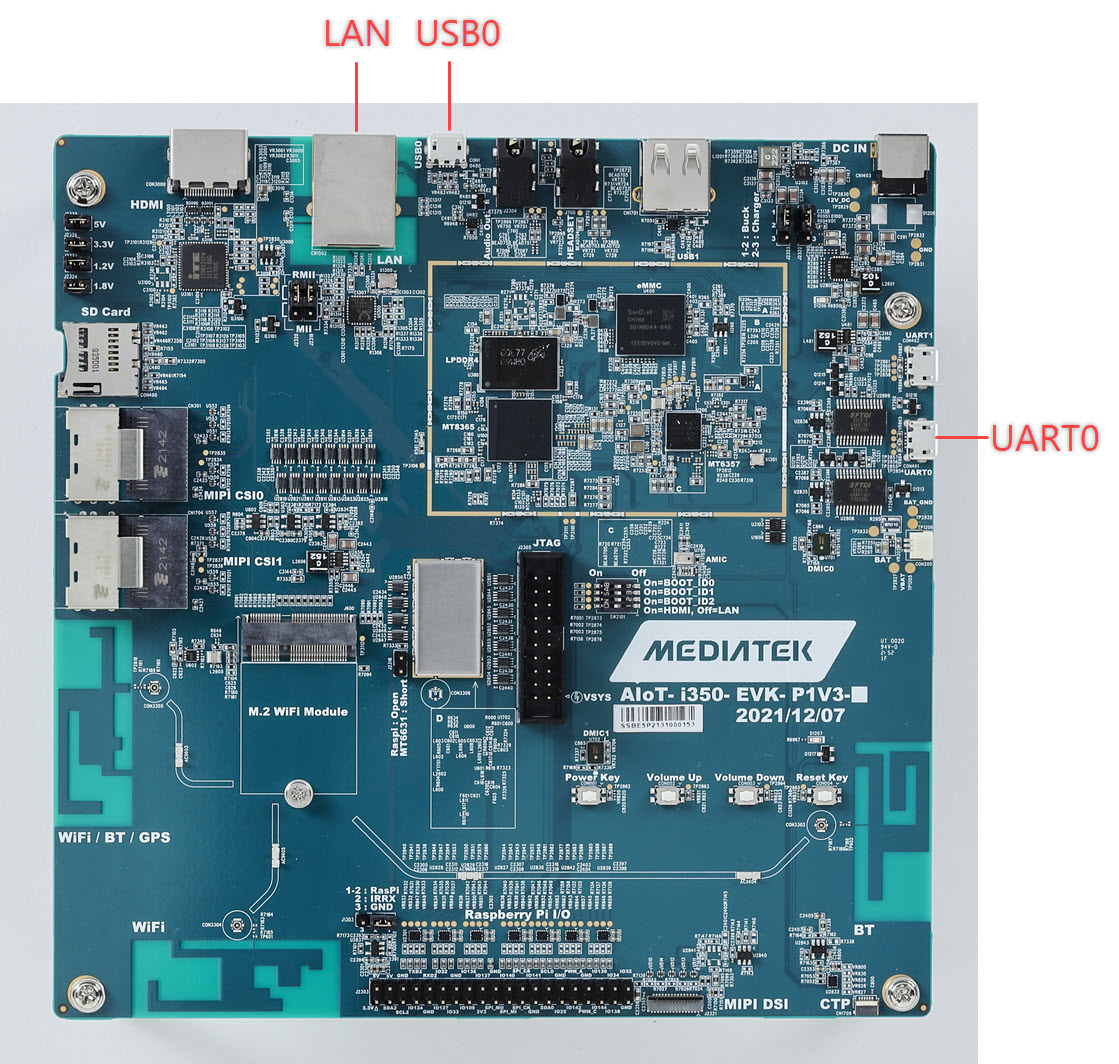
Ports of Genio 350-EVK main board
Note
Genio 350 EVK does not meet the hardware requirements of Ubuntu Desktop. The Ubuntu Desktop image is bootable on the Genio 350 EVK but you may encounter performance and stability issues.
What You’ll Need to Provide
You need a laptop or desktop computer to start using Ubuntu on Genio EVK. The requirements are:
Operating system: Ubuntu Desktop or Windows 10
Internet connection to download Ubuntu OS images and tools
Two USB ports:
One to write Ubuntu OS image and boot firmware to the Genio EVK.
Another for connecting to the UART0 debug port on the EVK.
We simply call the laptop or desktop computer host PC in the following sections.
You also need two cables:
A micro-USB cable to connect your host PC to the UART0 port on the board.
Another micro-USB cable to write Ubuntu OS images to the onboard eMMC storage via the USB0 port.
Also, prepare a unique MAC address that is allowed by your Ethernet local area network. This is because Genio 350 EVK does not have a pre-programmed onboard Ethernet MAC address.
The following sections show you how to:
Install tools and drivers on your Ubuntu or Windows host PC.
Install hardware parts of the EVK.
Download Ubuntu OS image and boot firmware to the host PC.
Connect EVK to the host PC.
Use
genio-flashto write(flash) the OS image and boot firmware to the EVK.
1. Set Up Host PC
Depending on the operating system of your host PC, follow these steps to set up the tools and drivers to connect to your Genio EVK.
Ubuntu Host PC
On the Ubuntu host PC, follow these steps to install tools and configure your host PC:
Open a terminal window on your host PC by pressing
Ctrl + Alt + T.Install picocom. This is used to connect to the UART debug port on the EVK.
sudo apt install -y picocomYou may also use other serial port clients, such as
minicom.Install genio-tool and its dependencies. This is used to flash Ubuntu images to the EVK.
# pip3 >= 20.3 is required for genio-tools, but the latest version in focal-update is 20.0.2
# Upgrade pip by pip command and remove pip deb packages
pip3 install --upgrade pip
sudo apt-get remove python3-pip python-pip-whl
sudo apt update
# Install fastboot
sudo apt install fastboot
# Install the latest genio-tools
pip3 install -U genio-tools
Add a new udev rule and add your user account to the
plugdevgroup:echo 'SUBSYSTEM=="usb", ATTR{idVendor}=="0e8d", ATTR{idProduct}=="201c", MODE="0660", $ GROUP="plugdev"' | sudo tee -a /etc/udev/rules.d/96-genio-board.rules sudo udevadm control --reload-rules sudo udevadm trigger sudo usermod -a -G plugdev $USER
This last command
usermodrequires you to logout and login again with your account to make it effective. You only have to do this once. Depending on your Ubuntu version you may also need to run:sudo usermod -a -G dialout $USERRun
genio-config. If it reports problems and errors, please perform further configurations so Genio tools have the permission to access necessary devices. It should reportOKif all the system configurations are ready.
Windows Host PC
Please visit this web page, and follow the steps on the web page to set up your Windows PC for Genio tools and its dependencies.
Once you have genio-config reporting fastboot: OK, come back here to write Ubuntu on your Genio EVK.
2. Kit Hardware Installation
The packing list of Genio 350 EVK is shown in the table below.
S.No |
Part Number or Marking |
Ubuntu Support |
Item Name |
Description |
Quantity |
|---|---|---|---|---|---|
1 |
AIoT-i350-EVK-P1V3 |
Y |
Genio 350 EVK main motherboard |
1 |
|
2 |
AIoT CAM DTB D1V2 |
N |
AP1302 ISP Camera Board |
Camera sub-board using onsemi AP1302 Image Sensor Processor |
2 |
3 |
AP-VISION- AR0430 |
N |
Appletec AR0430 Camera Module |
Camera Module using OnSemi AR0430 BSI CMOS Digital Image Sensor, preconnected to AP1302 ISP Camera Board |
2 |
4 |
MT7663BS NGFF V10 |
N |
AzureWave Wireless Module |
||
5 |
Mini-SAS cable |
Camera Cable |
2 |
||
6 |
TP7025C13 |
Y |
TFT LCM MODULE 7 LCM+TP |
LCD Module |
1 |
7 |
I350EVK-LCM FPC-R002 |
Y |
LCM FPC Cable |
1 |
|
8 |
Y |
12V AC adaptor |
1 |
||
9 |
Y |
AC cable |
1 |
||
10 |
Y |
Plastic Standoffs |
4 |
||
11 |
Y |
Screw |
4 |
||
12 |
N |
Jumper wires |
To jumper from AzureWave Wireless Module to PCB antennas |
2 |
Before installing the parts, please be aware of that:
Ubuntu does not support the
CAM DTB D1V2camera board.Ubuntu does not support the
MT7663BS NGFF V10wireless module.There are no pre-programmed MAC addresses for the onboard Ethernet. You need to provide a MAC address to use it.
By default, the boot firmware of Genio 350 EVK disables HDMI port to allow the Ethernet port to work. These two ports are mutually exclusive on Genio 350 EVK by design. Therefore, we recommend you install the LCM module as the display output device in this guide.
Genio 350 EVK Installation Steps for Ubuntu
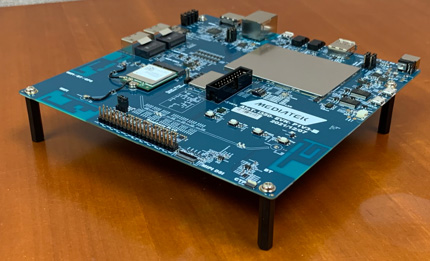
Insert the screws into the screw holes on the front of the Genio 350EVK mainboard and screw the plastic standoffs from the back.
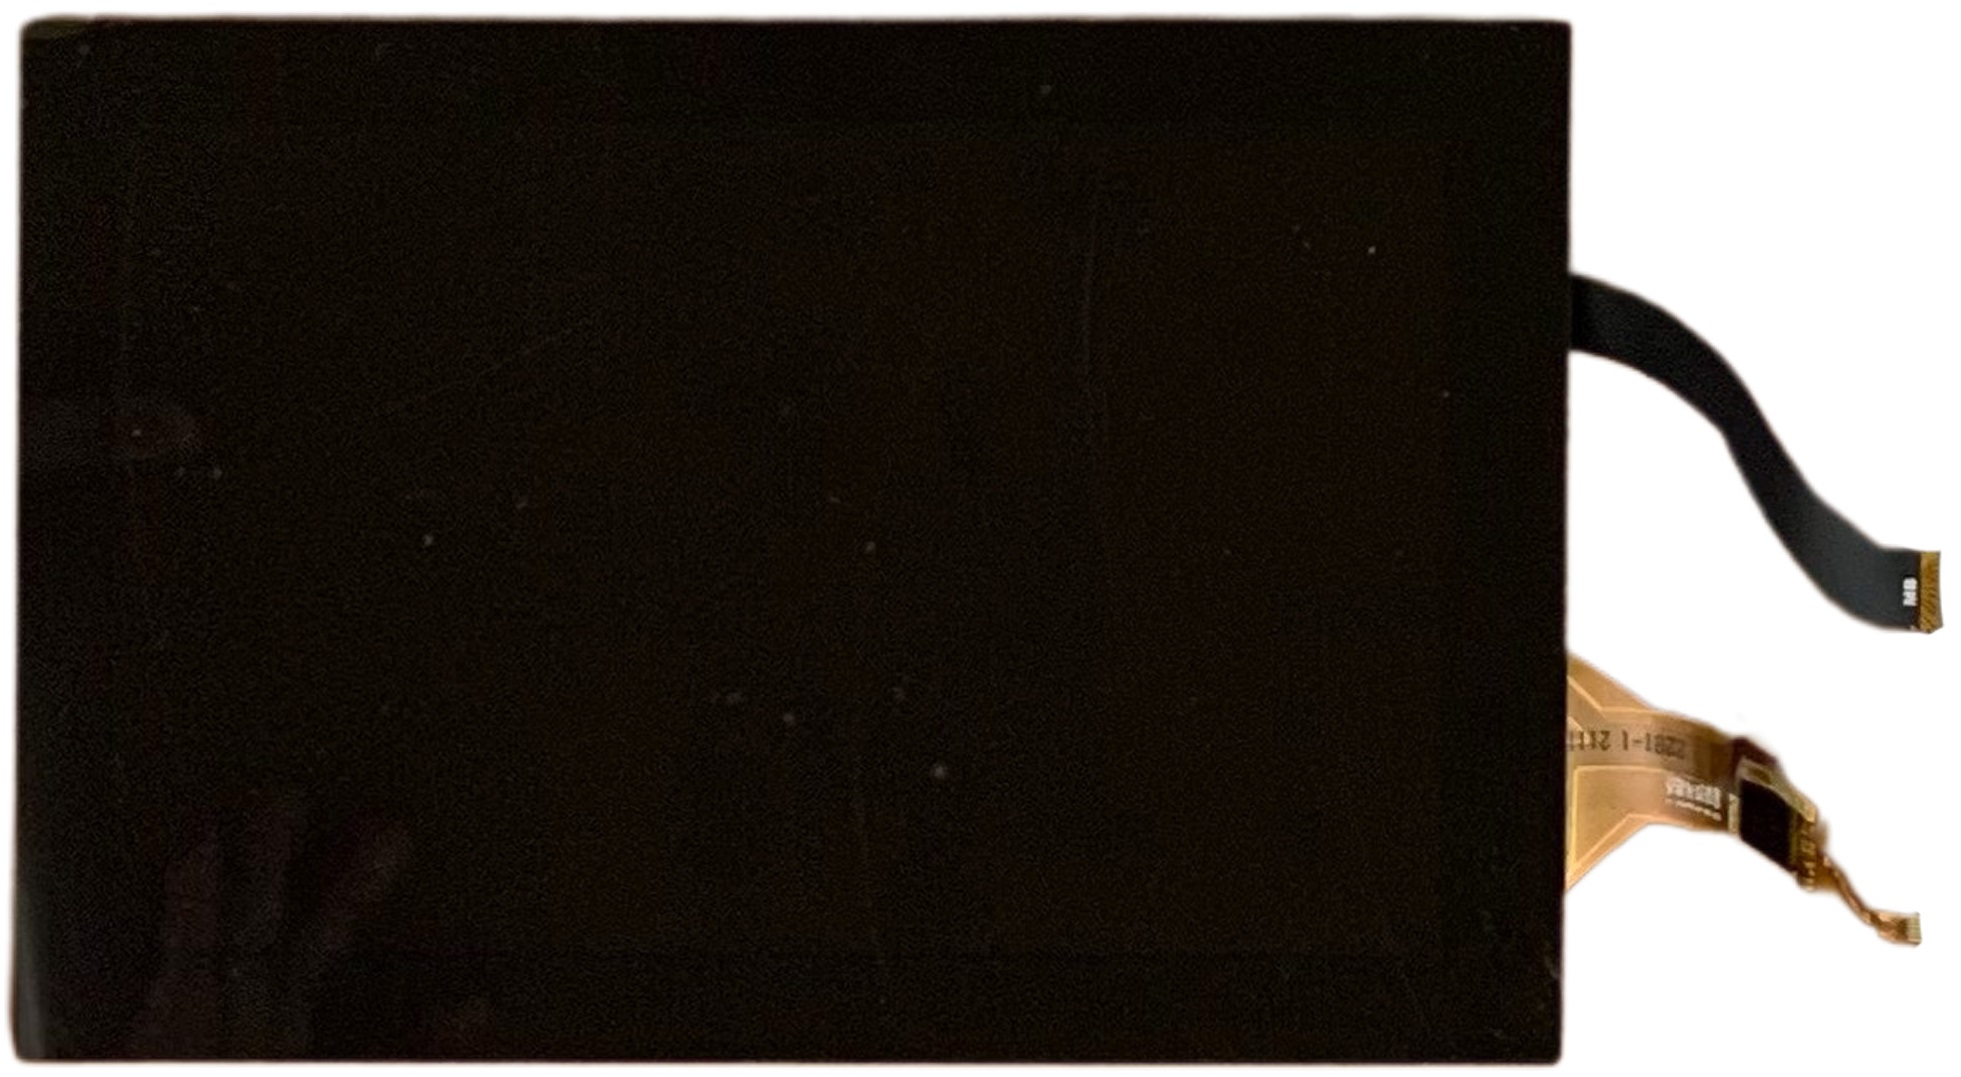
Connect the LCM module to the EVK. There are two FPC(Flexible Printed Circuit) cables, both are shown below:

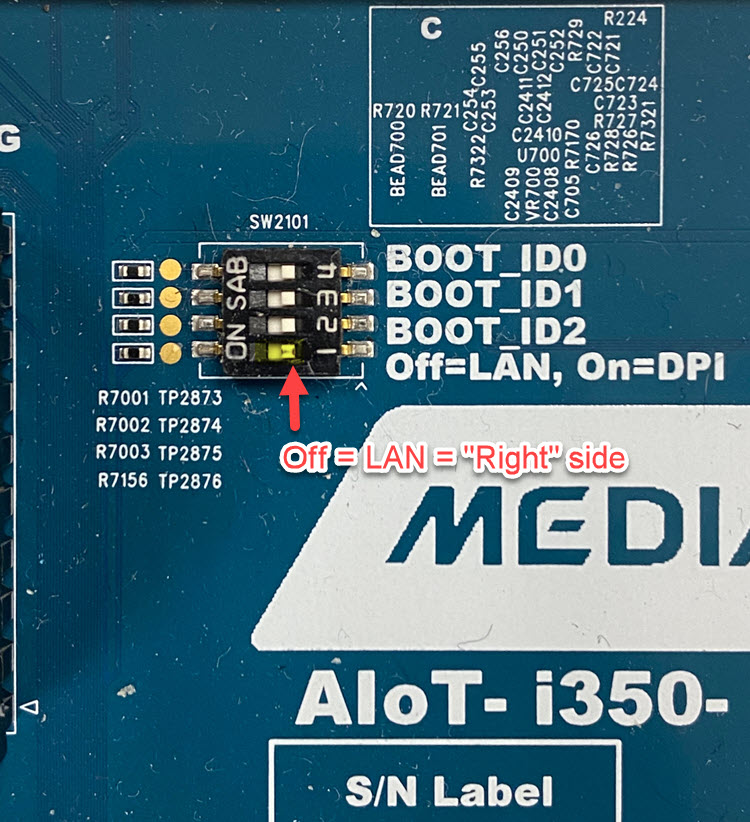
Configure the onboard switch
SW2101to the following to enable Ethernet(“LAN” on the board) and disable HDMI(“DPI” on the board):
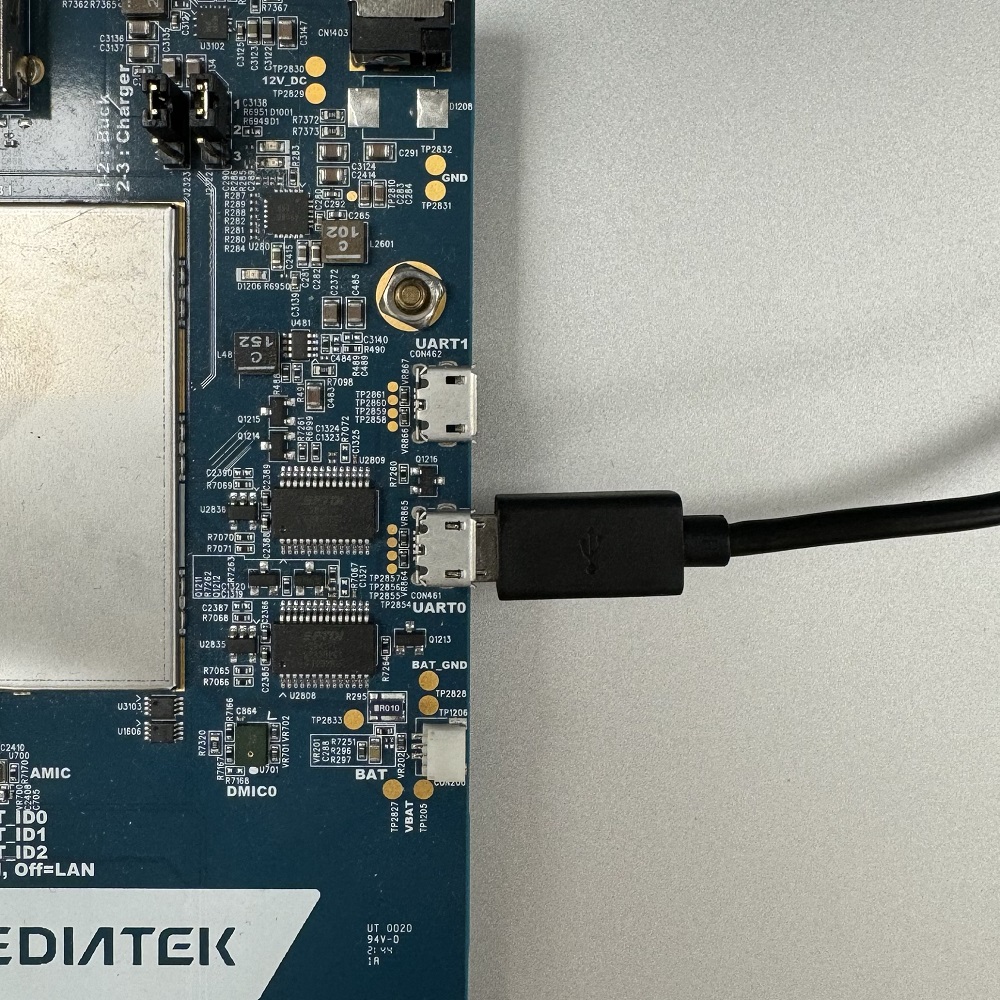
Connect a micro USB cable to the connector labeled UART0 as shown below:
For a Windows host PC, this requires installation of the FTDI VCP USB driver as outlined in here. If using Windows, open Device Manager and confirm that the driver appears under Ports (COM & LPT) \ USB Serial Port (COMx), where x is the port assigned by your system.
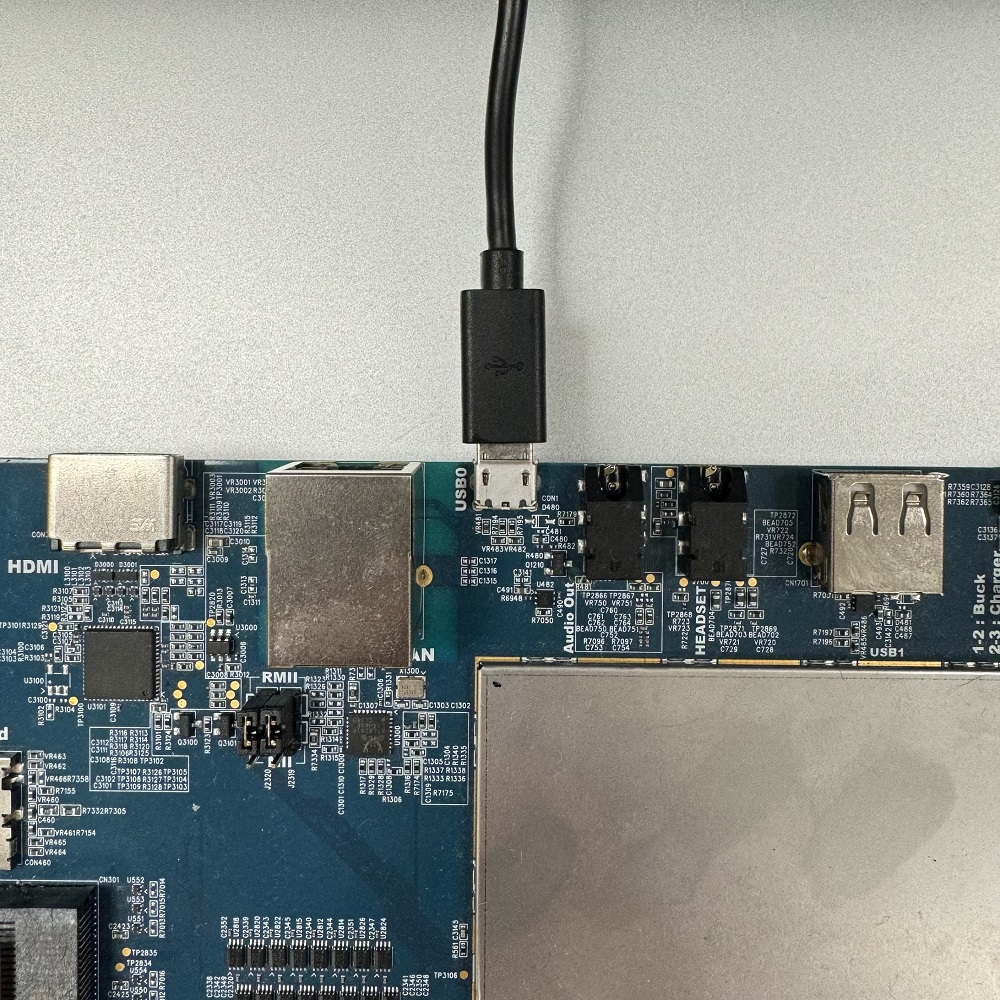
Connect a second micro USB cable to USB0 port:
For a Windows host, this requires installation of the Google Android USB driver and fastboot as outlined here.
Plug AC/DC power adapter into the connector.
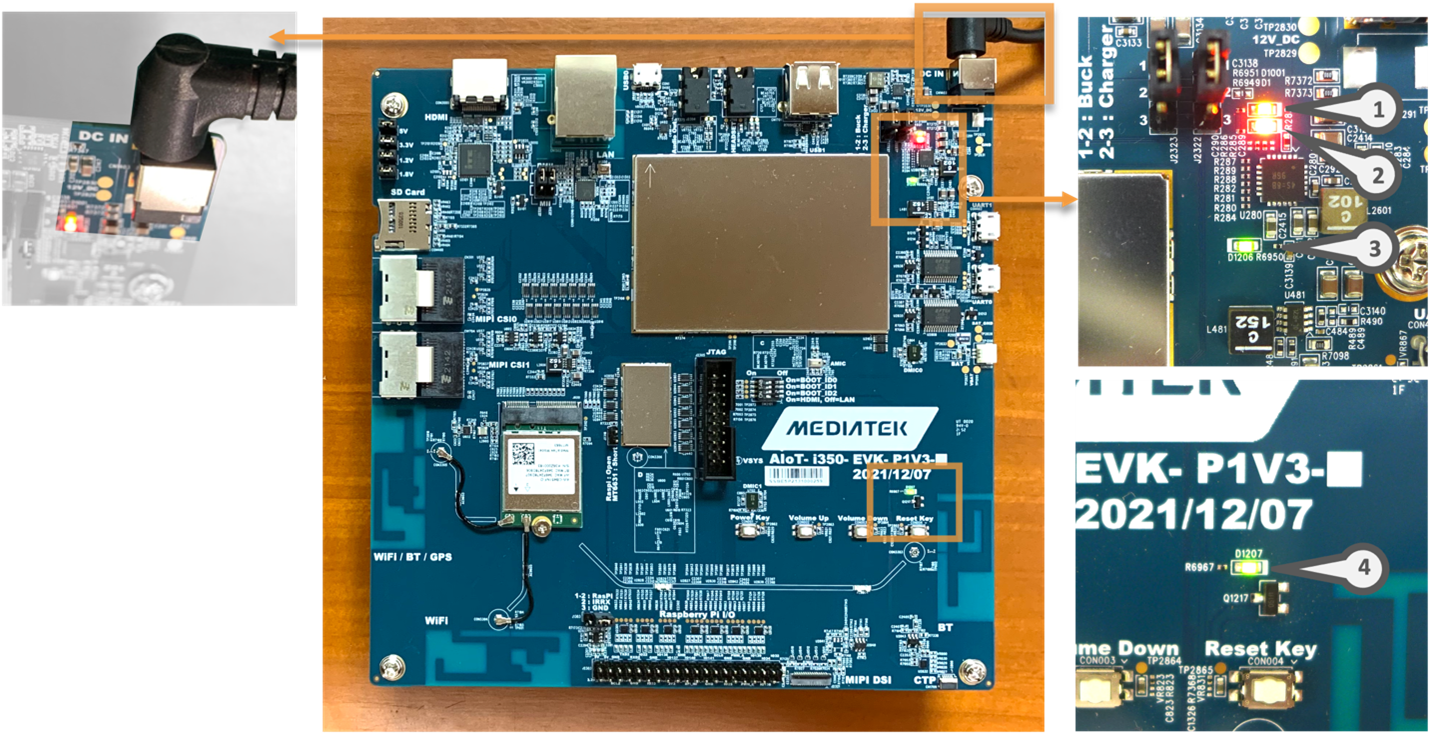
Power Adapter Installation
3. Download Ubuntu OS Images and Boot Firmware
Visit https://ubuntu.com/download/mediatek-genio and download the following two archives to your host PC:
The Ubuntu OS image (Desktop or Server) of your choice. The following steps apply to both Ubuntu Desktop and Ubuntu Server.
The boot firmware for your Genio EVK
Important
Make sure you download the correct boot firmware for your Genio EVK. Although the Ubuntu OS image is compatible with all supported Genio EVKs, the boot firmware is board-specific.
Extract the Ubuntu image first, and then extract the boot firmware into the same directory. On Ubuntu host PC this can be done with the following commands:
tar -xvf {UBUNTU_IMAGE}.tar.xz
tar --strip-components=1 -xvf {BOOT_FIRMWARE}.tar.gz -C {UBUNTU_IMAGE}/
cd baoshan-{UBUNTU_IMAGE}
Note
Please replace the
{UBUNTU_IMAGE}filename and{BOOT_FIRMWARE}filename with actual downloaded names.Please replace and overwrite all files from boot firmware to the Ubuntu image directory if there are duplicated files in both archives.
The resulting image directory should contain at least these files:
$ ls
bl2.img
bootassets.vfat
fip.bin
firmware.vfat
lk.bin
u-boot-initial-env
ubuntu.img
ubuntu.json
Set Onboard Ethernet MAC Address
To configure the MAC address of the onboard Ethernet during the image flashing process,
Modify the boot firmware file u-boot-initial-env. It is a plain text file and the file content
is a set of key-value pair like this:
list_dtbo= gpu-mali.dtbo video.dtbo apusys.dtbo
boot_targets=mmc0
To set the onboard Ethernet MAC address, add the following line to the end of the file:
ethaddr=00:55:7b:b5:7d:f7
Important
Please replace the MAC address example 00:55:7b:b5:7d:f7 with a unique MAC address that is allowed in your
local area network.
Save and close the u-boot-initial-env file.
This MAC address will be programmed to the onboard storage in the next section.
4. Connect Genio EVK to the Host PC
Follow these steps to connect Genio EVK to your host PC and prepare for image flashing:
Confirm the power adaptor has been connected to the board.
Note
Always connect the power adapter to supply enough power for the device. Please DO NOT use the Type-C or USB UART Debug port as the power source. It may appear to work initially but the system can be unpredictably reset when more hardware blocks are being enabled during system booting.
Confirm if both USB cables have been connected to your host PC.
Open a terminal application on your host PC and connect to the serial device that just generated. Make sure you set the following parameters on your terminal application:
baud rate: 921600
8-bit
Party bit: 1
No flow control
If you are using
picocomon Ubuntu host PC, the command line parameter is:$ sudo picocom -b 921600 -f n -y n -p 1 /dev/ttyUSB0The exact device path
/dev/ttyUSB0may be different on your host PC.
5. Flash Ubuntu Image to Genio EVK
Launch a command line prompt on your host PC.
First change directory(cd) to the image directory, and run genio-flash:
cd {UBUNTU_IMAGE}
genio-flash
The tool should have the following output:
genio-flash
AIoT Tools: v1.3.4
Ubuntu Image:
...
Looking for MediaTek SoC matching USB device 0e8d:0003
...
The line Looking for MediaTek SoC matching USB device 0e8d:0003 shows that
genio-flash tool is waiting for the board to be reset into download mode
to start the flash programming procedure. All Genio EVKs are designed to enter
download mode by pressing a button labeled as DOWNLOAD or VOLUME UP on the EVK while resetting the board.
Locate the Volume Up and Reset Key buttons on the board:
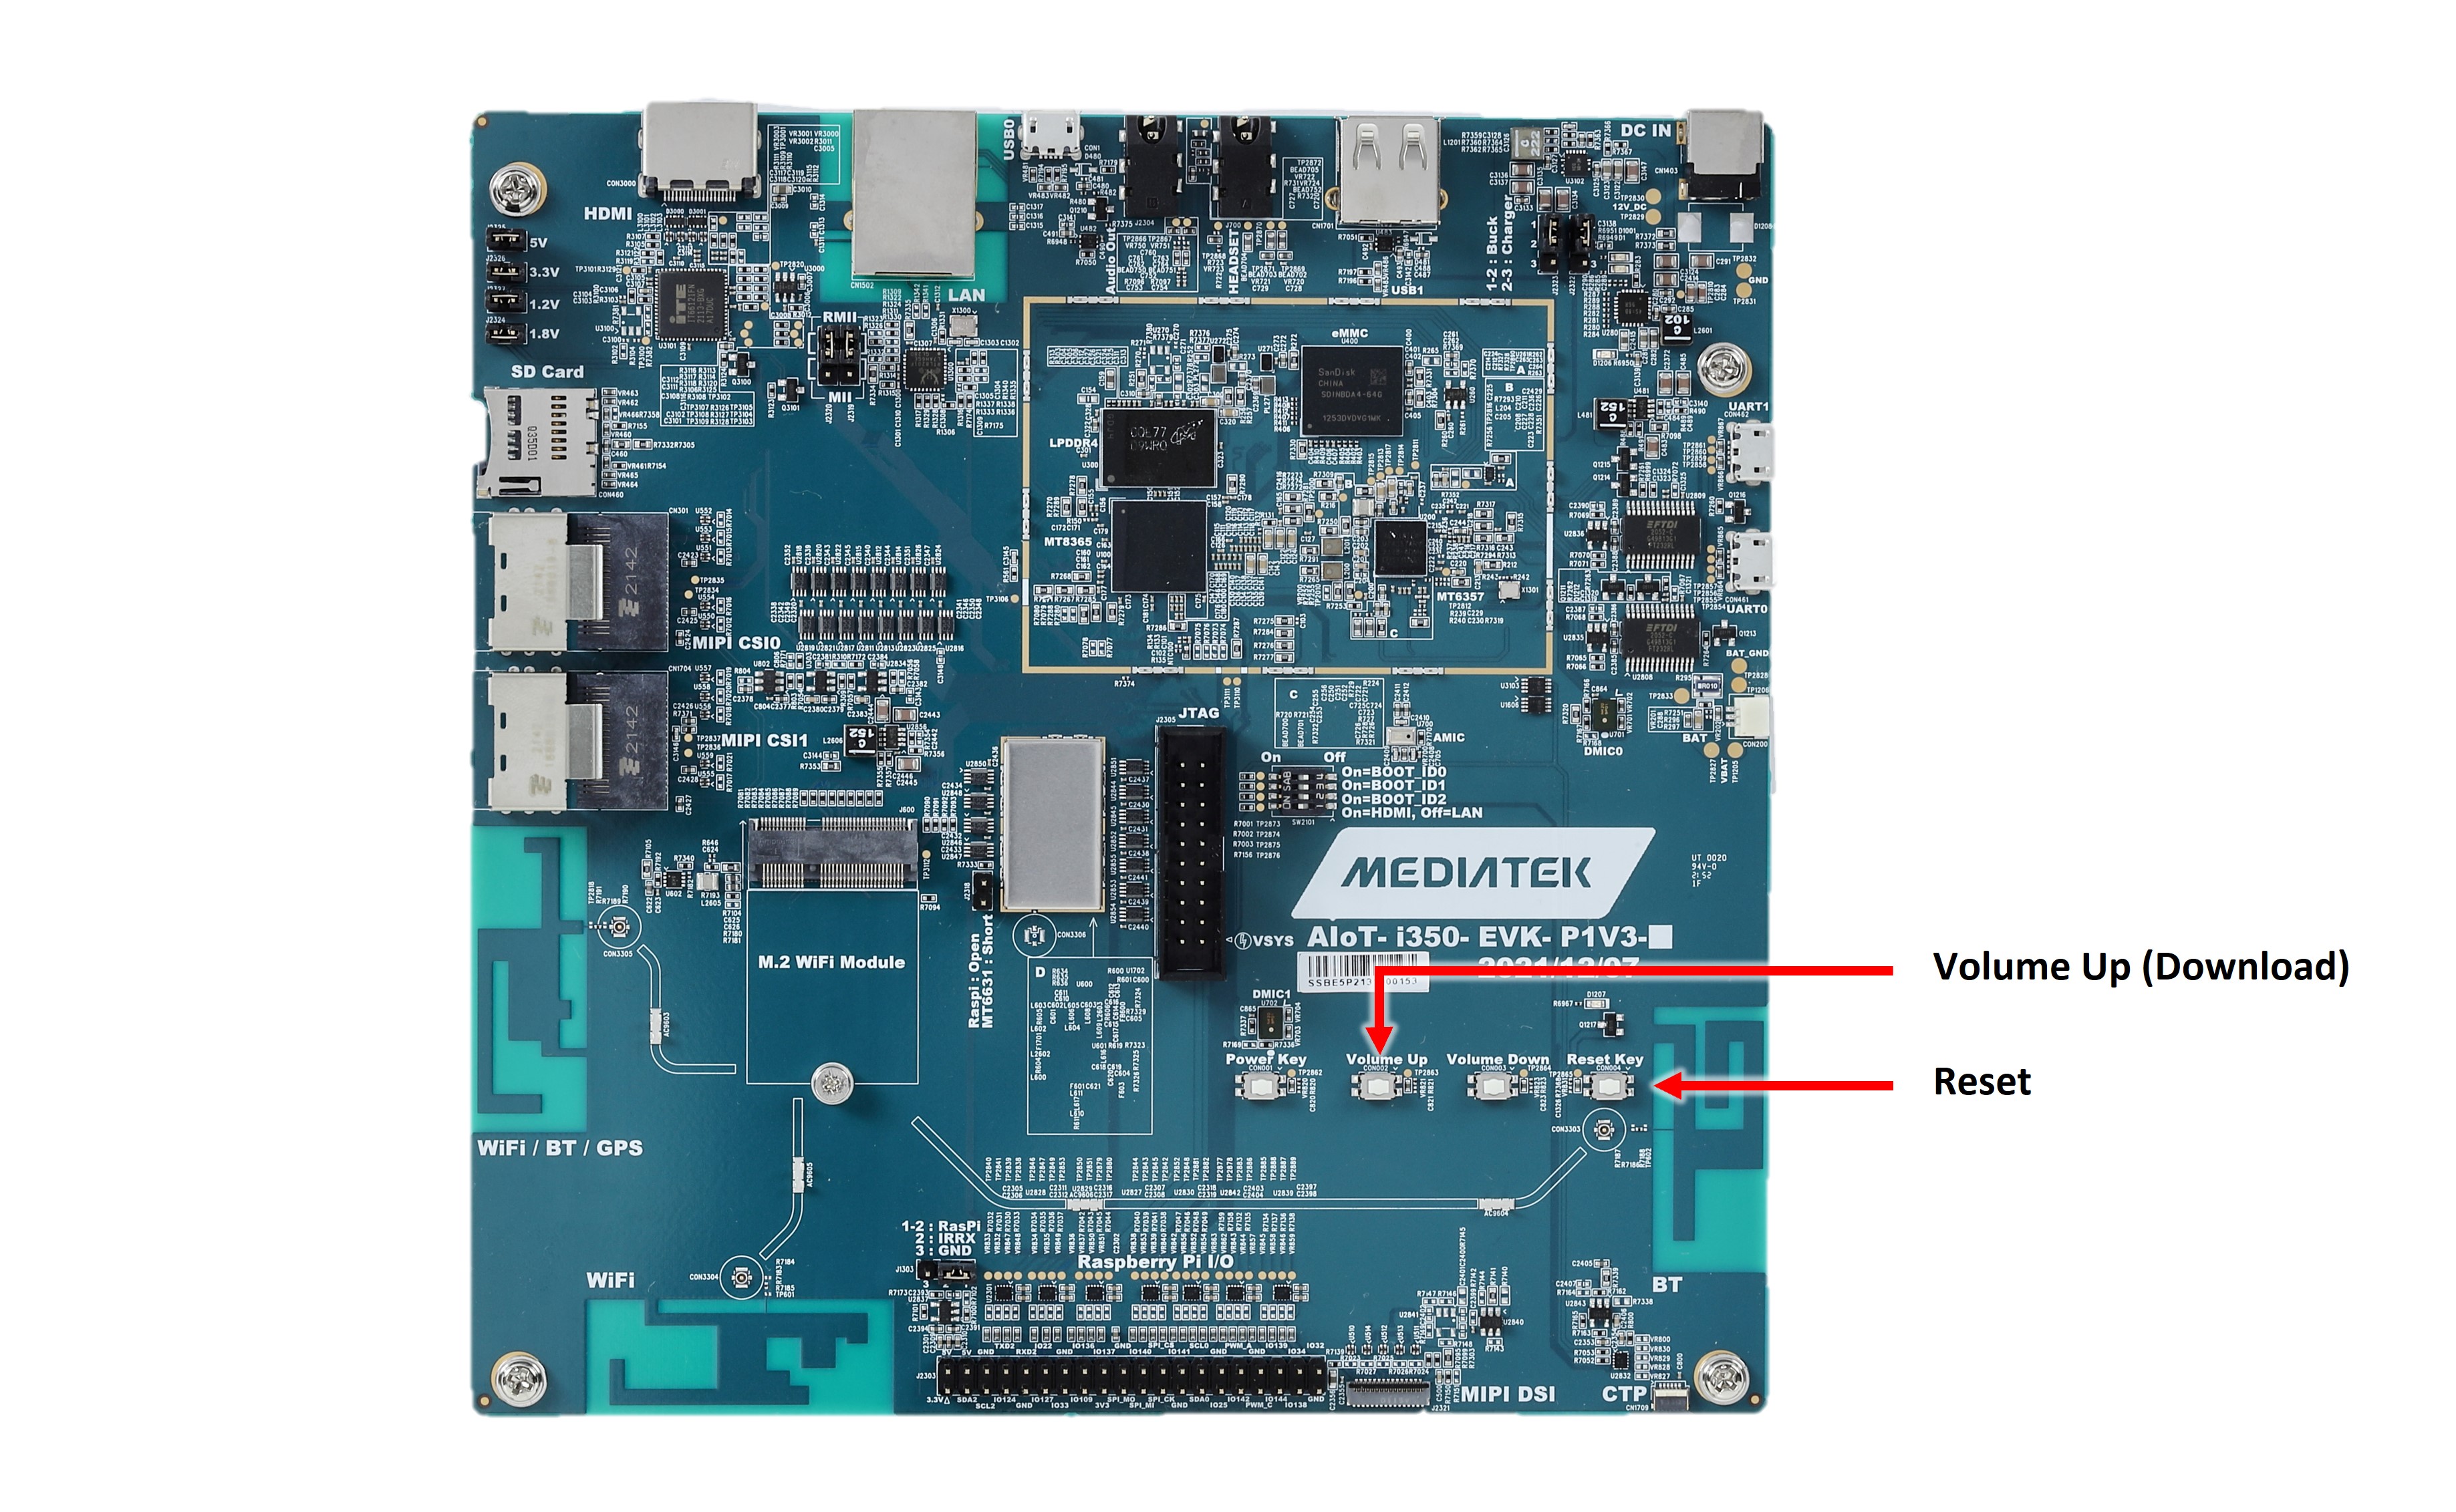
Follow these steps to enter download mode:
Press and keep pressing the Volume Up button.
Press and release the Reset Key button.
Hold the Volume Up button. The tool should output the following logs:
Opening <port> using baudrate=115200
Connected to MediaTek SoC: hw_code[0x8168]
Sending bootstrap to address: 0x201000
Jumping to bootstrap at address 0x201000 in AArch64 mode
erasing mmc0
< waiting for any device >
Release the Volume Up button after the tool outputs
< waiting for any device >
Note
When the bootROM in the SoC on the board has successfully entered download mode during reboot,
it creates a USB Virtual COM(VCOM) port on the USB0 port of the SoC. This VCOM may be detected
by a Linux host PC as /dev/ttyACM*. The download mode state only exists for several seconds
before the bootROM stops emulating the VCOM device. Therefore genio-flash scans for all the
arriving USB VCOM devices and ches for the matching device ID 0e8d:0003.
If the genio-flash tools reports errors or exceptions and cannot connect to the bootROM,
we recommend you checking the ttyACM* permission settings using the genio-config tool.
The flash tool should continue with the following log output, which shows the progress of erasing the onboard storage and writing image content to the storage:
Erasing 'mmc0'                                     (bootloader) request sz: 0xece000000, real erase len: 0x0
OKAY [  1.432s]
Finished. Total time: 7.869s
erasing mmc0boot0
Erasing 'mmc0boot0'                                (bootloader) request sz: 0x400000, real erase len: 0x400000
OKAY [  0.010s]
Finished. Total time: 0.015s
erasing mmc0boot1
Erasing 'mmc0boot1'                                (bootloader) request sz: 0x400000, real erase len: 0x400000
OKAY [  0.007s]
Finished. Total time: 0.013s
flashing mmc0=ubuntu.img
Sending sparse 'mmc0' 1/17 (261522 KB)             OKAY [  7.267s]
Writing 'mmc0'                                     OKAY [ 17.980s]
Sending sparse 'mmc0' 2/17 (261674 KB)             OKAY [  7.123s]
...
Note
If you are using a Windows host PC, and the tool stops at the output line < waiting for any device >,
please follow the steps in
this trouble shooting page
to solve an underlying Windows driver issue.
Eventually, the flash tool would report the following logs once it finishes writing the onboard storage and reboot the board:
Finished. Total time: 0.028s
Rebooting                                          OKAY [  0.002s]
Finished. Total time: 0.002s
UART Boot Logs
The system will auto reboot after flashing is complete. If you have connected to UART0 port,
you should see the boot firmware logs in your terminal program.
Below are examples of boot logs for you to check if board partitions have been successfully written, and if each stage of the boot firmware has been working properly or not.
BL2 (Trusted-Firmware-A)
NOTICE:  BL2: v2.6(release):9592c0bb7-dirty
NOTICE:  BL2: Built : 09:49:56, Jul  3 2023
NOTICE:  WDT: Status = 0x40000000
NOTICE:  WDT: Last reset was normal software reboot
PLL init start...
PLL init Done!
BL31 (Trusted-Firmware-A)
NOTICE:  BL2: Booting BL31
NOTICE:  MT8195 bl31_setup
NOTICE:  BL31: v2.6(release):9592c0bb7-dirty
NOTICE:  BL31: Built : 09:49:56, Jul  3 2023
U-Boot
U-Boot 2022.10 (Jul 04 2023 - 06:23:24 +0000)

CPU:   MediaTek MT8395
DRAM:  8 GiB
Disabling WDT
Enabling SCP SRAM
Core:  69 devices, 24 uclasses, devicetree: separate
MMC:   mmc@11230000: 0
Loading Environment from MMC... OK
Warning: device tree node '/config/environment' not found
In:    serial
Out:   serial
Err:   serial
Net:   eth0: ethernet@11021000, eth1: usb_ether
Hit any key to stop autoboot:  0
base: /FIRMWARE/mediatek/genio-1200-evk/
fdtfile: genio-1200-evk.dtb
fdtaddr: 0x44000000
Probing mmc 0:3 for device tree...
Loading dtb '/FIRMWARE/mediatek/genio-1200-evk//genio-1200-evk.dtb'
105988 bytes read in 3 ms (33.7 MiB/s)
Loading overlay '/FIRMWARE/mediatek/genio-1200-evk//gpu-mali.dtbo'
3505 bytes read in 2 ms (1.7 MiB/s)
Loading overlay '/FIRMWARE/mediatek/genio-1200-evk//video.dtbo'
GRUB
                                                            GNU GRUB  version 2.06

lqqqqqqqqqqqqqqqqqqqqqqqqqqqqqqqqqqqqqqqqqqqqqqqqqqqqqqqqqqqqqqqqqqqqqqqqqqqqqqqqqqqqqqqqqqqqqqqqqqqqqqqqqqqqqqqqqqqqqqqqqqqqqqqqqqqqqqqk
x*Ubuntu                                                                                                                                x
x Advanced options for Ubuntu                                                                                                           x
x                                                                                                                                       x
x                                                                                                                                       x
x                                                                                                                                       x
x                                                                                                                                       x
x                                                                                                                                       x
x                                                                                                                                       x
x                                                                                                                                       x
x                                                                                                                                       x
x                                                                                                                                       x
x                                                                                                                                       x
x                                                                                                                                       x
x                                                                                                                                       x
x                                                                                                                                       x
x                                                                                                                                       x
x                                                                                                                                       x
x                                                                                                                                       x
x                                                                                                                                       x
x                                                                                                                                       x
mqqqqqqqqqqqqqqqqqqqqqqqqqqqqqqqqqqqqqqqqqqqqqqqqqqqqqqqqqqqqqqqqqqqqqqqqqqqqqqqqqqqqqqqqqqqqqqqqqqqqqqqqqqqqqqqqqqqqqqqqqqqqqqqqqqqqqqqj

    Use the ▲ and ▼ keys to select which entry is highlighted.
    Press enter to boot the selected OS, `e' to edit the commands before booting or `c' for a command-line. ESC to return previous
    menu.
The highlighted entry will be executed automatically in 0s.
Linux
The Linux kernel is also configured to use UART0 as a Linux console. The kernel boot logs should also output to your terminal application:
[    0.000000] Booting Linux on physical CPU 0x0000000000 [0x412fd050]
[    0.000000] Linux version 5.15.0-1026-mtk (buildd@bos02-arm64-009) (gcc (Ubuntu 11.4.0-1ubuntu1~22.04) 11.4.0, GNU ld (GNU Binutils for Ubuntu) 2.38) #28-Ubuntu SMP PREEMPT Wed Sep 20 22:09:35 UTC 2023 (Ubuntu 5.15.0-1026.28-mtk 5.15.39)
[    0.000000] Machine model: MediaTek Genio 1200 EVK-P1V2-EMMC
[    0.000000] efi: EFI v2.90 by Das U-Boot
[    0.000000] efi: ESRT=0xfe9c6040 RTPROP=0xfe9c8040 SMBIOS=0xfe9c4000 MOKvar=0xfe9b9000 MEMRESERVE=0xfe9aa040
Note that the exact Machine model: name may be different for your EVK.
Ubuntu Server on Genio 350 EVK
If you have connected to the UART console (ttyS0 in Ubuntu) in previous steps,
the following prompt should appear in your terminal application.
Use ubuntu as both the username and password to login:
Ubuntu 22.04.2 LTS mtk-genio ttyS0

mtk-genio login: ubuntu
password: ubuntu
If you are using Ubuntu Server image, a console tty1 should appear on the built-in display panel:
Ubuntu 22.04.2 LTS mtk-genio tty1

mtk-genio login:
You may connect a USB keyboard to the USB1 Type-A port on the board,
use the USB keyboard to input username and password to login to the tty1 console.
Accessing Ubuntu Archive
Connect an Ethernet cable to the onboard Ethernet port, and use the following commands to update Ubuntu package lists in the console:
sudo apt update
The log should look like this:
[sudo] password for ubuntu:
Get:1 http://oem.archive.canonical.com/updates jammy-baoshan InRelease [4735 B]
Hit:2 http://ports.ubuntu.com/ubuntu-ports jammy InRelease
Get:3 http://ports.ubuntu.com/ubuntu-ports jammy-updates InRelease [119 kB]
Get:4 http://ports.ubuntu.com/ubuntu-ports jammy-backports InRelease [109 kB]
...
Get:40 http://ports.ubuntu.com/ubuntu-ports jammy-security/multiverse Translation-en [7060 B]
Get:41 http://ports.ubuntu.com/ubuntu-ports jammy-security/multiverse arm64 c-n-f Metadata [232 B]
Fetched 26.3 MB in 1min 51s (237 kB/s)
Reading package lists... Done
Building dependency tree... Done
Reading state information... Done
19 packages can be upgraded. Run 'apt list --upgradable' to see them.
You are now ready to install more software packages from the Ubuntu archive.
Next Steps
Ubuntu Server is now up and running on your Genio EVK. To get the most out of Ubuntu and Genio platform, we recommend you to:
Visit the official Ubuntu documentation to learn more about Ubuntu software packages:
Visit the Using Ubuntu on Genio to learn tips and topics using Ubuntu on Genio EVKs.
Visit Install Genio Hardware Support Packages to install hardware support packages of Genio EVK for hardware video codecs.